When a Job-Search CLI Times Out, It Says "Result Unknown" and Never Re-Sends: recruitment-cli's Failure Model
recruitment-cli: Let AI Handle Job Seeking and Hiring, from Architecture to Handling a Send Timeout
This article uses juejin-cli for draft creation and publishing; screenshots and architecture diagrams are hosted on GitHub. For the design of that tool, see my earlier article: "From Command to Workflow: How juejin-cli Makes Writing Automation More Reliable". This post continues the "CLI-Anything" theme, turning to job seeking and hiring.
recruitment-cli is a job-searching and recruiting tool I built for AI assistants. It organizes searching, filtering, communication planning, and execution receipts into callable workflows, so people can use the same capabilities through a terminal, a chat interface, or their own business system. This article first explains the product and overall architecture, then focuses on one problem: when a greeting is sent and times out, what should the next run actually do?
Meet the Product: Putting Repeated Filtering Before Valuable Conversations

The image above is from the recruitment-cli website. The project is open source: Ganzhib/recruitment-cli. The installed command is recruit.
When job seeking, you usually start by limiting to a position and city, browsing openings, checking whether a recruiter is still active, and then deciding who is worth further contact. When hiring, the direction is reversed: identify currently open roles, review candidates from recommendations, and build a contact list based on requirements and active status. These steps contain judgment and a lot of repetitive clicking.
recruitment-cli folds the repetitive operations into the tool and leaves direction and judgment to the user. You can give a very small task:
Help me organize frontend positions in Shanghai, prioritize recruiters active in the last 7 days, give me 5 opportunities worth learning about first, don't contact them this time.
The "last 7 days" refers to the other party's active time. It helps narrow the scope, but it doesn't guarantee they will reply, nor does it mean the position was just posted. The tool organizes results based on the actual scan range; it doesn't claim to have ranked every position on the whole site.
For a recruiter, the starting point is confirming the current identity and related roles, then filtering candidates from the recommended list for a given position. Requirements such as experience, technical keywords, and city should come from the user; the current capability is recommended-list filtering, not site-wide candidate search, and it doesn't replace the recruiter's hiring decision.
From "Help Me Find" to "This Step Has an Inspectable Result"
The product splits a task into four stages, each producing a result that can be handed to the next step.
| Stage | What the user cares about | What the tool leaves behind |
|---|---|---|
| Define scope | Which platform, which account, job seeking or hiring, what position | Actual account identity, current role, and filter parameters |
| Organize targets | Which results are worth continuing, which are excluded | Target list, activity evidence, scan count, and exclusion reasons |
| Prepare communication | Who are we contacting this time | Locally saved plan snapshot and plan ID |
| Execute and inspect | Which completed, which skipped, which still need verification | Operation records, platform receipts, and uncertain results |
"Prepare a plan first" doesn't mean the product must pop up a confirmation at every step. When the user has already authorized and the caller has enabled communication permissions, the AI can prepare and execute the plan in the same round; in read-only mode, it stops at search and organization. The permission is decided by the user and the host program; the model can only call tools within that scope.
Actual communication uses the current pre-configured greeting configured in BOSS. The tool doesn't rewrite the wording in this flow; successful execution only means the corresponding platform interface returned success evidence, not that the other party has read, replied, or wants to continue.
Three Entry Points for Three Ways to Use It
For command-line users, you can directly use recruit search, recruit plan create, and recruit plan run. Searching, preparing, and executing are composable actions, and output can be further processed as structured JSON.
For people who want to arrange work with natural language, you can start the local AI Demo, or let an Agent with local-tool capability use the CLI. The chat interface shows tool calls, corresponding commands, and results, making "what the AI is doing" traceable. This flow doesn't require manually extracting cookies; account login happens through the local browser.
For developers, you can import the client from the npm package root, or plug in the tool definitions provided by createRecruitmentTools into an existing Agent. Custom recruiting backends, internal workstations, and chat products can reuse the same business services without parsing results back from terminal prompt text.
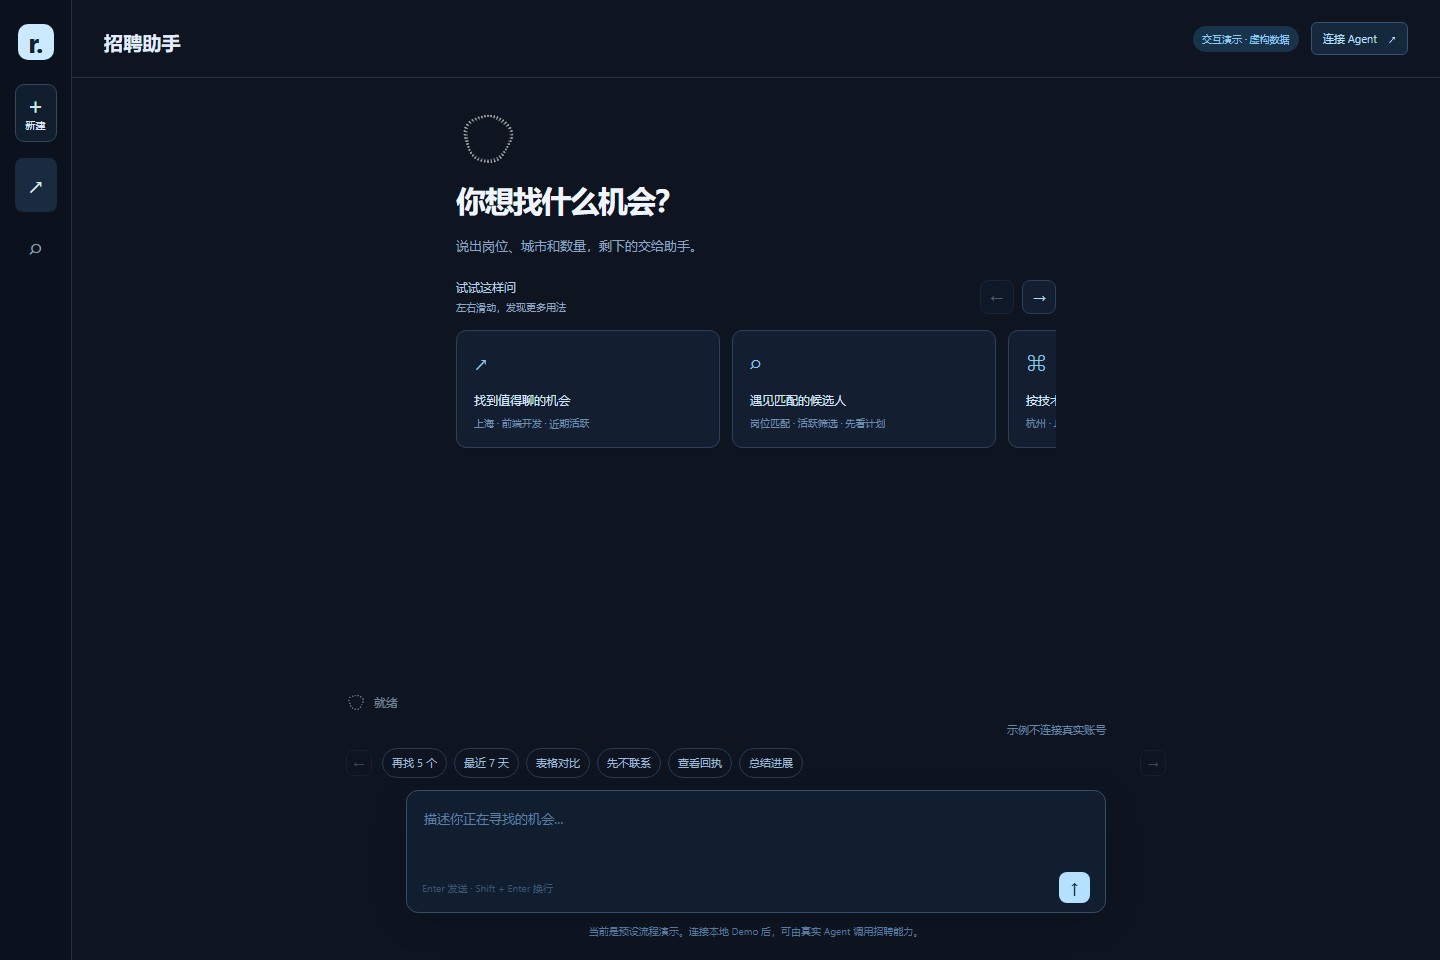
The public Demo page explicitly labels "interaction demo · fictional data". It's for understanding the interaction and doesn't connect to a reader's real recruiting account. Real operations require local environment setup: installation, model configuration, and platform login. Login state is stored locally; when using a remote model, the conversation and tool results sent to the model still go to the configured model service.
Currently, the company careers-site adapter can read public position lists and details based on site configuration, but it doesn't implement automatic form submission. The product's scope is to turn supported actions into inspectable workflows; "can read positions" shouldn't be understood as "can complete applications on any recruiting site".
Look at the Architecture First: Business Rules Live Where Every Entry Point Passes
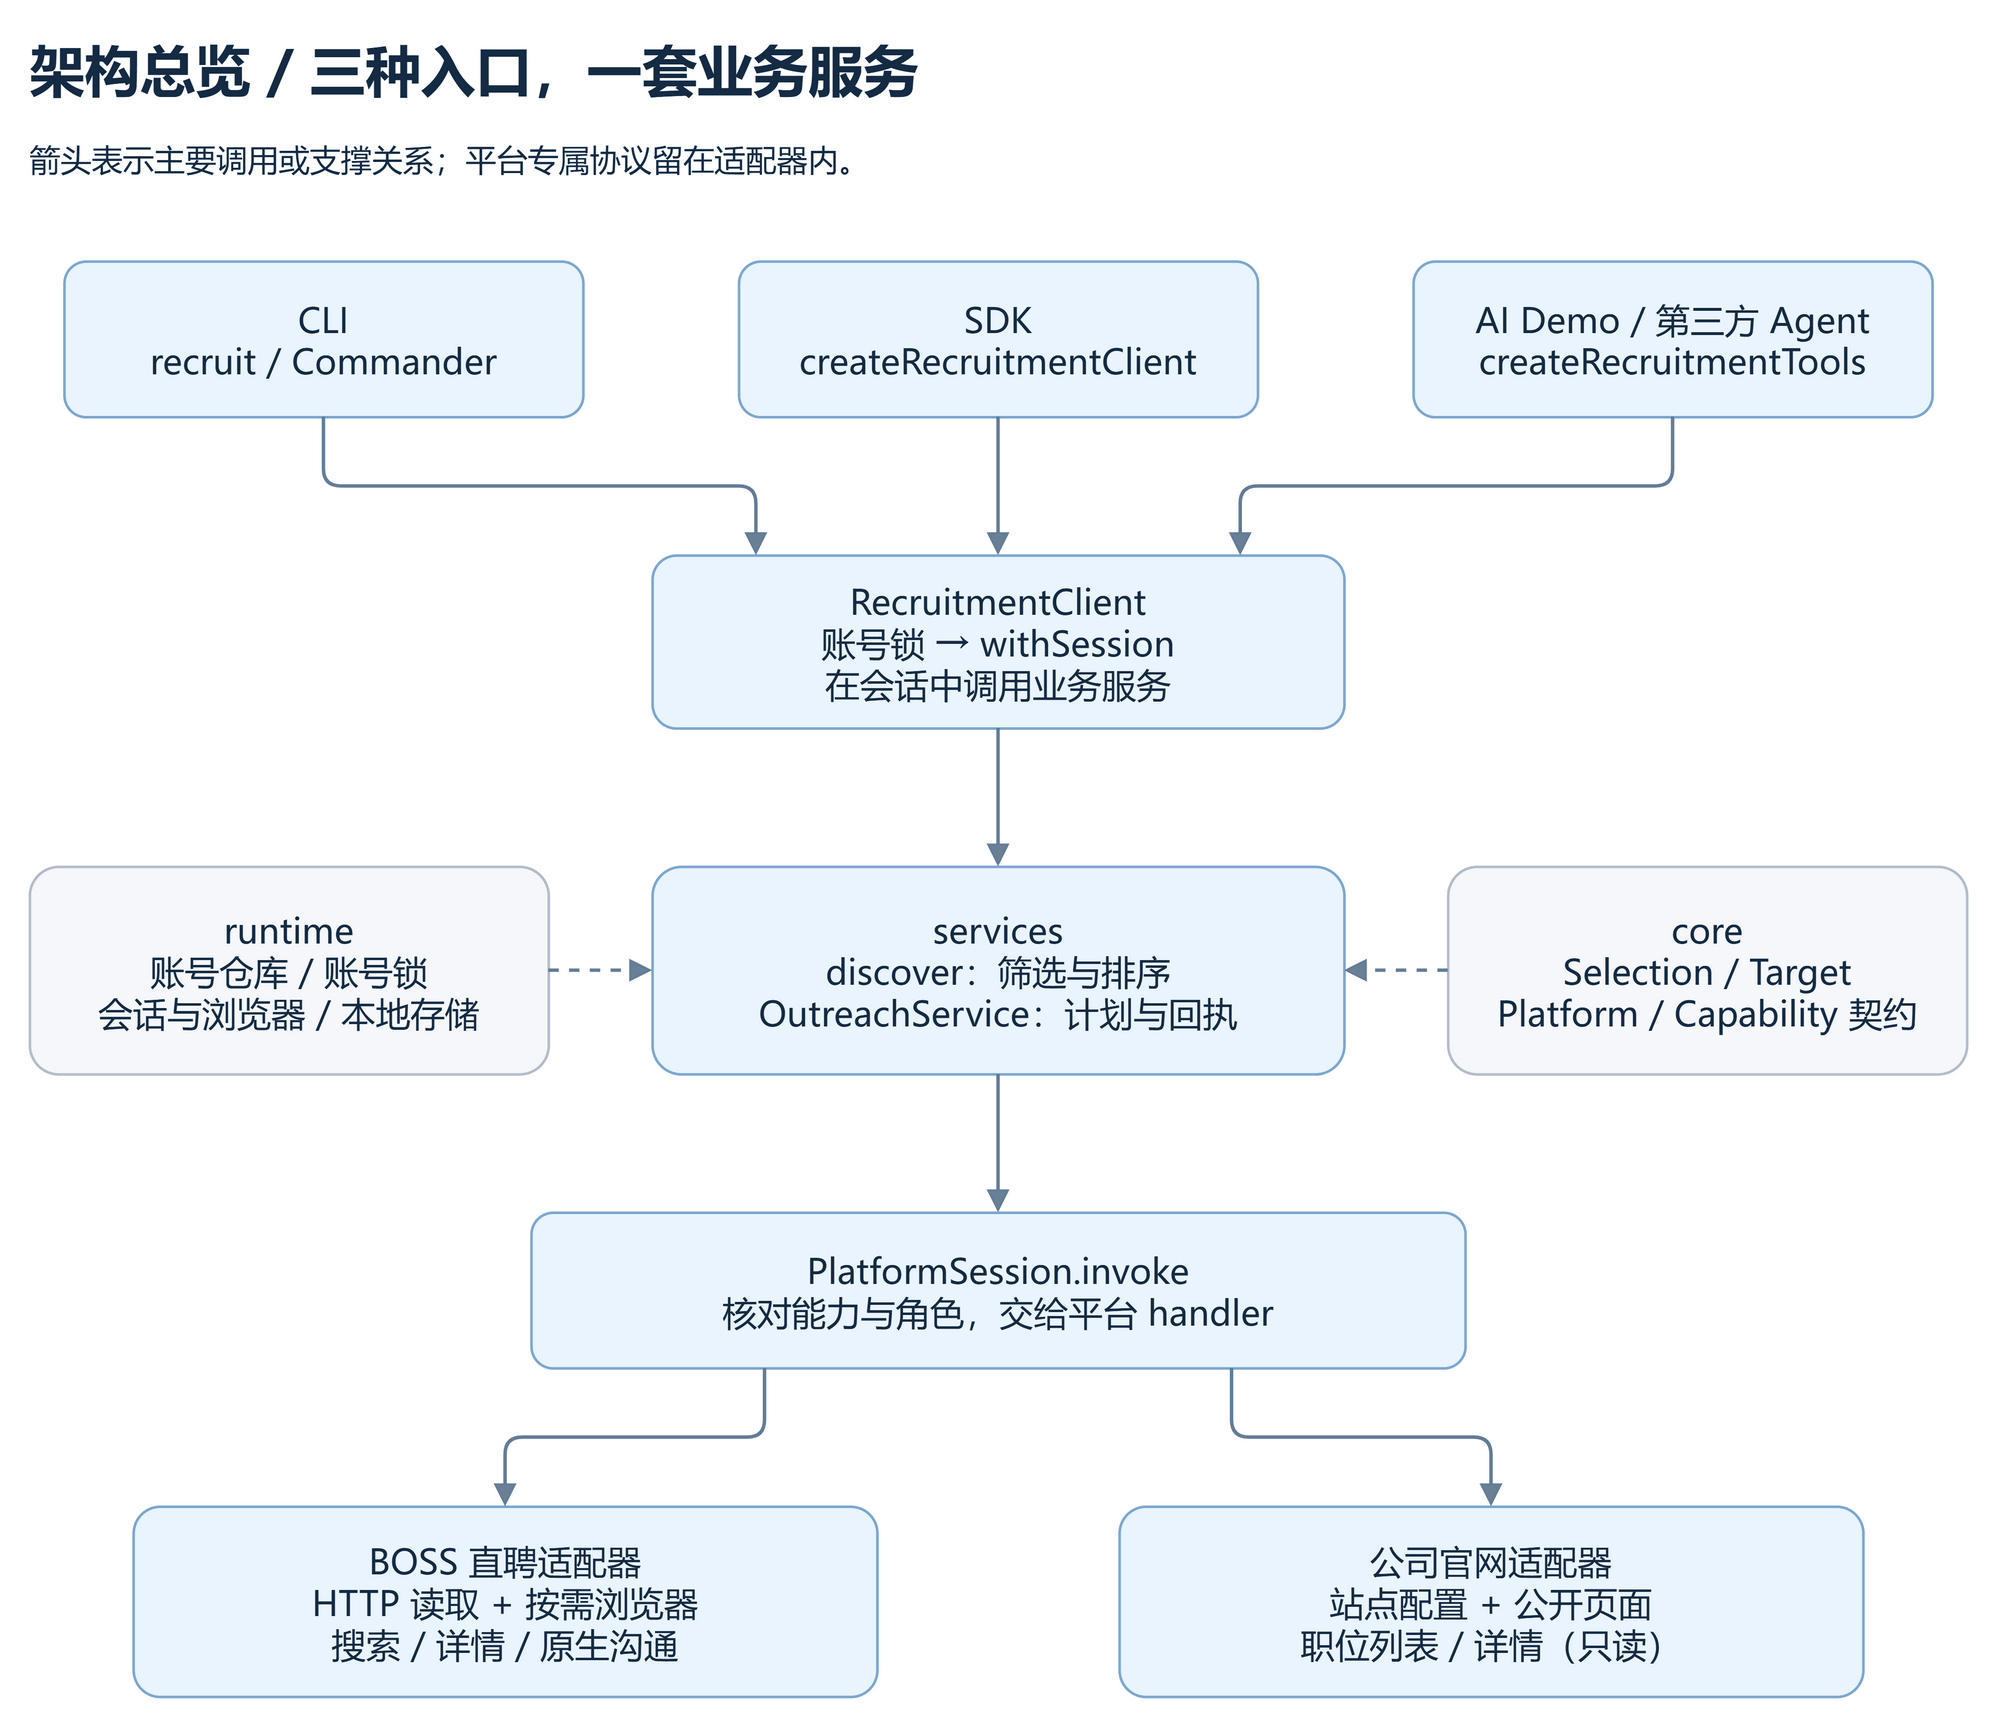
This diagram shows the main calls and support relationships. Public company websites don't need account locking; platforms like BOSS that require login go through an account repository into a session.
src/cli handles command input and display, src/core defines platform capabilities and data contracts, src/runtime manages accounts, locks, storage, and browser lifecycle, and src/services handles filtering and communication orchestration. Authentication, page selectors, site protocols, and platform-specific parameters live in src/platform/<id>/.
Built-in platforms are assembled in src/platform/builtins.ts. To add a new platform, implement the platform contract and inject it into the client; generic services operate on Selection, Target, and capability interfaces and don't need to understand a site's button text.
For this article, the key split is: the platform adapter completes one concrete action and returns evidence; the business service decides whether the action is allowed to happen and how to continue when the result is unknown.
For example, the BOSS adapter internally splits HTTP and browser responsibilities: when a reusable session exists, job-list reads for the job-seeker side can go over HTTP; details, some recruiter-side operations, and native communication use the browser as needed. This is a platform-internal choice; OutreachService shouldn't grow two sets of retry rules because of it.
CLI, SDK, and AI tools ultimately converge on RecruitmentClient. If deduplication logic were written only in CLI commands, business systems calling the SDK might bypass it; putting it in a shared service ensures all entry points follow the same rules.
Corresponding implementation: client.ts, platform contract. Let's trace one communication operation further down.
Enter a Failure Window: The Platform Did It, But the Local Side Never Got the Answer
Imagine a plan that wants to contact 5 targets. While processing the third target, the native communication button on the page has been triggered, and the platform has completed the operation, but the client didn't get a definite receipt.
This scenario is used to explain the design's failure model; it's not a real send test on a real account.
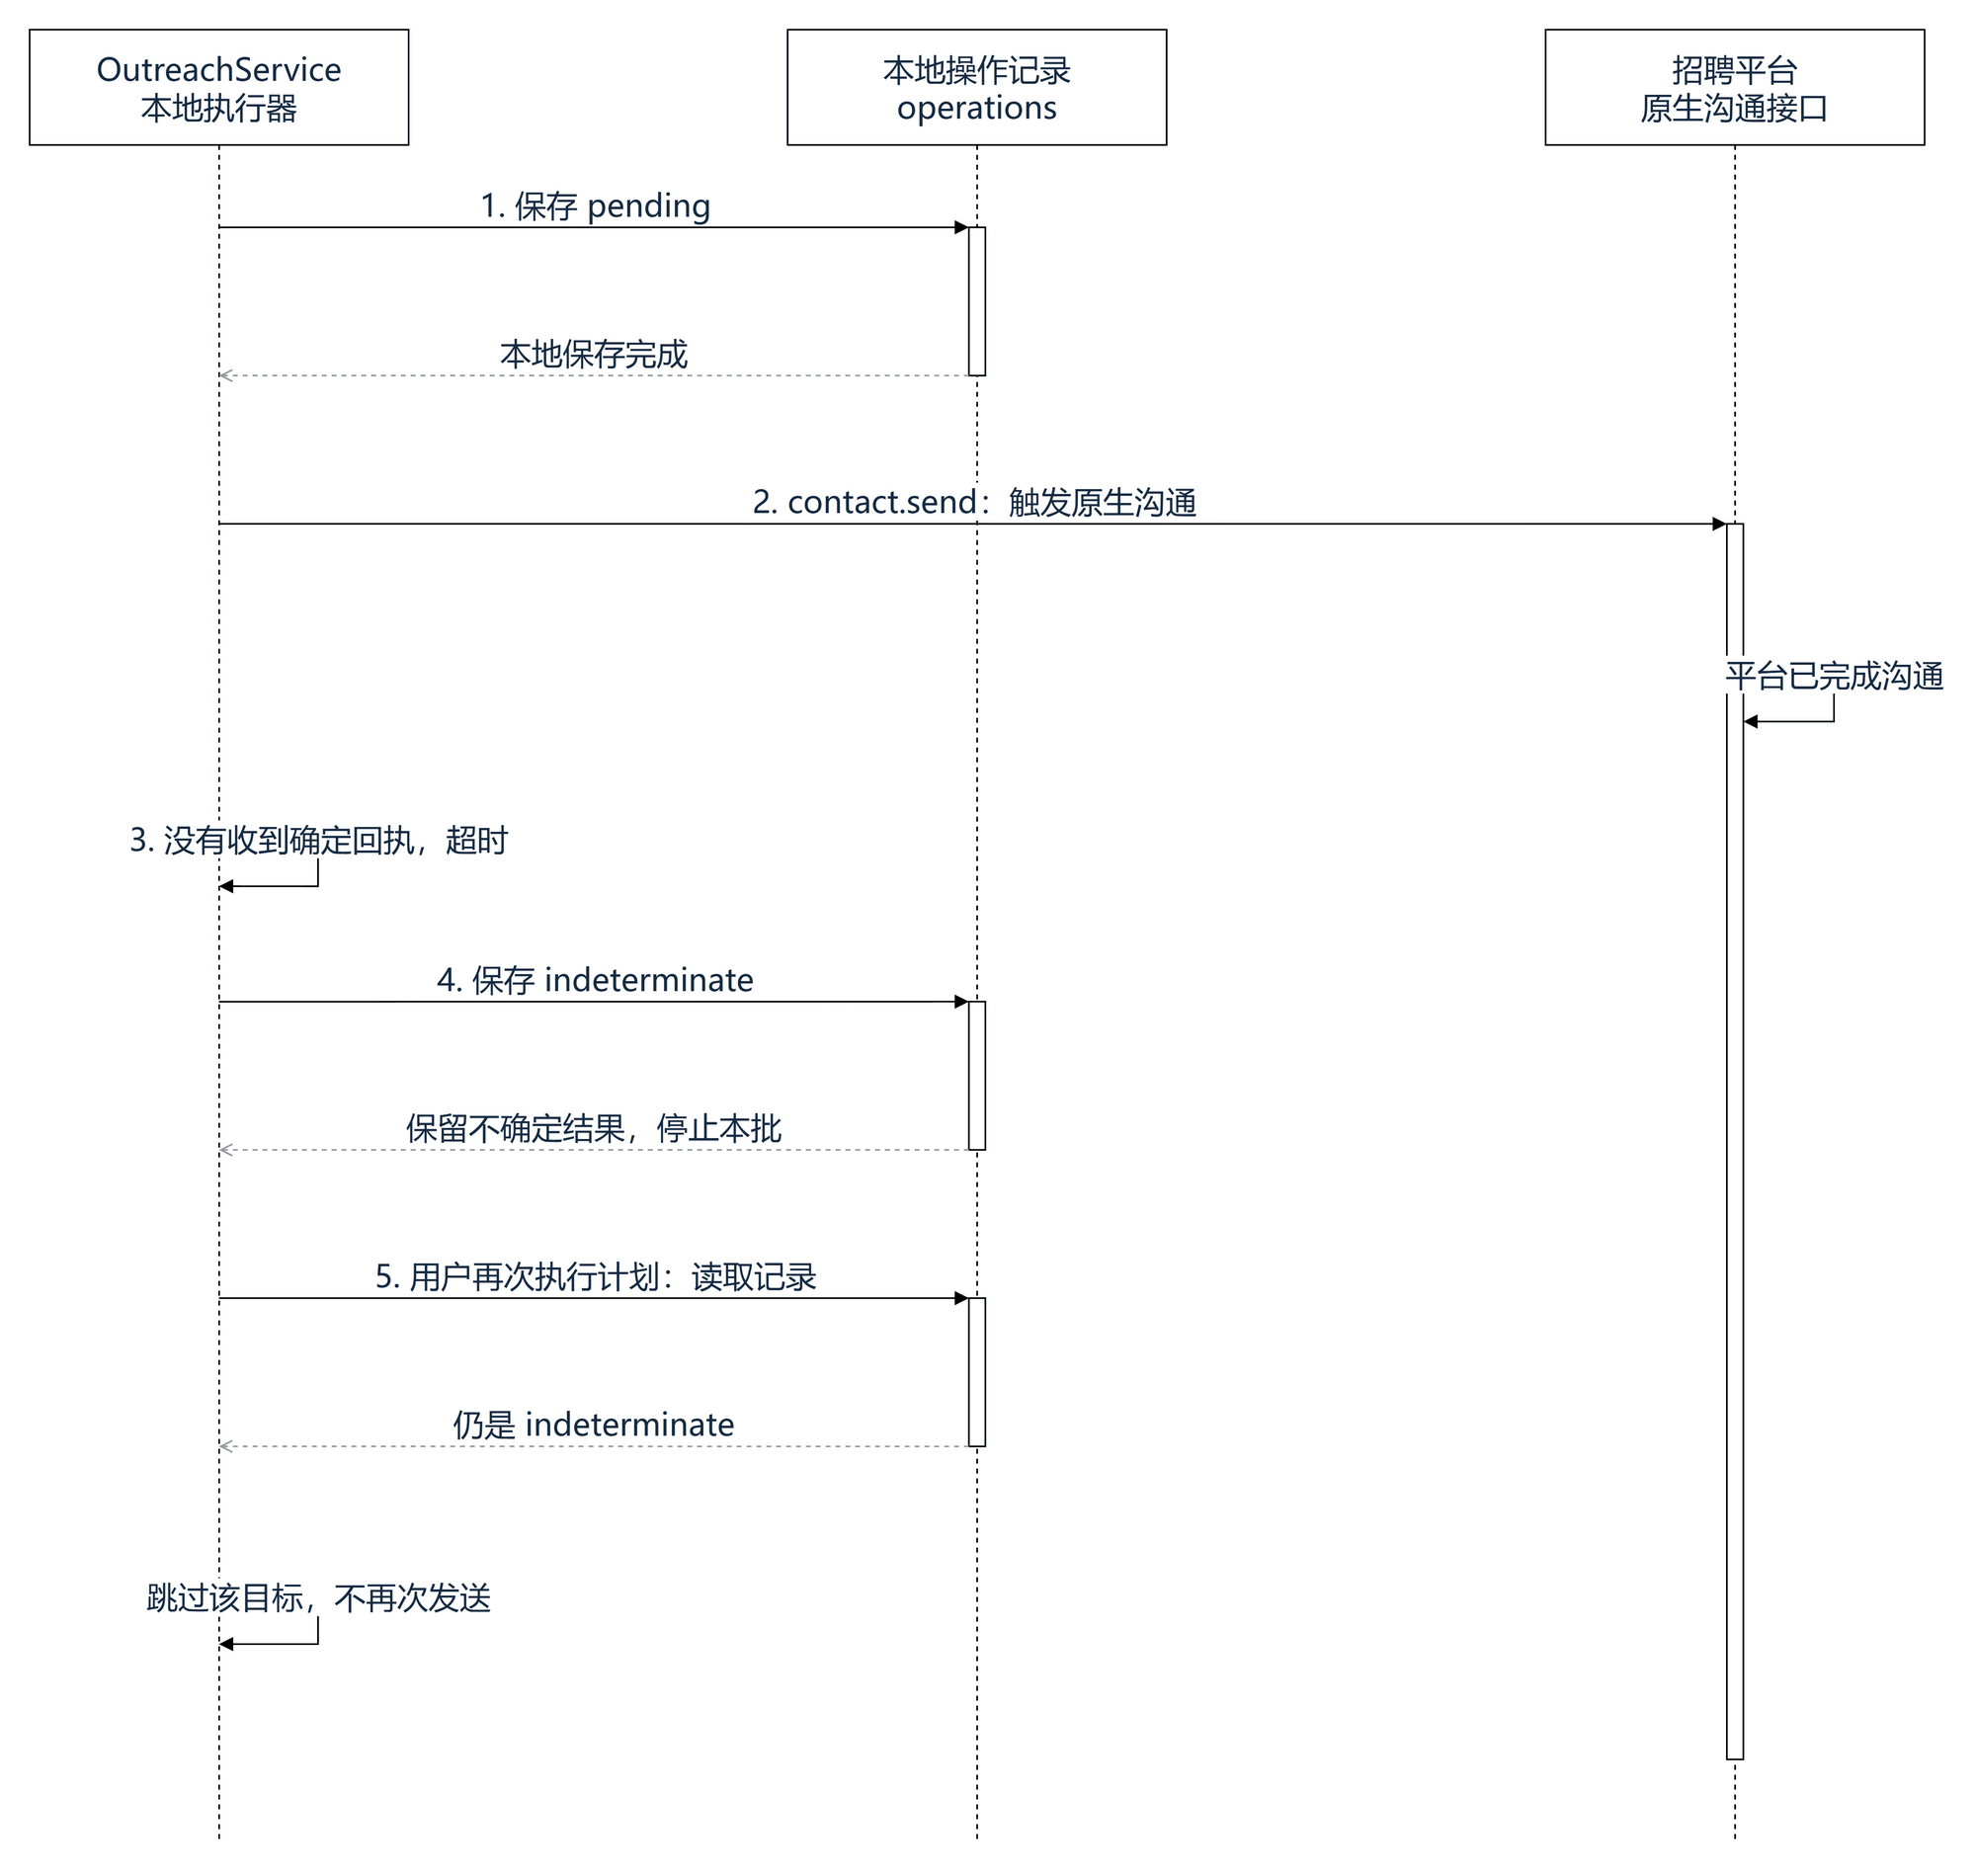
The client sees "timeout", which corresponds to at least two possibilities: the request didn't complete, or the request completed but the client didn't confirm the result. The local exception alone can't distinguish them.
If you click again, the second case can become a duplicate contact. If you directly declare success, the first case becomes a false completion record. The tool needs to acknowledge a third outcome: indeterminate, i.e., unknown.
This isn't just swapping an error message. For the next run to still remember this, three questions must be answered: Who does this record belong to? What business action does it describe? At what point must it be saved?
Step One: Make Records Belong to the Real Account, Not an Alias or Process
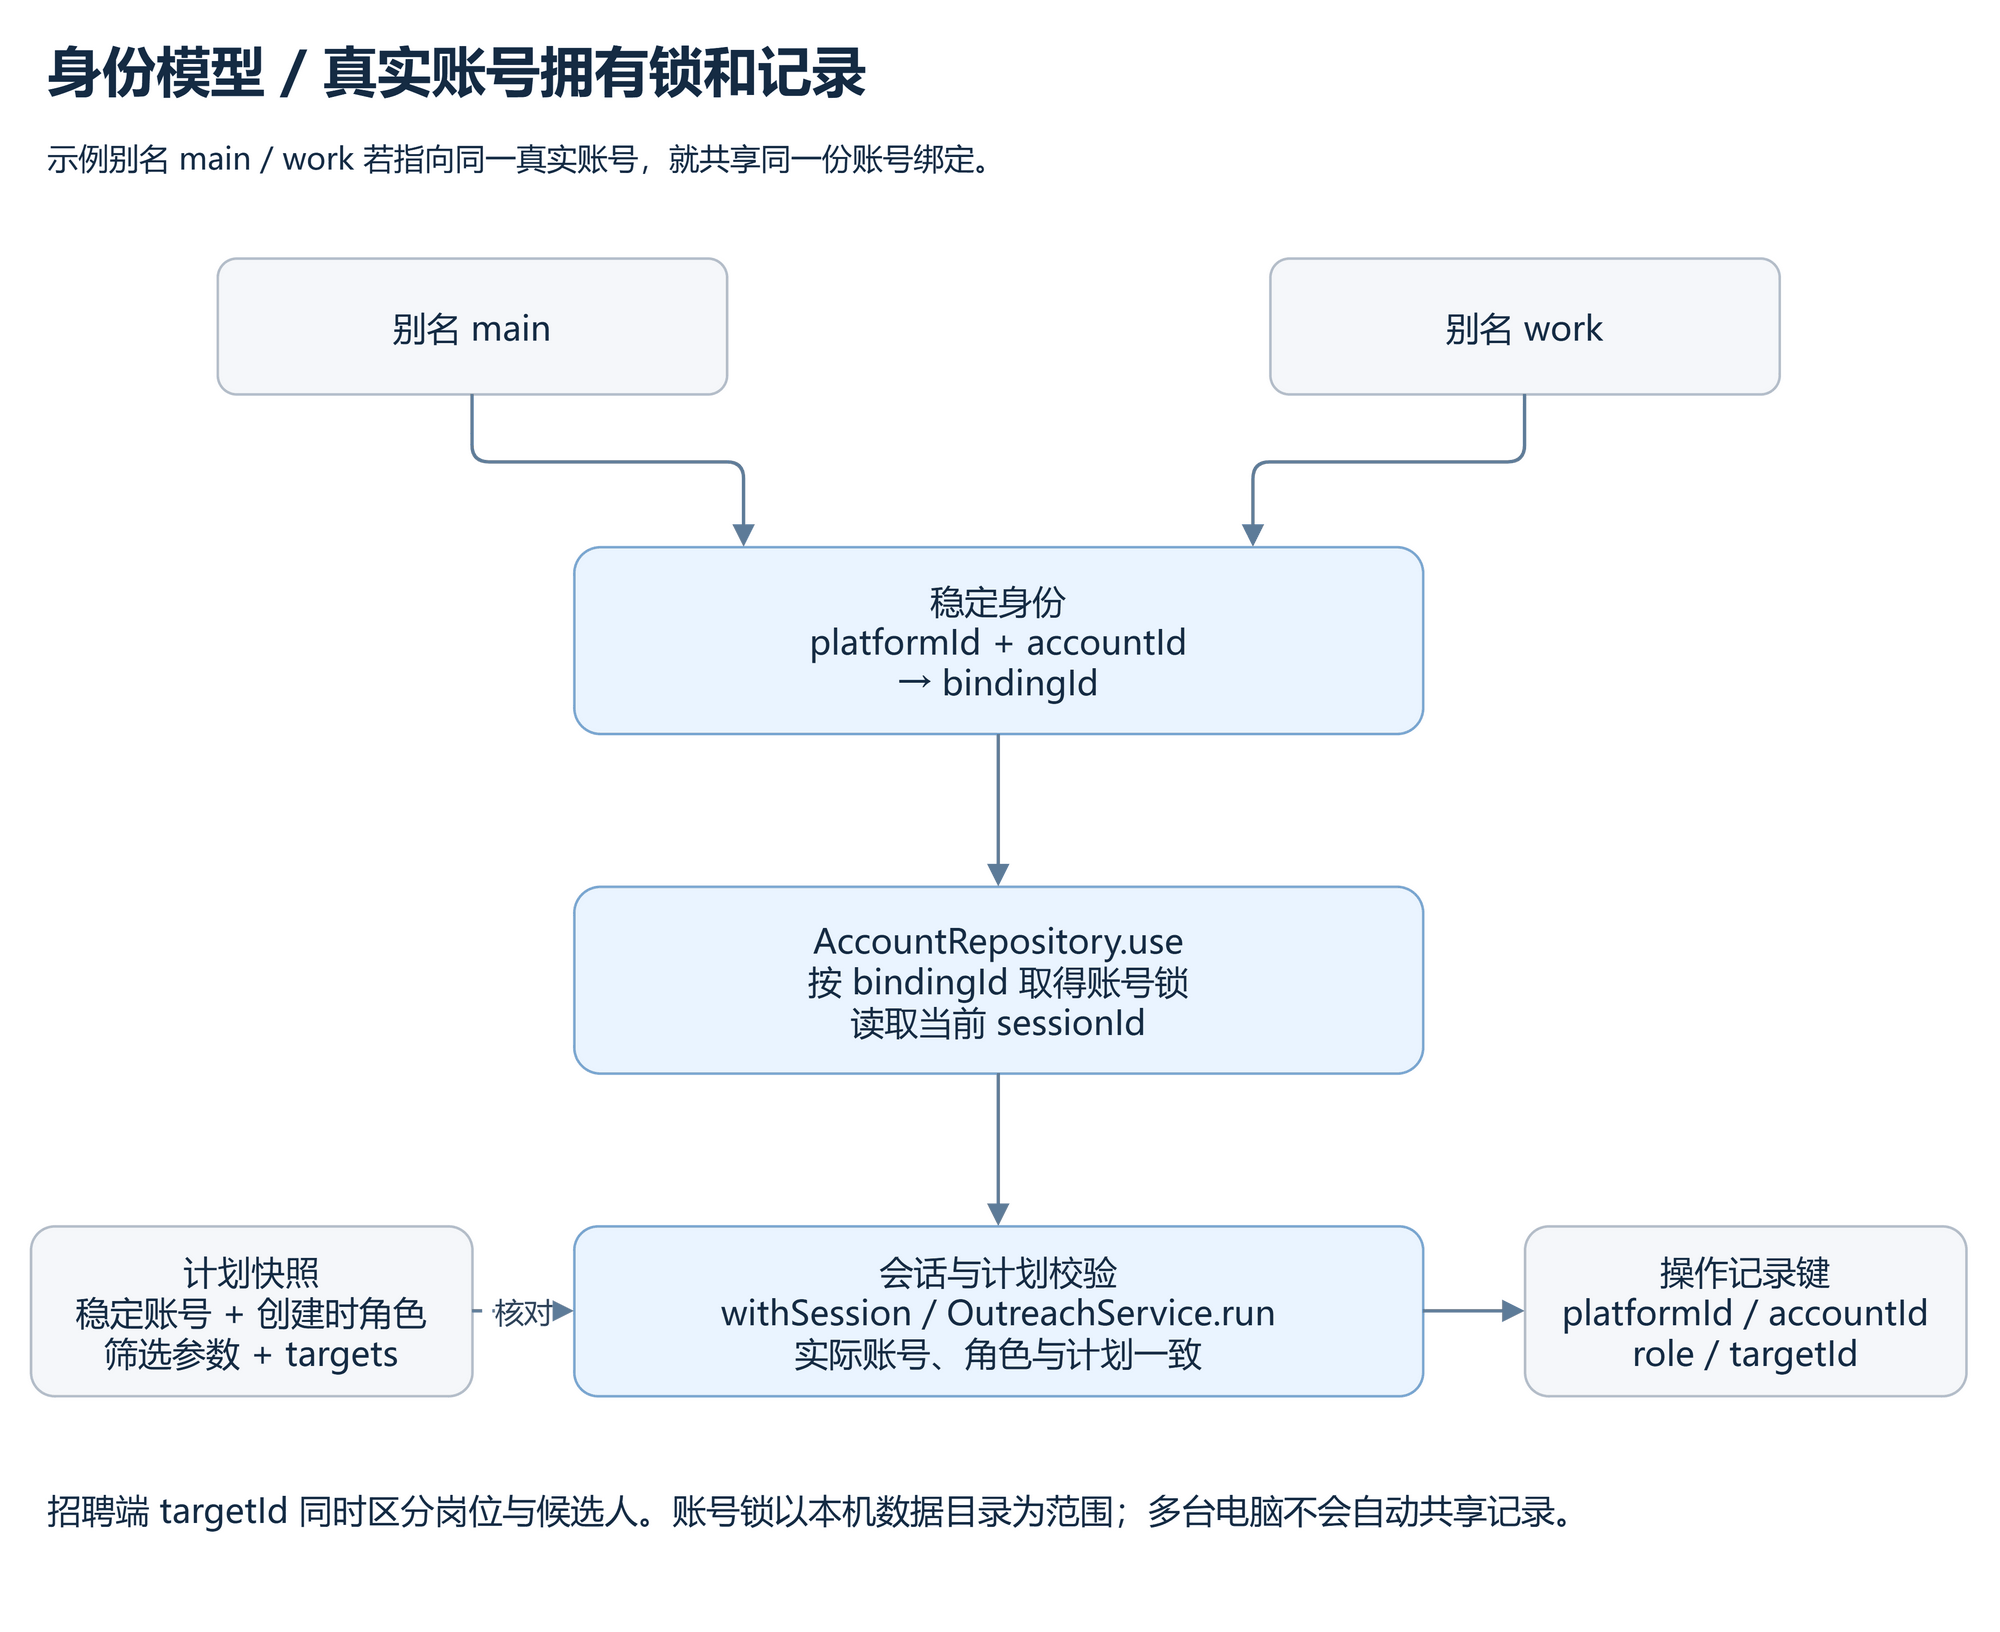
Aliases like main are good for human memory but not as business identities for deduplication. The same platform account can be referenced by different aliases; if each alias holds its own lock and history, two entry points might each judge "haven't sent yet".
The project first calculates a stable binding identifier bindingId based on platformId + accountId. Aliases only serve to look up that identity; the account directory and execution locks are based on the stable identity. When entering a platform session, it also reads the actual current account; when executing a plan, it checks the role, to avoid running a job-seeker-identity plan under a recruiter identity.
The send record key further includes:
platformId + accountId + role + targetId
Note there's no planId. Otherwise, the same target appearing in two new plans would produce two different deduplication keys. planId is still written into the record for traceability, but it doesn't determine whether it's "the same business contact".
On the recruiter side, the target ID also distinguishes position and candidate, making deduplication granularity match the specific position scenario. The key point here is to define business identity first, then compute a hash over that identity; the hash itself doesn't decide what counts as duplicate.
The account lock solves concurrency within the same local data directory: while one task is operating that account, another task can't enter at the same time. Operation records solve the problem after a task ends or a process restarts. Locks and records have separate responsibilities; only locks can't remember what happened yesterday, and only records could let two concurrent tasks both read "no record".
Corresponding implementation: accounts.ts. These locks and records are not automatically shared across multiple computers or different data directories; that constraint also matters.
Step Two: Plans Save Intent; Operation Records Save Execution Facts
When a plan is generated, it saves account identity, role, filter parameters, target snapshots, and exclusion information. It answers "who are we planning to handle this time", and it doesn't automatically change just because a later search finds new targets.
However, a snapshot can't guarantee the target state remains valid forever. After plan creation, the other party may become inactive, or may already have been contacted through another entry point. So before actual execution, contact.prepare is called to re-check the target, activity, and communication status.
After passing the pre-check, we enter the write phase. The key order in OutreachService.run is:
// operation is already constructed as pending; the following is the key order in the source.
await writeJson(file, operation);
try {
  const receipt = await session.invoke('contact.send', { target: prepared.target });
  operation.receipt = receipt;
  operation.state = receipt.state === 'sent' ? 'sent' : 'skipped';
} catch (error) {
  operation.state = 'indeterminate';
  // The full implementation also records failure clues, saves the record, and stops new sends in this batch.
}
This is a key excerpt from the implementation, omitting error-message formatting and final save logic. Full code at outreach.ts.
The order can't be swapped. Saving pending first and then making the remote write call means that even if the process disappears during the call, the next run can still see "this target has already entered the send phase". If you sent first and created the record later, an interruption in between could leave no trace of the attempt locally.
Local files are replaced by "write a temp file, then rename" to reduce the chance of reading a half-written JSON. But it's still local file storage, not a transaction committed together with the platform database, and you can't derive strong durability guarantees under power loss.
Step Three: Write the Recovery Branches Clearly; Don't Let Unknown Results Re-enter the Send Entry Point
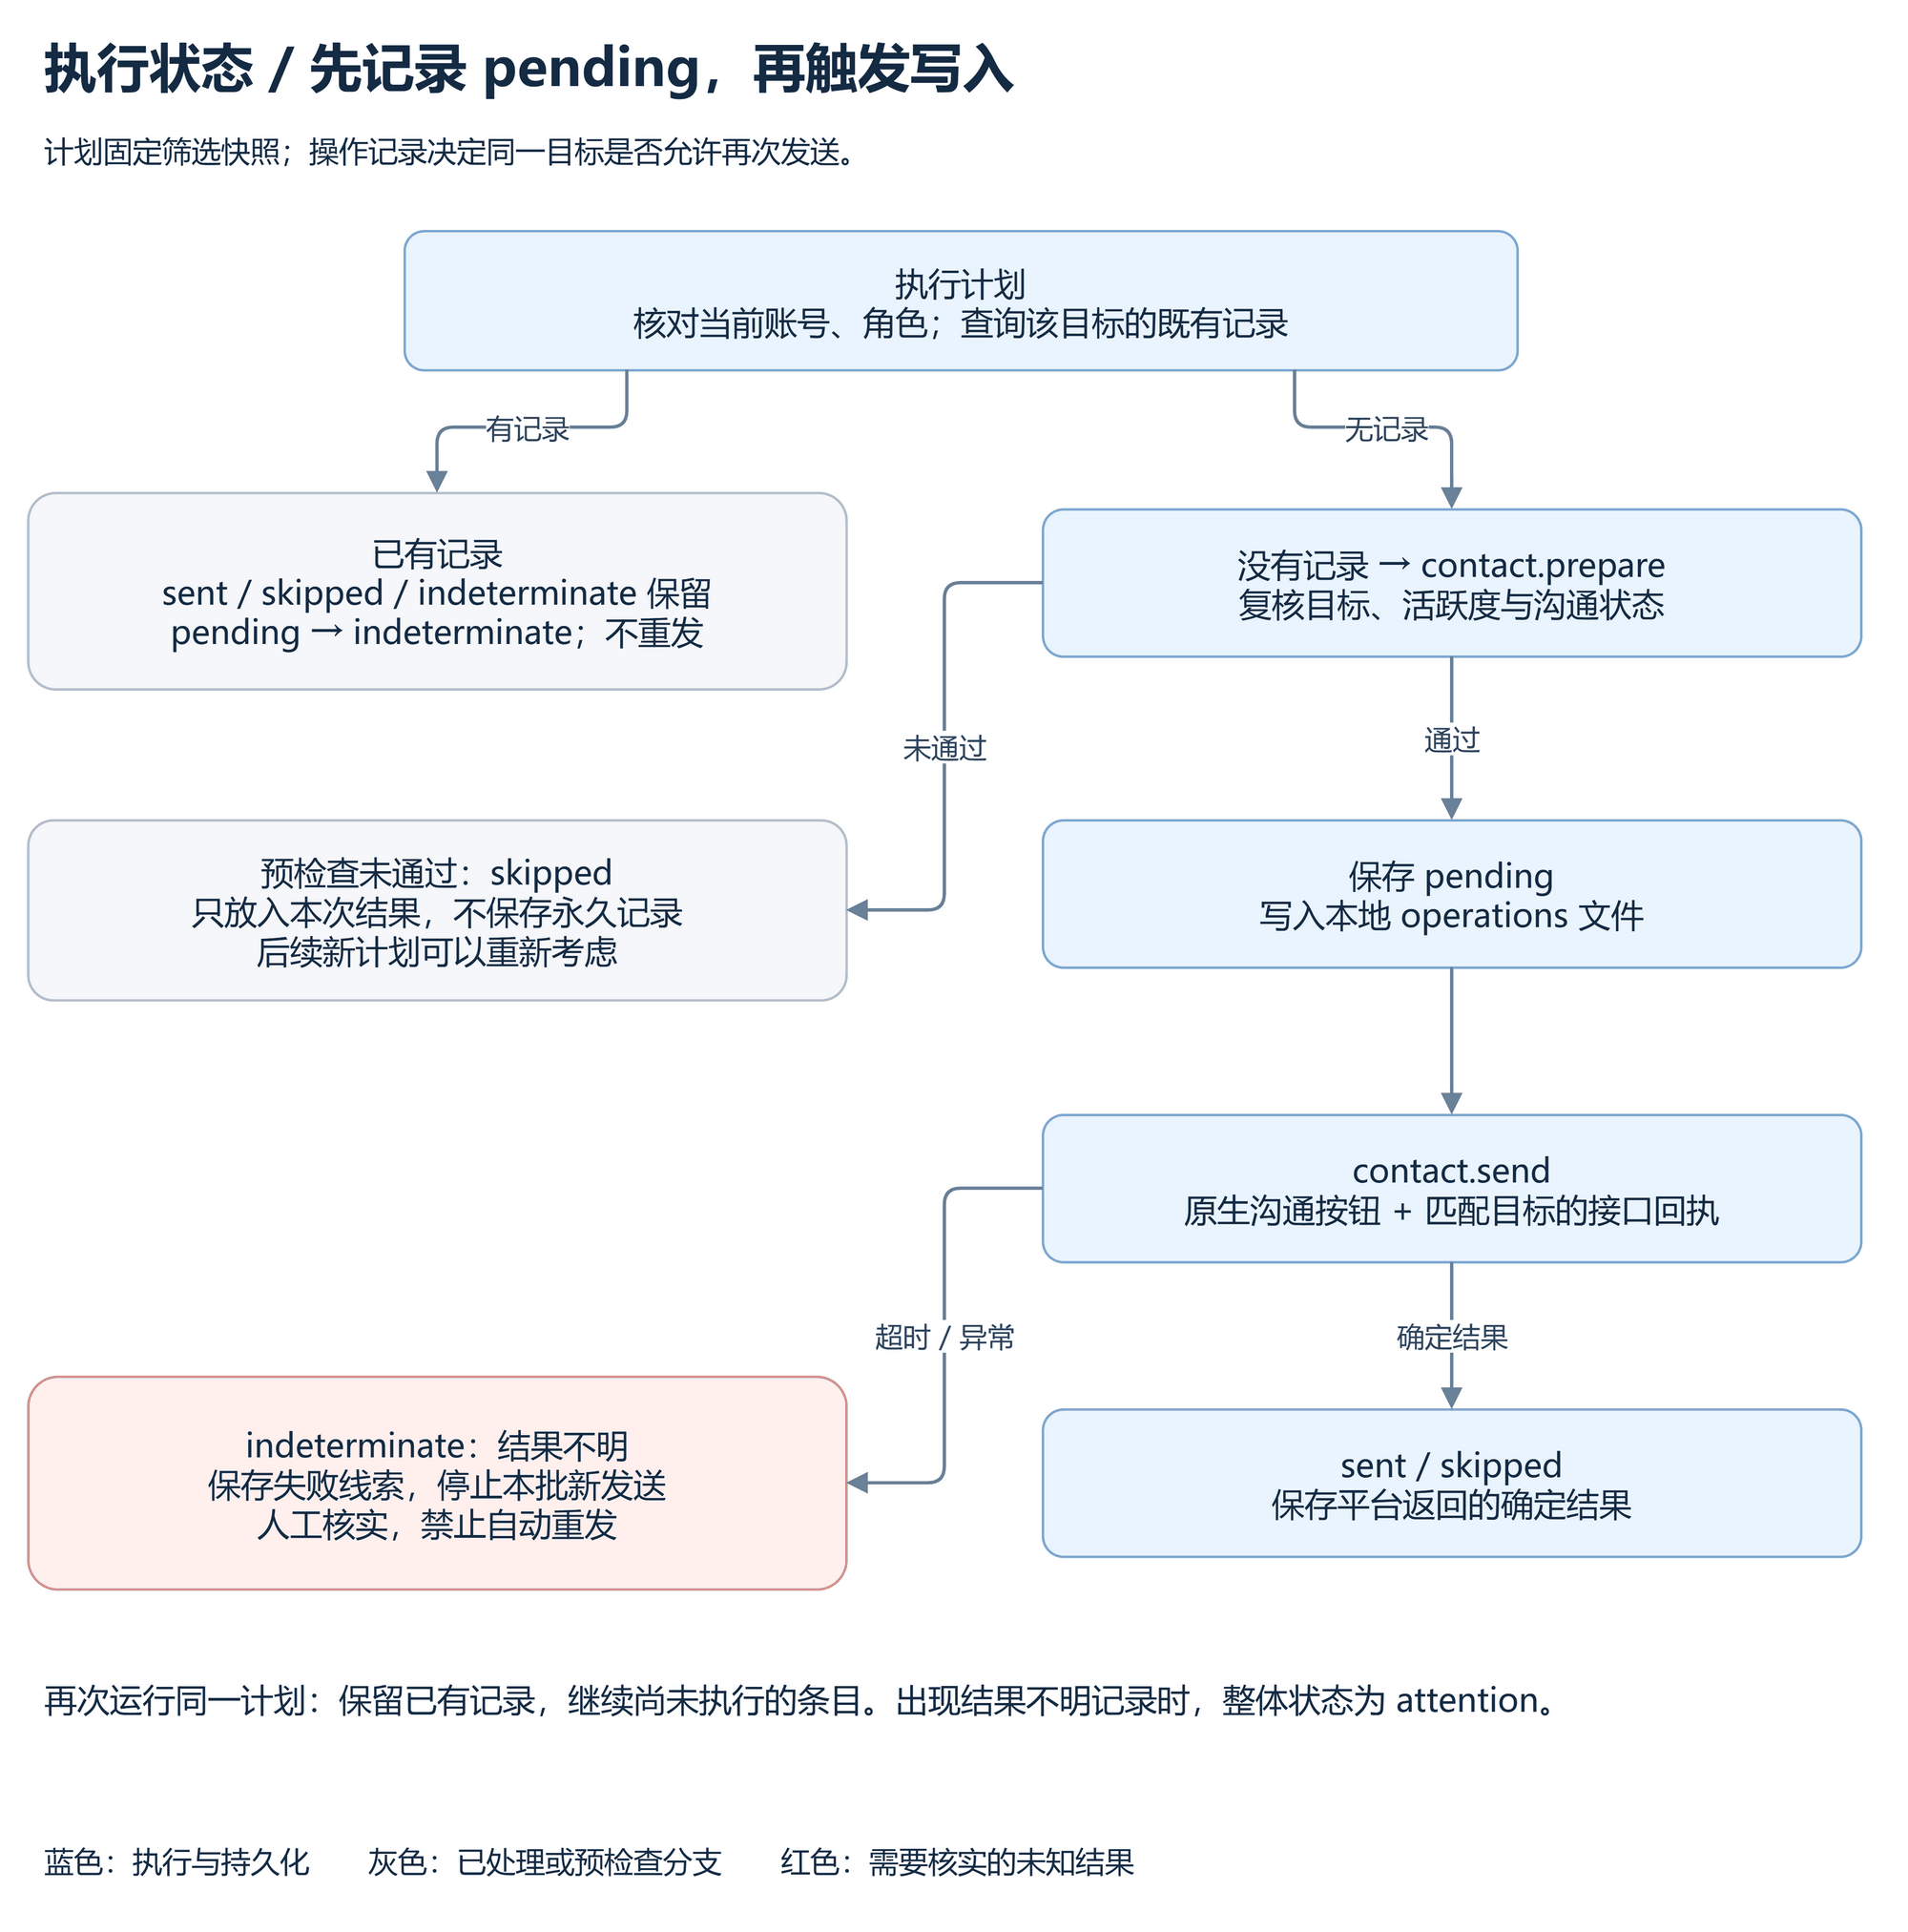
There are two easy-to-miss details.
First is the recovery semantics of pending. On a subsequent run, if an existing pending is found, the project converts it to indeterminate and skips that target. It doesn't interpret pending as "not done, try again". Because locally, we don't know whether the process was interrupted before or after the actual send.
Second is the source of skipped. When the pre-check finds a target unsuitable for contact, the result is marked as skipped, but it isn't written to the permanent operation record; a new plan can reconsider that target later. A definite skip returned after entering contact.send is saved and handled by existing records on next read. Behind the same display word, whether or not it entered the send phase determines a different recovery behavior.
Continuing with the 5-target example: the first two have definite results, the third becomes indeterminate, and the current batch stops sending the fourth and fifth. When the user runs the same plan again, the first three are handled by existing records, and the not-yet-executed targets can continue. As long as any indeterminate remains in the results, the overall state is attention, reminding the user that something needs verification.
There's an explicit cost: if the process happens to be interrupted after saving pending but before the remote call, no message may actually have been sent, but the next run won't auto-send it either. The design chooses to be conservative about uncertainty; the price is possibly manual handling for a contact that never actually happened.
This mechanism reduces duplicate attempts caused by re-running while the shared record is still valid. It does not implement exactly-once delivery on the platform side. There is also no server-side idempotency key the client can use; you can't treat a local operation ID as a platform-recognized idempotency protocol.
Step Four: Only a Business Receipt Matching the Target Can Be Written as sent
If "button click succeeded" were enough to write sent, then all the records above would only be a complete record of an unverified conclusion.
The BOSS adapter registers request and response observers before triggering the native button. The observers verify the API path and target parameters and associate the response with the matching request; only when the corresponding business result succeeds does it generate a send receipt. Opening a resume, popping a window, or returning from a click does not separately count as evidence of successful communication.
Timeouts, exceptions, and protocol errors preserve clues for debugging, such as API path, HTTP status, platform business code, and whether a request was observed. The source also cleans up listeners and timers in finally, so previous observers don't affect subsequent operations.
Corresponding implementation: BOSS communication and receipt observation.
These pieces of evidence still have scope: the platform interface confirming completion doesn't equal the user having read it; the local side not observing a request also shouldn't be automatically interpreted by an upper layer as "definitely no side effects". The shared service conservatively records errors during the send phase as unknown, sacrificing some automatic recovery capability in exchange for simpler, traceable execution rules.
How the AI Entry Point Follows the Same Rule
The model might suggest "try again" after an error, so deduplication can't rely only on prompt instructions asking the model to be careful.
The tool layer divides operations into read, local-write, and remote-write. recruit_plan can prepare and save a plan; recruit_run_plan, which actually executes an existing plan, requires the caller to pass an allowContact policy. This policy is separate from model-generated tool arguments; the model can't grant itself communication permission inside its own arguments.
Even when sending is authorized, the call still lands in the client and OutreachService, so existing records and unknown-result handling don't disappear. The client's generic invoke also rejects write capabilities; contact.send must be orchestrated by the plan-execution flow. If a third party directly uses the lower-level adapter session, they take on that responsibility themselves.
Corresponding implementation: agent-tools.ts. This makes "whether sending is allowed" and "whether sending again is allowed" two independent judgments: the former comes from the caller's authorization, the latter from business state.
How to Start, and Where This Analysis Has Been Verified
To try the product first, check the installation instructions on the website, or open the online Demo to understand the interaction. Real execution requires Node.js >= 22.16 and Chrome/Chromium. Below, using the released v0.1.2 package, pin the version:
npm install -g https://github.com/Ganzhib/recruitment-cli/releases/download/v0.1.2/ganzhibin-recruitment-cli-0.1.2.tgz
recruit --version
recruit demo
In the local Demo, configure a compatible model service, model name, and API key, then log in to BOSS via browser QR code. For the first time, just do search and plan preparation, then decide whether to enable communication after seeing results. If you prefer the terminal, start with read-only queries:
recruit auth login boss
recruit auth status boss
recruit search "前端" --platform boss --city 上海 --active-within 7d -n 5
recruit greet "前端" --platform boss --city 上海 --active-within 7d -n 5 --dry-run
Installation and usage details are in the Getting Started guide. This article is based on the public repository commit fa6643a, verified the Release package entry point and CLI version, and ran 13 offline tests covering workflow and AI tool calls, all passing. These include continuing a plan after an uncertain send, recovering leftover pending, cross-alias account locks, and blocking execution on identity change. Tests use fictional platforms and data; product images come from the real website; the failure sequence diagram is a code-based analysis and didn't trigger a real account communication operation for the sake of writing this article.
This also clarifies the boundaries of the current implementation: records rely on the local data directory; different devices don't automatically share deduplication state; unknown results still require manual verification in the platform's communication records; page and protocol changes need ongoing adaptation. In the source, the attention state makes problems visible, but it doesn't do the final verification for the user.
Putting this back into the product, recruitment-cli's value is both in connecting search, filtering, and communication, and in letting users know where the flow stopped. A CLI that can be run repeatedly needs to distinguish between "can continue processing remaining targets" and "can do that same action again". That is where this architectural thread ultimately lands in the user experience.