OpenSpec Replaces Prompt-by-Prompt AI Coding with a Spec-Driven Command Workflow
As the title says, why have I only written 100 lines of code after being here for two months, but git statistics show I wrote 10,000 lines? This issue brings you a "tool": openspec
What is openspec?
OpenSpec introduction: https://lzw.me/docs/OpenSpec-Docs-zh/#overview
OpenSpec is an AI-Native specification-driven development system that provides a lightweight specification layer for AI coding assistants. Before the first line of code is written, align requirements with AI to make the development process more predictable and efficient.
It is not a model, nor an IDE. It can be understood as a framework that enables AI to output more accurately, standardizes AI output, and makes human-AI communication more standardized. It changes the usual development mode of direct Q&A with AI into a mode of commands + Q&A, allowing AI to better understand what people need to do and letting people know better what AI is doing.
Install Node.js
Node.js Installation Tutorial (Linux)
Download installation package from official website (Windows)
# Verify Node.js version
node --version
Install OpenSpec Globally
Execute in cmd
# Use npm (recommended)
npm install -g @fission-ai/openspec@latest
Verify Installation
# Check version
openspec --version
OpenSpec provides 4 standard commands by default: /opsx:propose, /opsx:explore, /opsx:apply, /opsx:archive
If you want more commands, you can execute the following configuration wizard (executed globally)
Tip: Select
Delivery and workflowsin the configuration wizard to get more extended commands (/opsx:new,/opsx:continue,/opsx:verify, etc.)
# Start configuration wizard
openspec config profile


# Interactive configuration selection:
# 1. Delivery and workflows - Basic commands
# 2. Both (skills + commands) - Create skills and commands
# 3. Custom Profile - Custom configuration (Select all, use ↑↓+Space to select, [x] means selected)
This is the installation and configuration of openspec for the computer, but openspec is project-level, so you need to enter the project to execute the initialization OpenSpec script
# Enter project directory
cd your-project
# Initialize OpenSpec
openspec init
Press Enter to continue to the next step, use Up/Down keys to select, Space key to confirm
After selecting trae, press Enter to complete the selection. At this point, you will find two more folders in the project. One is .trae\skill, which was created because the init command above gave trae skill capabilities. The specific commands inside are the commands selected in the third step of the configuration wizard run above, which are the commands executable in trae. Another folder is called openspec, which is the main folder of openspec.
Directory structure after initialization
openspec/
├── specs/              # Main specs (authoritative baseline of current system behavior)
│   └── <domain>/
│       └── spec.md
├── changes/            # Proposed changes (each change in its own folder)
│   └── <change-name>/
│       ├── proposal.md    # Why and what to do
│       ├── design.md      # How to implement
│       ├── tasks.md       # Implementation task checklist
│       └── specs/         # Delta specs (parts that are changing)
│           └── <domain>/
│               └── spec.md
└── config.yaml         # Project configuration (optional)
The complete flowchart of openspec is as follows:
But the commands used in trae are: Step 1: openspec-propose, Step 3: openspec-apply-change, Step 4: openspec-verify-change, Step 5: openspec-verify-change
However, if you want AI to write things more accurately and better, you can also execute the openspec-explore command before the first step (before submitting a change, think about ideas, investigate problems, clarify requirements). This command will do some things: understand requirements, confirm requirements with you, and even scan the entire project's code, etc. It consumes a lot of tokens.
Practical Operation
A complete demonstration from requirement proposal to code completion, showing how to write less code or even not write a single line of code, letting AI complete the requirement development.
openspec-explore
This command is optional. If the requirement is vague, large, or even if you don't understand the requirement yourself, you can execute this command before the first step: openspec-propose. During this process, if AI also cannot understand your requirement, it will ask us and confirm some requirement details, and we can also supplement (for example, confirm with product manager and colleagues).
This command does not produce any files. Its output only exists in the context of the AI Q&A. When the openspec-propose command is executed later, the confirmed issues will be carried over to the next command, making the output of openspec-propose more accurate.
Example:
You: /openspec-explore This is my requirement document, help me handle authentication for the mobile application (paste your requirement document)

AI:  Let me study your current authentication setup...
     [Analyzing codebase]

     I see you are using session-based authentication on the Web side.
     For mobile, we have three main options:

     1. JWT tokens (stateless, supports offline)
     2. OAuth2 (if third-party login is needed)
     3. Extend current session (simpler, but requires connection)

     Your API is already configured with CORS. Which direction are you interested in?

You: Let's use JWT. Can we start a change?

AI:  Ready. Run /opsx:propose add-jwt-auth to start.
Practical: If there is a corresponding requirement on Zentao and the MCP service has been configured, you can directly use the following prompt to let AI start understanding this requirement:
/openspec-explore mcp get task id: 2213913, use getUserTaskList

Add two interfaces: diff and log, log for list query, diff for detail query
If there is no corresponding requirement or task on Zentao, just give the PRD to AI directly. Here, because there is a task on Zentao, we directly use MCP to get it.
It will scan our project's code:
Finally, it will output its thinking results:
If AI has questions about our requirements, it will ask us. Because AI had no questions about this requirement, it didn't ask us. Next, it asks us to create an OpenSpec change proposal, so we proceed to the next step.
openspec-propose
Create a new change and generate all planning artifacts in one step.
Example
You: /openspec-propose natural language

AI:  Created openspec/changes/add-dark-mode/
     ✓ proposal.md
     ✓ specs/ui/spec.md
     ✓ design.md
     ✓ tasks.md
     Ready to implement. Run /opsx:apply.
Practical:
We can directly execute the openspec-propose command, or we can supplement some things with it, just communicate normally:
/openspec-propose Add a few points: when the user clicks the log, call the log interface, then it will enter the second image. Clicking the view button will call the diff interface.
Start creating four files:
Task completed:
Output finished:
This command will output four files (proposal.md, specs//spec.md (there can be multiple), design.md, tasks.md):
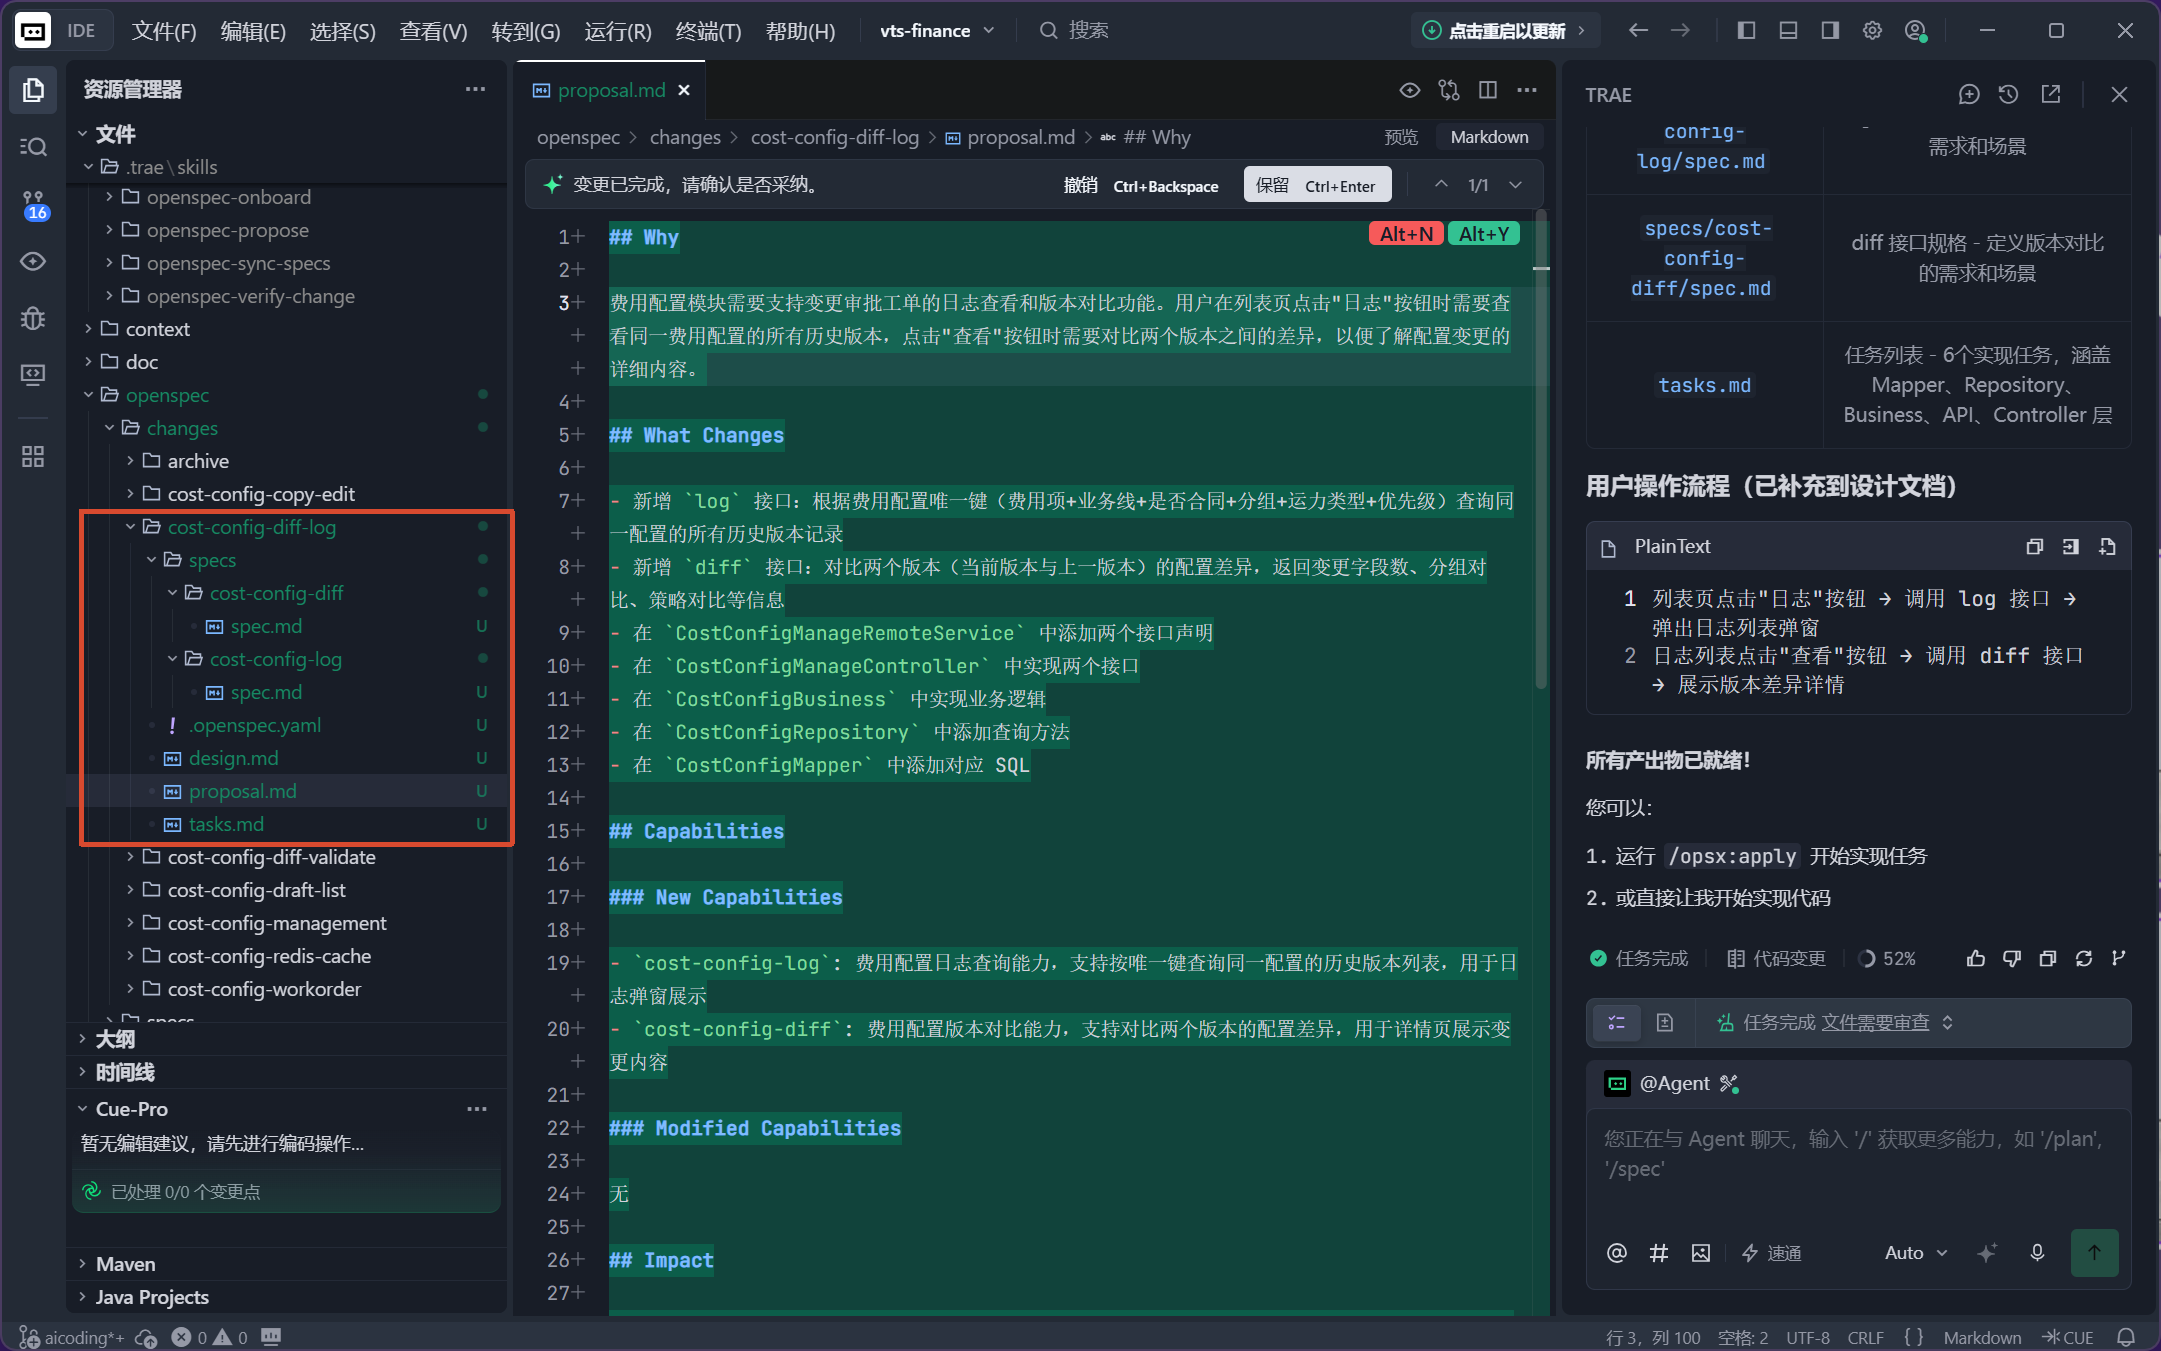
The four files it outputs are called Changes. Changes are proposed modifications to the system, packaged as a folder containing everything needed for understanding and implementation:
Change folder structure
openspec/changes/cost-config-diff-log/
├── proposal.md           # Why and what to do
├── design.md             # How to implement (technical solution)
├── tasks.md              # Implementation task checklist (with checkboxes)
├── .openspec.yaml        # Change metadata (optional)
└── specs/                # Delta specs
    └── cost-config-xxx/
        └── spec.md       # Content that is changing in cost-config-xxx/spec.md
This document output is mainly for us to read, and the reading order is:
If we have questions about its change artifacts after reading, we can supplement with it:
Add a few supplementary points to the change artifacts:

1. The coding style should follow the existing code

2. Database-related operations should be written in the Repository class

3. I asked the product manager, he said there might be many change records in the external list data
Here you can use natural language description. The ultimate goal is to further standardize what AI does and how it does it, as well as supplement some detailed points, making the code written by the next step openspec-apply-change command more standardized and accurate.
It will modify the AI-generated change files and supplement details.
It will also generate details that we ourselves missed based on the UI we provided earlier:
Finally output the result of modifying files, letting us proceed to the next step:
Note here, when creating a change, do not create a very large change at once (i.e., let him create one change for a whole large function at once) for the following reasons:
Long runtime, uncontrollable results
If the function is complex, it will consume a huge amount of tokens
Difficult to maintain and fix bugs later
......
So only propose one small change at a time, manually dividing large requirements into a, b, c... several small requirements, making the granularity smaller. For example, execute one openspec-propose command for one small function or one interface:
openspec-apply-change
Implement the tasks in the change. Process the task list step by step, write code and check off completed items.
Example:
You: /openspec-apply-change

AI:  Implementing add-dark-mode...

     Reading tasks.md:
     - [ ] 1.1 Create ThemeContext
     - [ ] 1.2 Add CSS custom properties
     - [ ] 1.3 Implement localStorage persistence

     Processing 1.1: Creating ThemeContext...
     [Creating src/context/ThemeContext.tsx]
     ✓ 1.1 Completed

     Processing 1.2: Adding CSS custom properties...
     [Updating src/styles/globals.css]
     ✓ 1.2 Completed
     ...
Practical:
Execute the command directly. If there are supplements, you can also tell AI in natural language after the command.
Then it starts automatically executing these 17 tasks. At this time, try not to operate the code, wait for it to complete automatically.
After the 17 tasks are completed, openspec will automatically compile and fix:
Finally, it will modify the tasks.md file to show that each task is completed:
At this point, you can see the code has changed:
At this time, if our code has any bugs, or we want to change something, we can also tell it in natural language:
openspec-verify-change
Verify whether the implementation matches the change artifacts. Check from three dimensions: completeness, correctness, and consistency.
Example
You: /openspec-verify-change

AI:  Verifying add-dark-mode...

     Completeness
     ✓ All 8 tasks in tasks.md are completed
     ✓ All requirements in the spec have corresponding code
     ⚠ Scenario "System preference detection" has no test coverage

     Correctness
     ✓ Implementation matches spec intent
     ✓ Edge cases in scenarios are handled

     Consistency
     ✓ Design decisions are reflected in code structure
     ⚠ Design mentioned "CSS variables" but implementation used Tailwind classes

     Summary
     Critical issues: 0 | Warnings: 2 | Can archive: Yes (with warnings)
This command is optional. If you want to check whether the code matches the artifacts, you can directly execute this command. When using it, it is recommended to throw the PRD to AI again.
openspec-archive-change
Archive completed changes. Complete the change and move it to the archive folder.
Example:
You: /openspec-archive-change

AI:  Archiving add-dark-mode...

     Artifact status:
     ✓ proposal.md exists
     ✓ specs/ exists
     ✓ design.md exists
     ✓ tasks.md exists (8/8 tasks completed)

     Delta specs: Not yet synced
     → Sync now? (Recommended)

You: Yes

AI:  ✓ Synced specs to openspec/specs/ui/spec.md
     ✓ Moved to openspec/changes/archive/2026-03-10-add-dark-mode/

     Change archived successfully.
Practical:
/openspec-archive-change openspec\changes\cost-config-diff-log
When we are sure that this requirement has been completed, we can use this command. If you want the openspec artifacts to be more standardized, you can ask AI to modify the openspec artifacts in the dialog after fixing bugs, and then run this command. This command will move the openspec\changes\cost-config-diff-log folder to openspec\changes\archive\2026-07-13-cost-config-diff-log, indicating that this requirement has been completed. At this point, you can push to git or push to the remote repository for team members to use the change together (optional).
In fact, you can also manually move it to the openspec\changes\archive folder, the effect is the same as this command. If we need to fix bugs later, just tell AI:
openspec\changes\archive\2026-07-13-cost-config-diff-log There is a bug: the frontend sends super long text, the backend reports an error
At this time, AI will directly find the corresponding change artifact and fix the corresponding bug:
At this point, we have not written a single line of code and completed the code-level development of this requirement.
Extension
mcp
The MCP service used in the article, if your company has it, configure it like this:
It can be understood as a service that uses natural language to obtain data from third-party systems. If you don't have it, it's okay, just throw the product document directly to openspec. If you are interested, the author can teach you how to develop MCP services later, welcome to follow.
rule
We can use tool-level rules and skills, generally placed in the C:\Users\username\.trae-cn folder. It will activate corresponding rules and skills based on the tool being used.
Agent
We can create our own agents to make AI output more specialized.
Other Coding Software
Can other coding software be used?
As we said earlier, openspec is just an AI process framework, and mainstream IDEs on the market basically all support it.
But the commands will be different. For example, in trae it is called
/openspec-apply-change, but in other software it is called /opsx:apply. Specifically, it depends on the IDE selected during openspec init, and then the name of the skill file in the skills folder of the corresponding IDE project file.
Finally, in the two months since the blogger has been deeply using openspec, the code written has not exceeded 100 lines. This data is really exaggerated. It has now completely changed the author's development model. I believe AI will slowly change everyone's development model. If there is no openspec, there might be openspring.
Similar tools or frameworks will always appear. AI is slowly changing the world. Learn it, young man...
Note: This article is not an advertisement. I haven't written a blog for a long time, I just wanted to share something. Thank you for watching, see you next time.
Top 1 from juejin.cn, machine-translated. The original thread is authoritative.
In the era when VibeCoding is all the rage, what's the point of writing technical blogs?