Loop Engineering: The New AI Programming Paradigm That Replaces Prompt-by-Prompt Coding
Hello everyone, I'm programmer Yupi.
The AI programming circle has a new concept again...
This time it started with Claude Code's father Boris Cherny saying in a recent interview:
I no longer prompt Claude. I have a bunch of loops running, and they are the ones prompting Claude and deciding what to do next. My job has become writing loops.
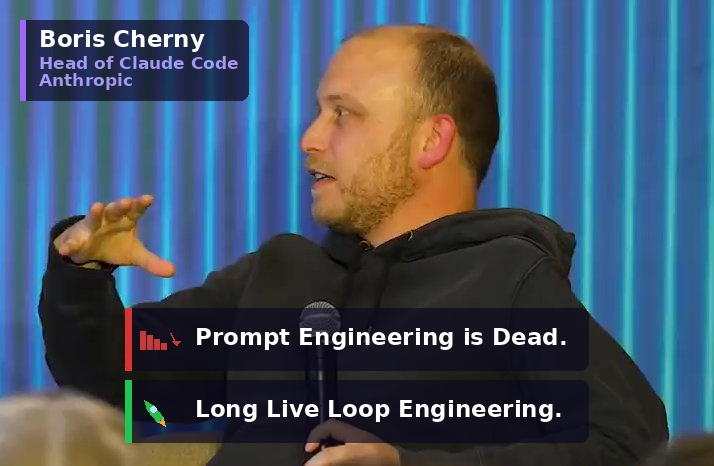
Then, OpenClaw's father Peter Steinberger also tweeted:
You should no longer write prompts for programming agents. You should design a loop mechanism, and let those loops prompt your agents.
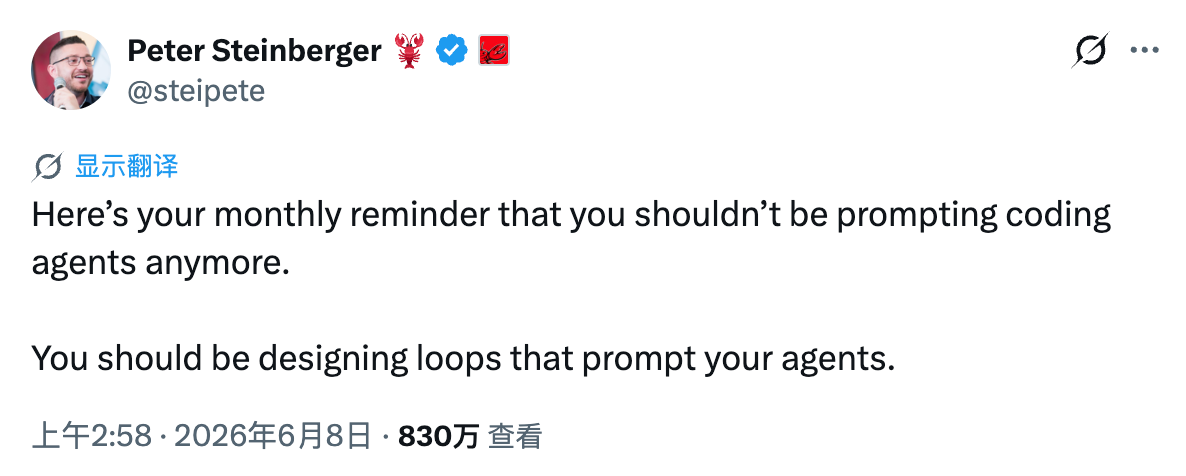
Key figures from two top AI companies, Anthropic and OpenAI, are simultaneously saying the same thing: The paradigm of AI programming is about to upgrade again, from manually writing prompts to designing loop systems.
This new paradigm is called Loop Engineering.
I can't take it anymore. At the beginning of this year, Harness Engineering just became popular, and now there's a new concept?
Can't finish learning, really can't finish learning...

But don't worry, this article will explain Loop Engineering to you from start to finish. First, I'll tell you what it is and how it relates to previous AI programming modes. Then, I'll take you through a hands-on experience with Loop using three tools: Claude Code, Codex, and Cursor. Finally, I'll discuss its methodological framework and pitfalls.
Bookmark this, and let's begin.
1. What is Loop Engineering
The term Loop Engineering literally means "loop engineering." Simply put, you design an automatically running system that replaces you in giving instructions to AI, checking AI's output, recording progress, deciding what to do next, and then continuously looping until your preset goal is achieved.

Previous AI programming modes were like driving a manual car. You had to operate every step yourself—pressing the accelerator, shifting gears, turning. You give the AI a prompt, the AI returns some code, and then stops, waiting for your next instruction. If you don't speak, it doesn't work.
The Loop Engineering mode is more like autonomous driving. You set the destination and safety rules in advance, and the car drives itself—stopping at red lights, rerouting when traffic changes, parking automatically when you arrive. You only need to glance at the dashboard occasionally to confirm the direction is correct.
In other words, you transform from an operator who "prompts AI sentence by sentence manually" into a manager who "designs loop rules."

The 3 Core Elements of a Loop
Some might ask: Isn't a Loop just a scheduled task? Just have the model repeatedly execute the same operation, right?
Of course not!
Without judgment capability, a loop might cause the AI to treat errors as correct answers and continue running, going further off track. That's no different from a cron scheduled script; it doesn't qualify as Loop Engineering.
A truly reliable Loop requires 3 core elements:
- Clear Goal and Stopping Condition
You must tell the Loop when it's considered complete, and this completion standard must be verifiable. For example, all tests pass, lint has zero errors, all files are processed—these are good stopping conditions. But "optimize the code a bit" won't work because no one knows when it's considered optimized.
- Feedback Loop
After each loop iteration, the Loop must check the result of that round, deciding whether to continue to the next round or stop. The most common approach is to automatically run tests after code execution. If tests fail, continue fixing; if tests pass, stop.
- State Memory
The AI's conversation window is limited; once closed, it's gone. The Loop needs an external file to record current progress, such as which tasks are done, which are not, and what the conclusion of the previous loop was. This way, even if interrupted and restarted, it doesn't start from scratch.
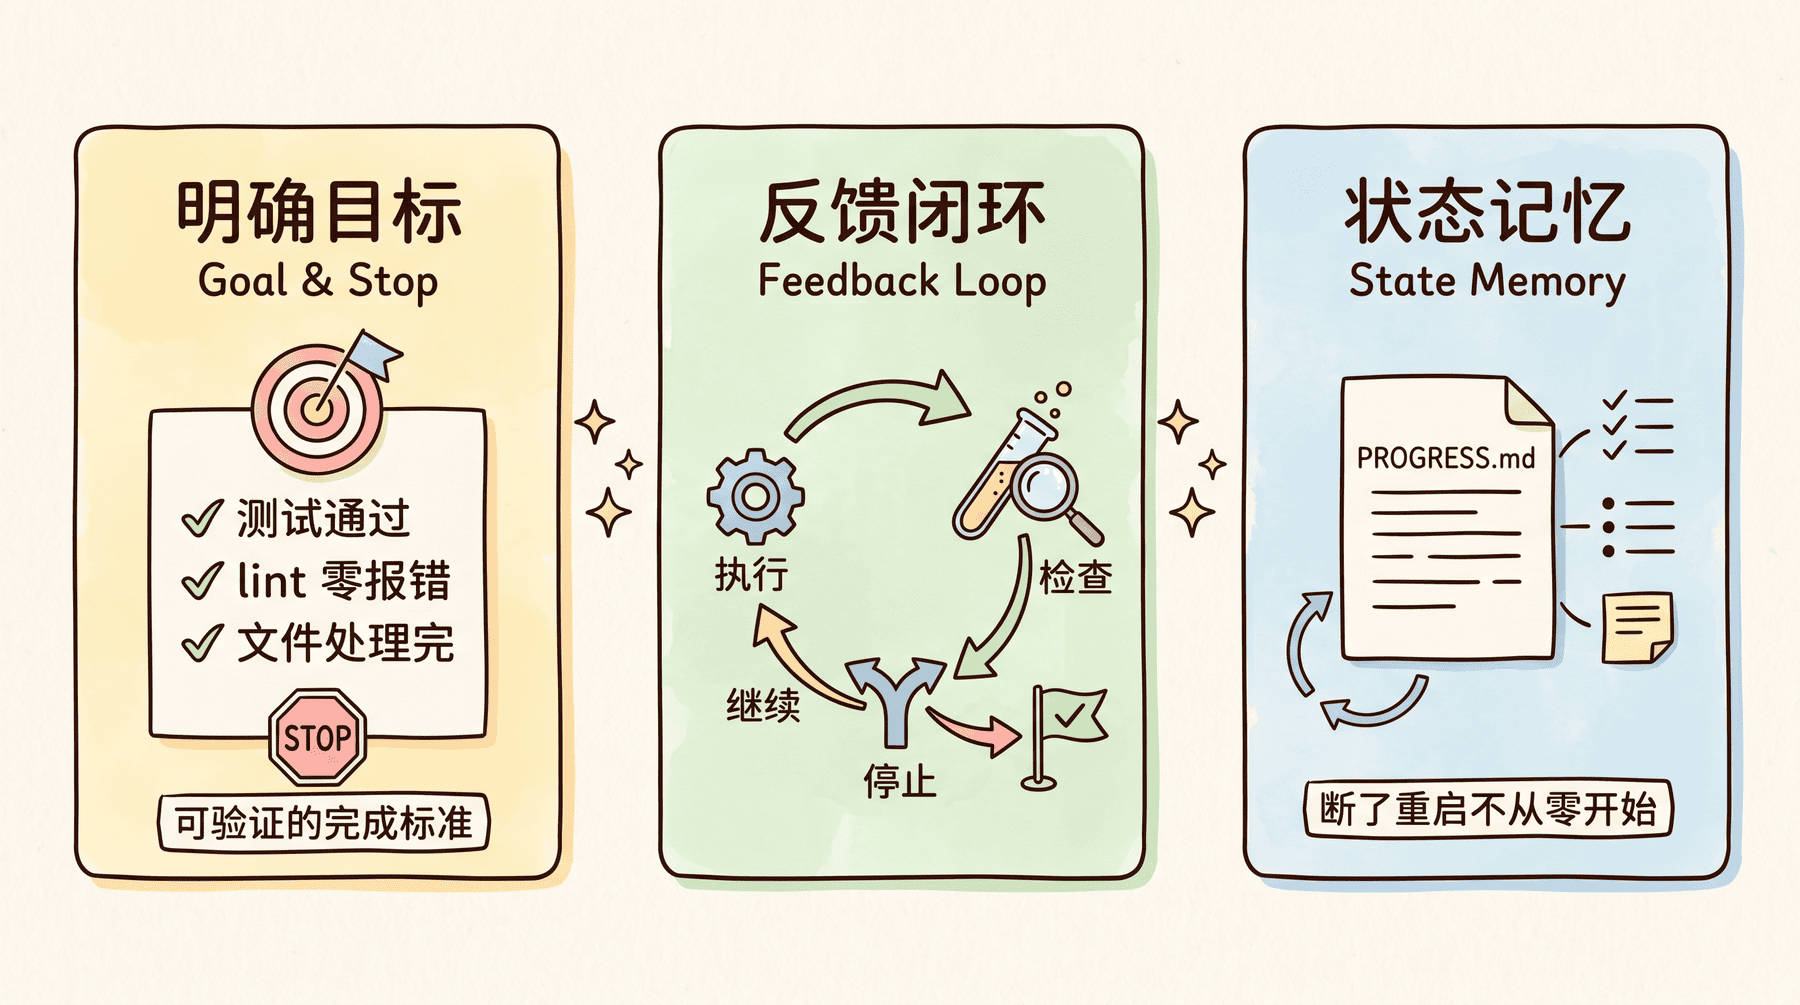
You'll see these three elements repeatedly in the hands-on section later. Just keep them in mind for now.
2. The Evolution of AI Programming
Loop didn't emerge out of thin air; it evolved step by step from previous generations of AI programming methodologies. Understanding the evolution of AI programming helps you know what problem Loop actually solves and why it's needed.
Here's a brief overview of this evolutionary path:
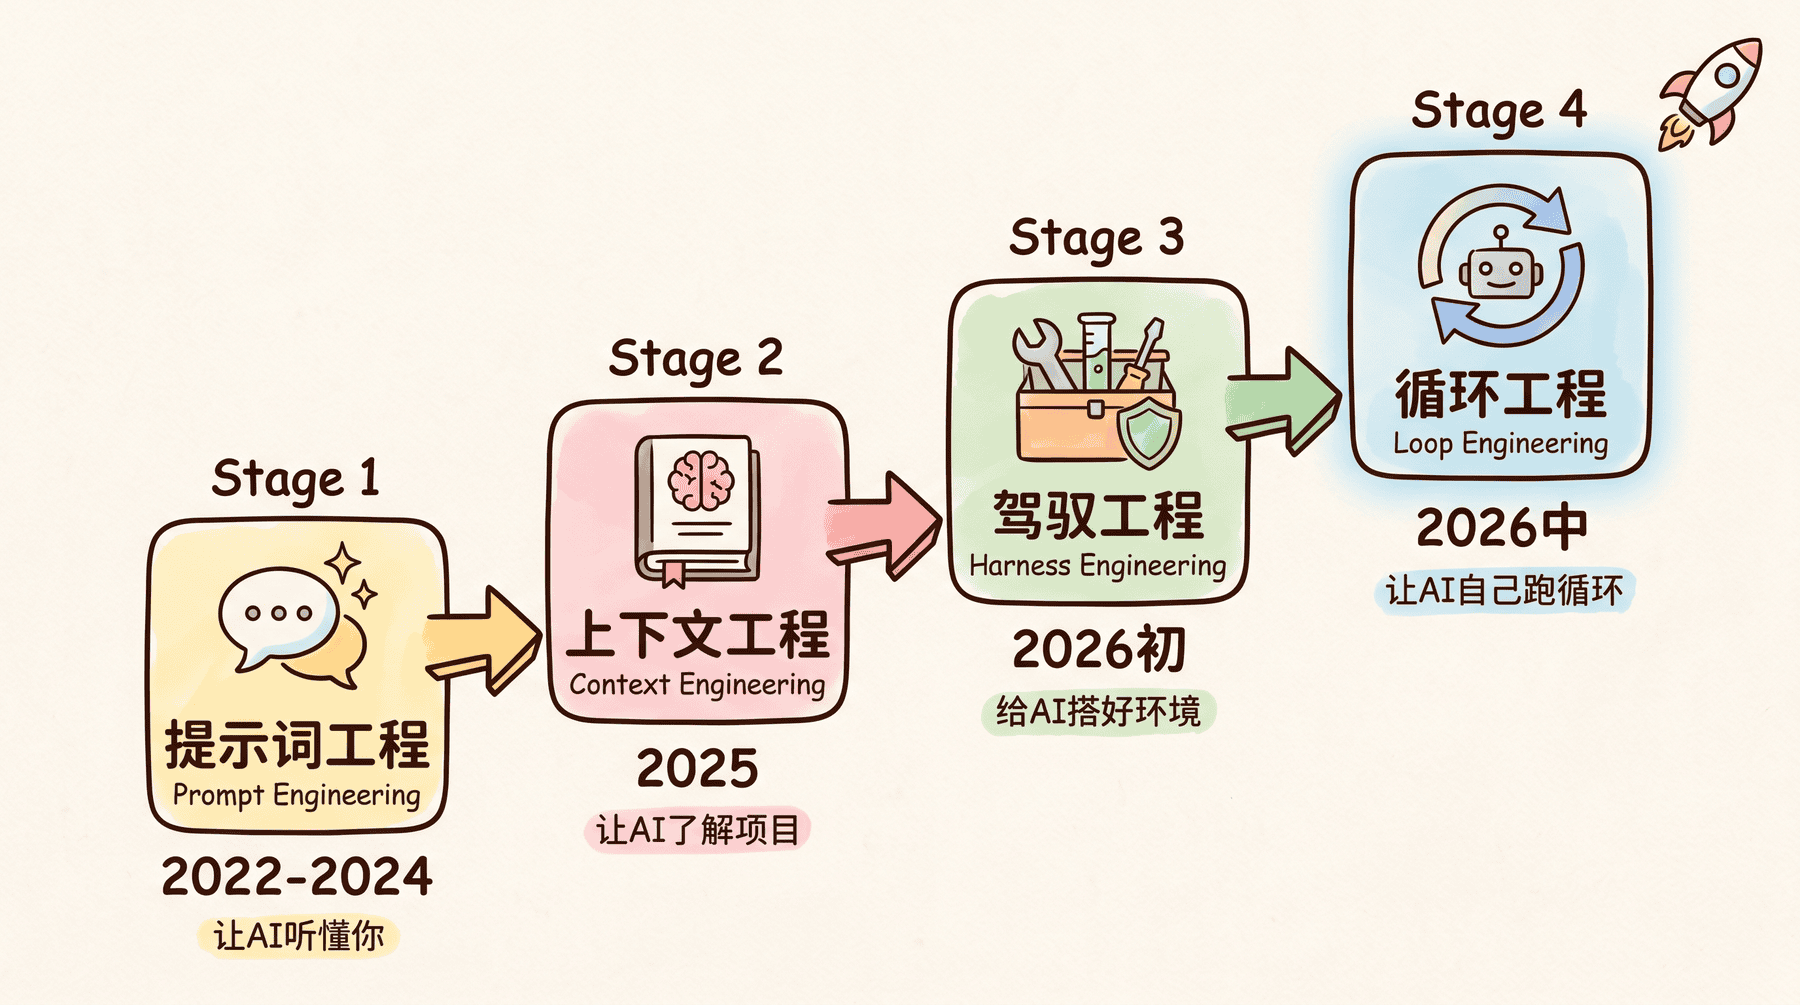
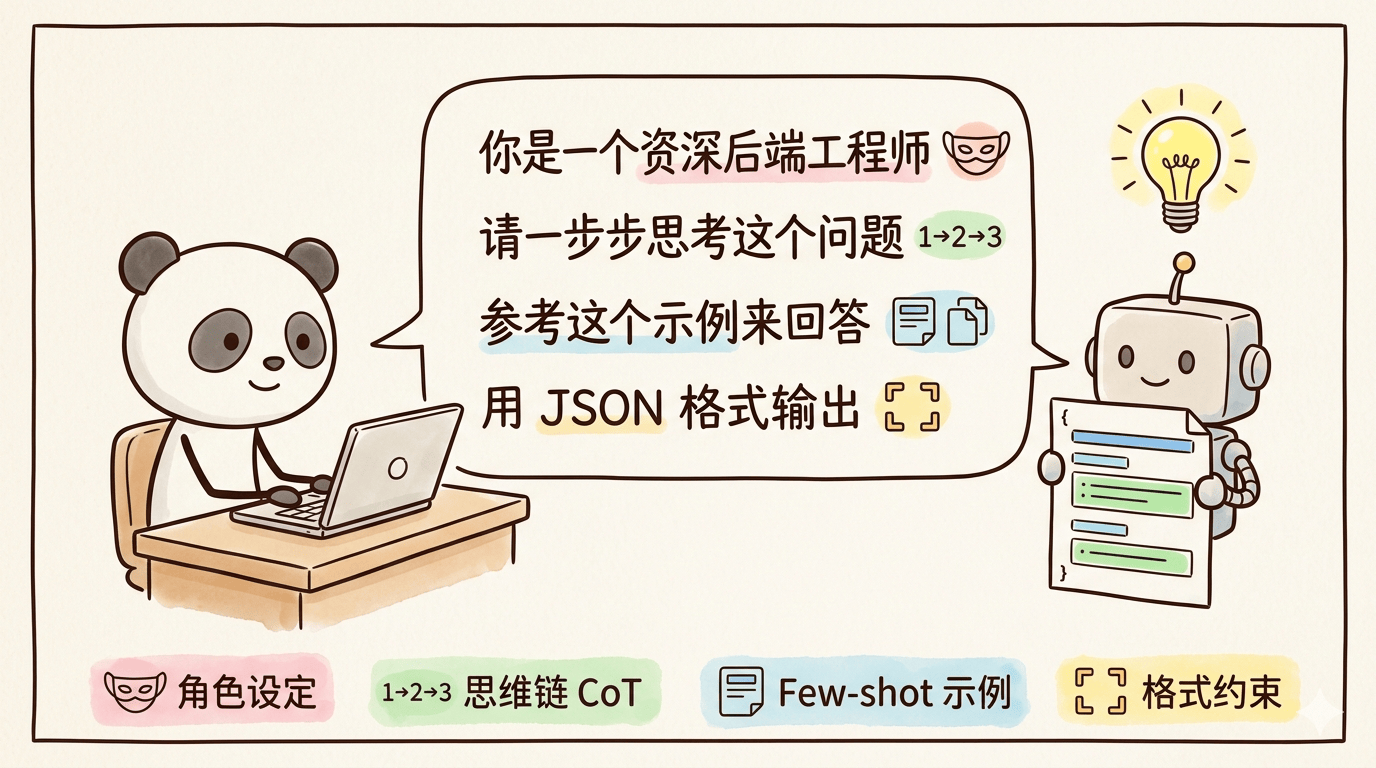
1. Prompt Engineering (2022 ~ 2024)
Focused on how to make AI understand your needs through conversation. For example, setting roles for AI, constraining output formats, using chain-of-thought to make it think step by step.
The core problem Prompt Engineering solved was "AI giving irrelevant answers." Mastering prompt writing could significantly improve output quality.
2. Context Engineering (2025)
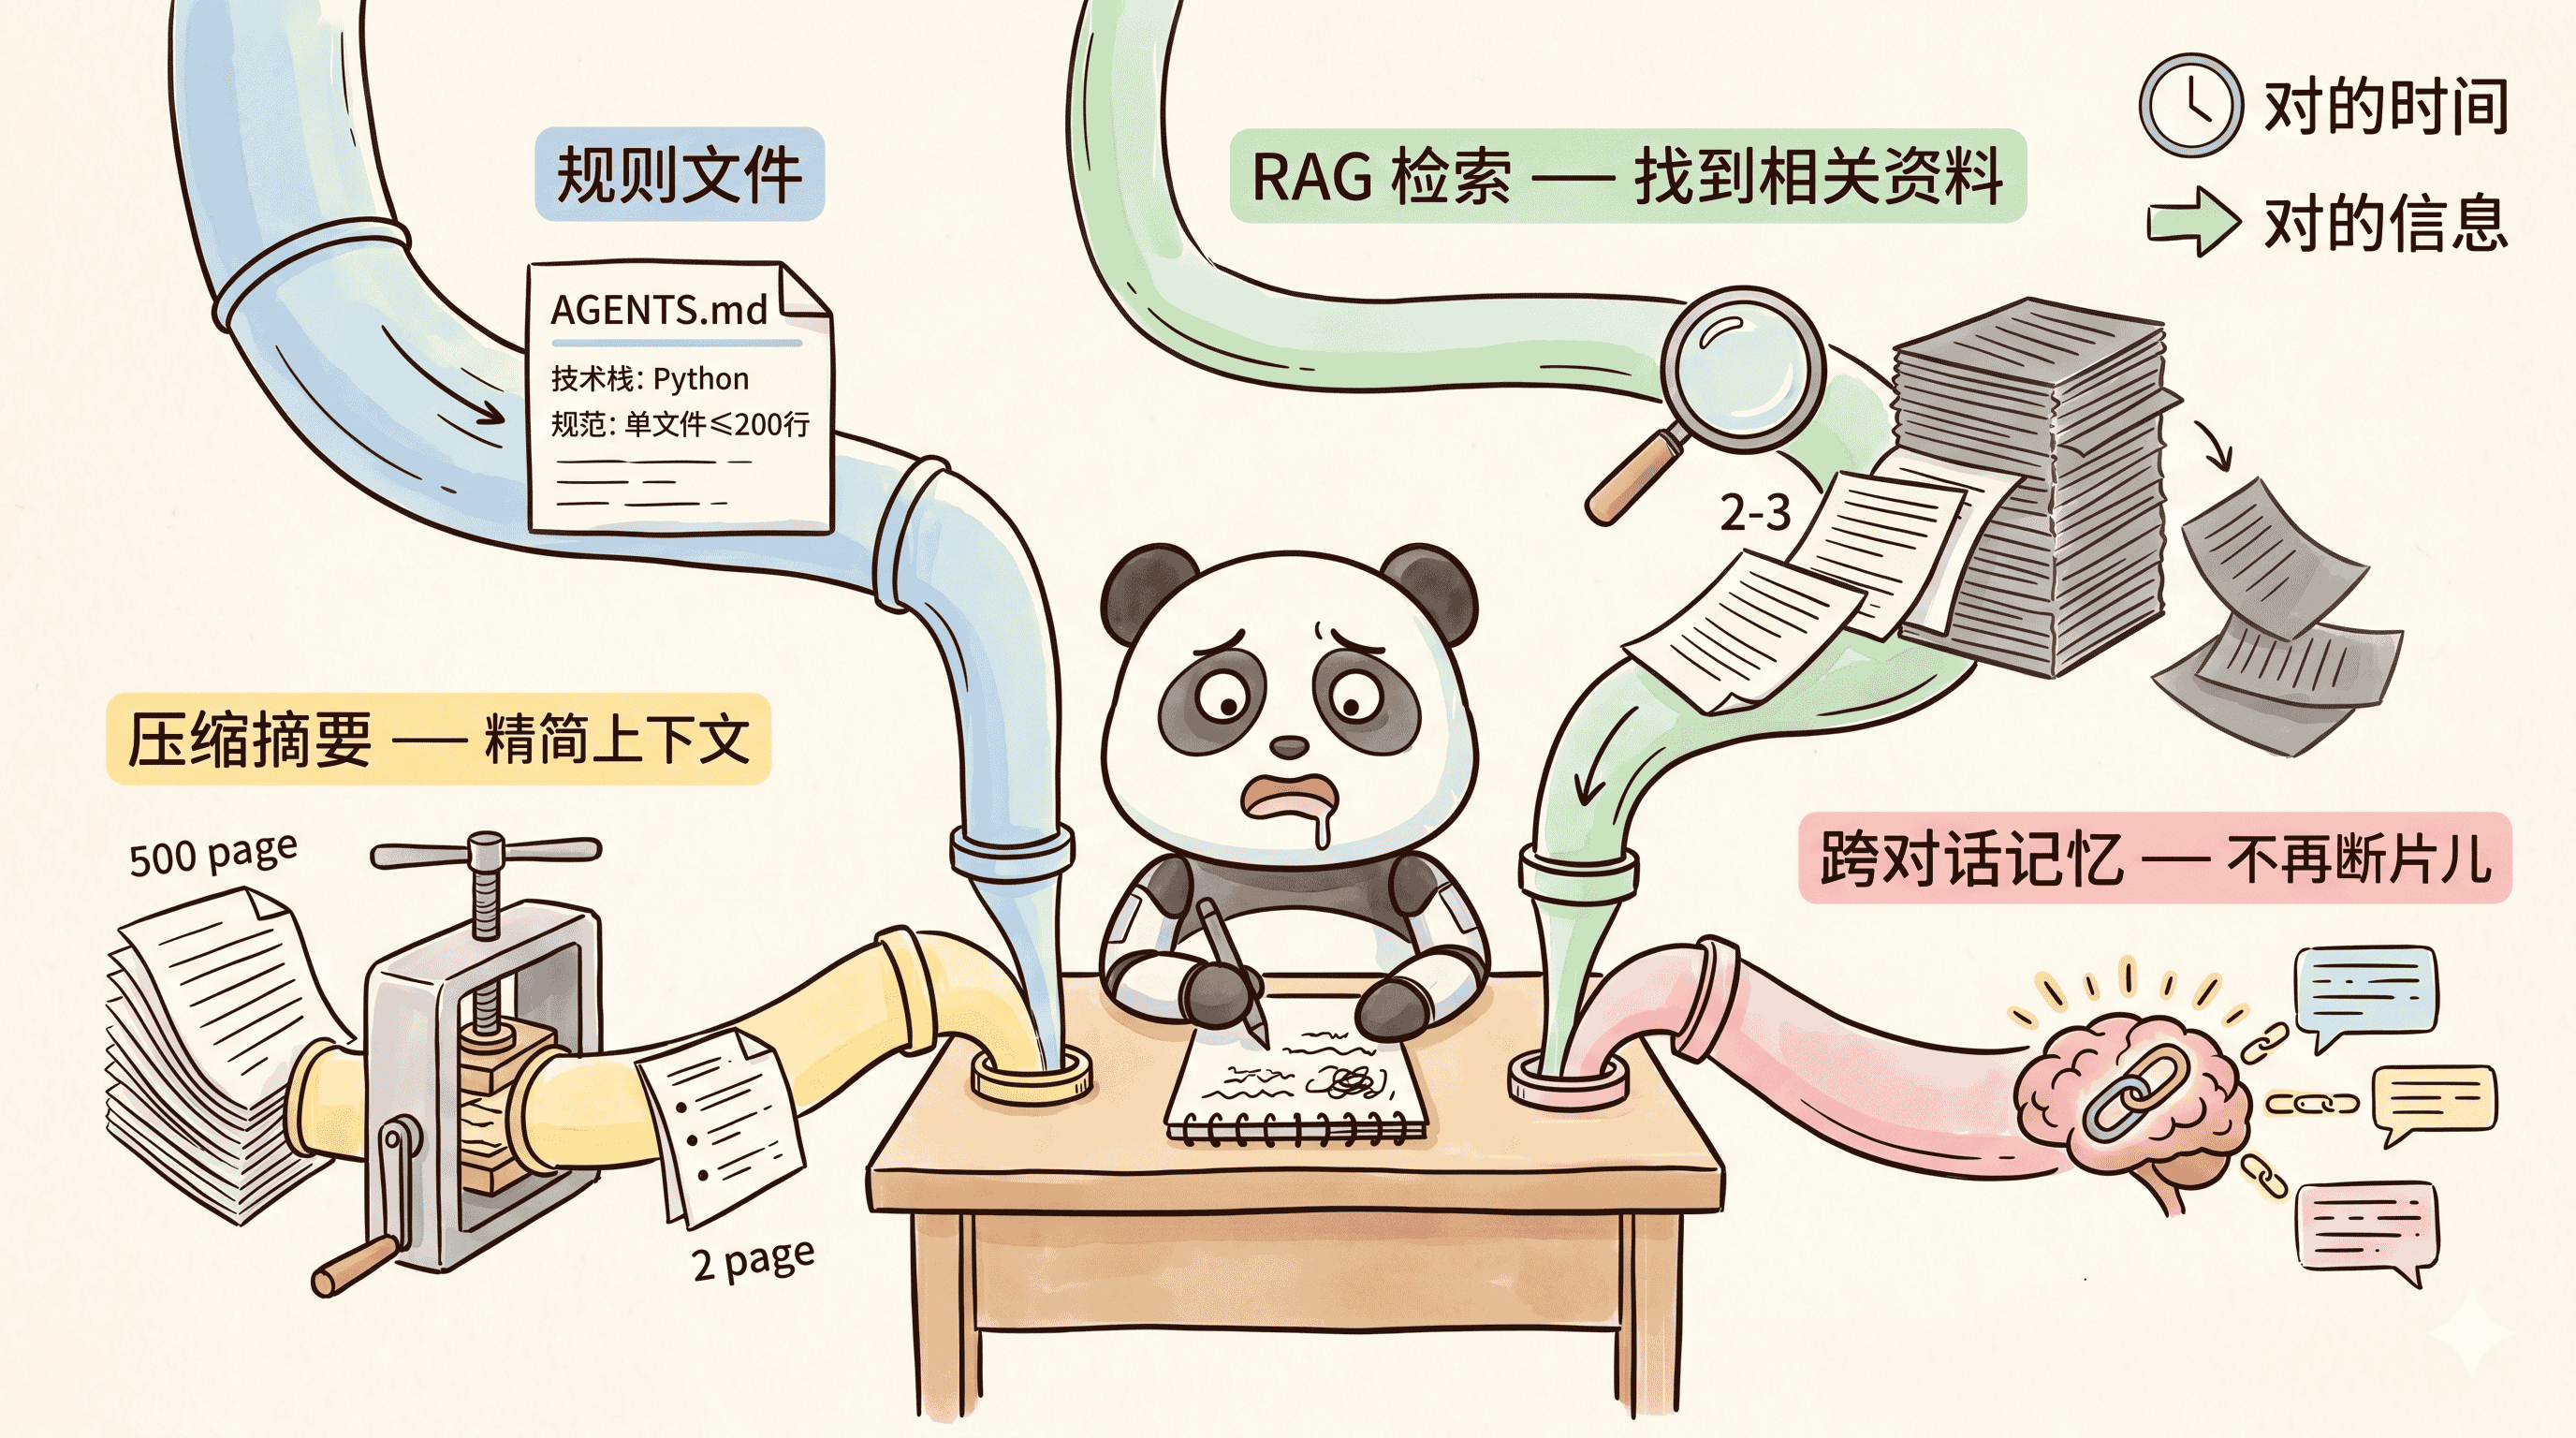
Writing good prompts alone wasn't enough; AI also needed to understand your project background to give reliable answers.
Context Engineering focuses on feeding the right information to AI at the right time.
For example, writing AGENTS.md rule files to let AI understand project background, using RAG to allow AI to retrieve relevant materials, and establishing cross-conversation memory mechanisms for AI.
The core problem Context Engineering solved was "AI's answers being detached from reality." With good context management, AI's output could better fit your project's actual situation.
3. Harness Engineering (Early 2026)
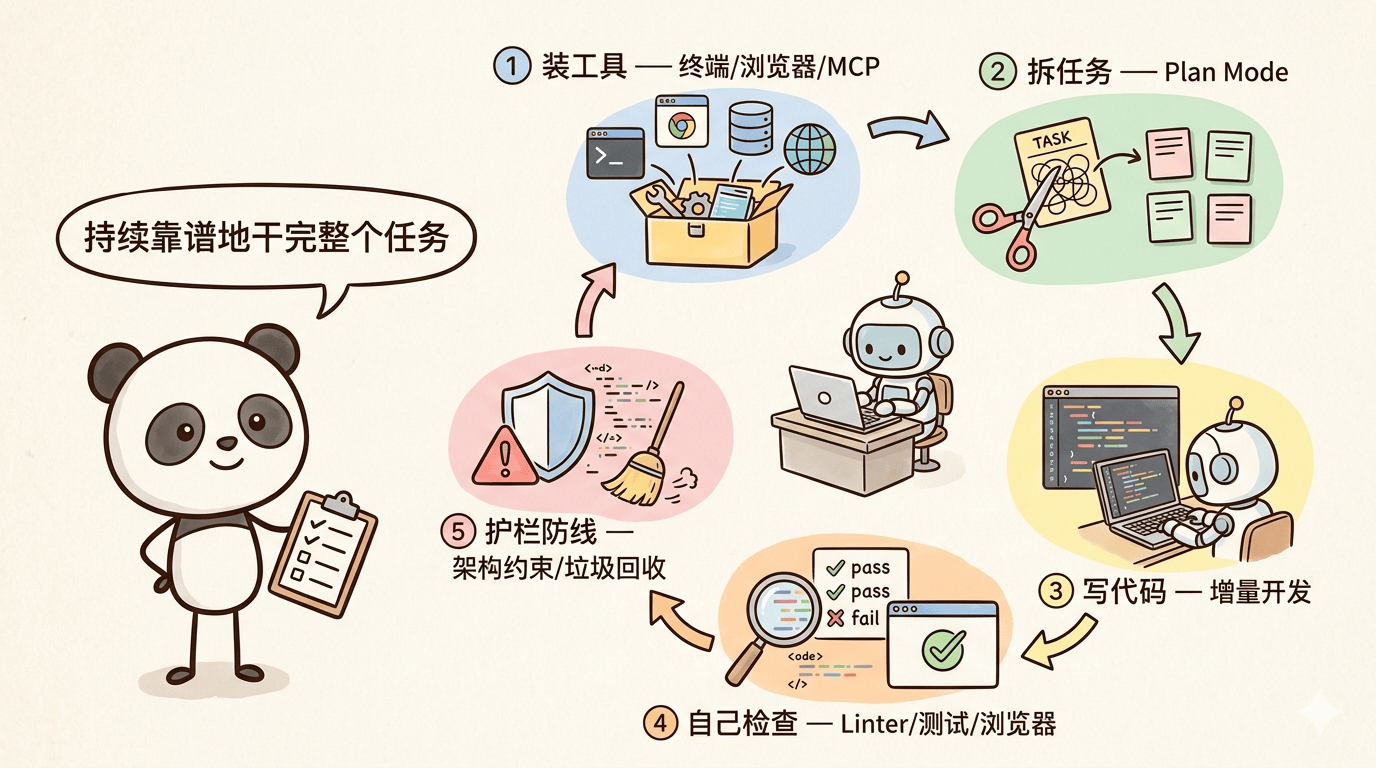
With context, AI could understand your project, but to make it truly do good work, you needed to build a complete, reliable working environment.
Besides providing appropriate context information to AI, you also needed to equip it with tools, break down tasks, set up tests, and prevent code rot.
With a good Harness in place, AI could produce stable and reliable output in an environment with tools, tests, and constraints.
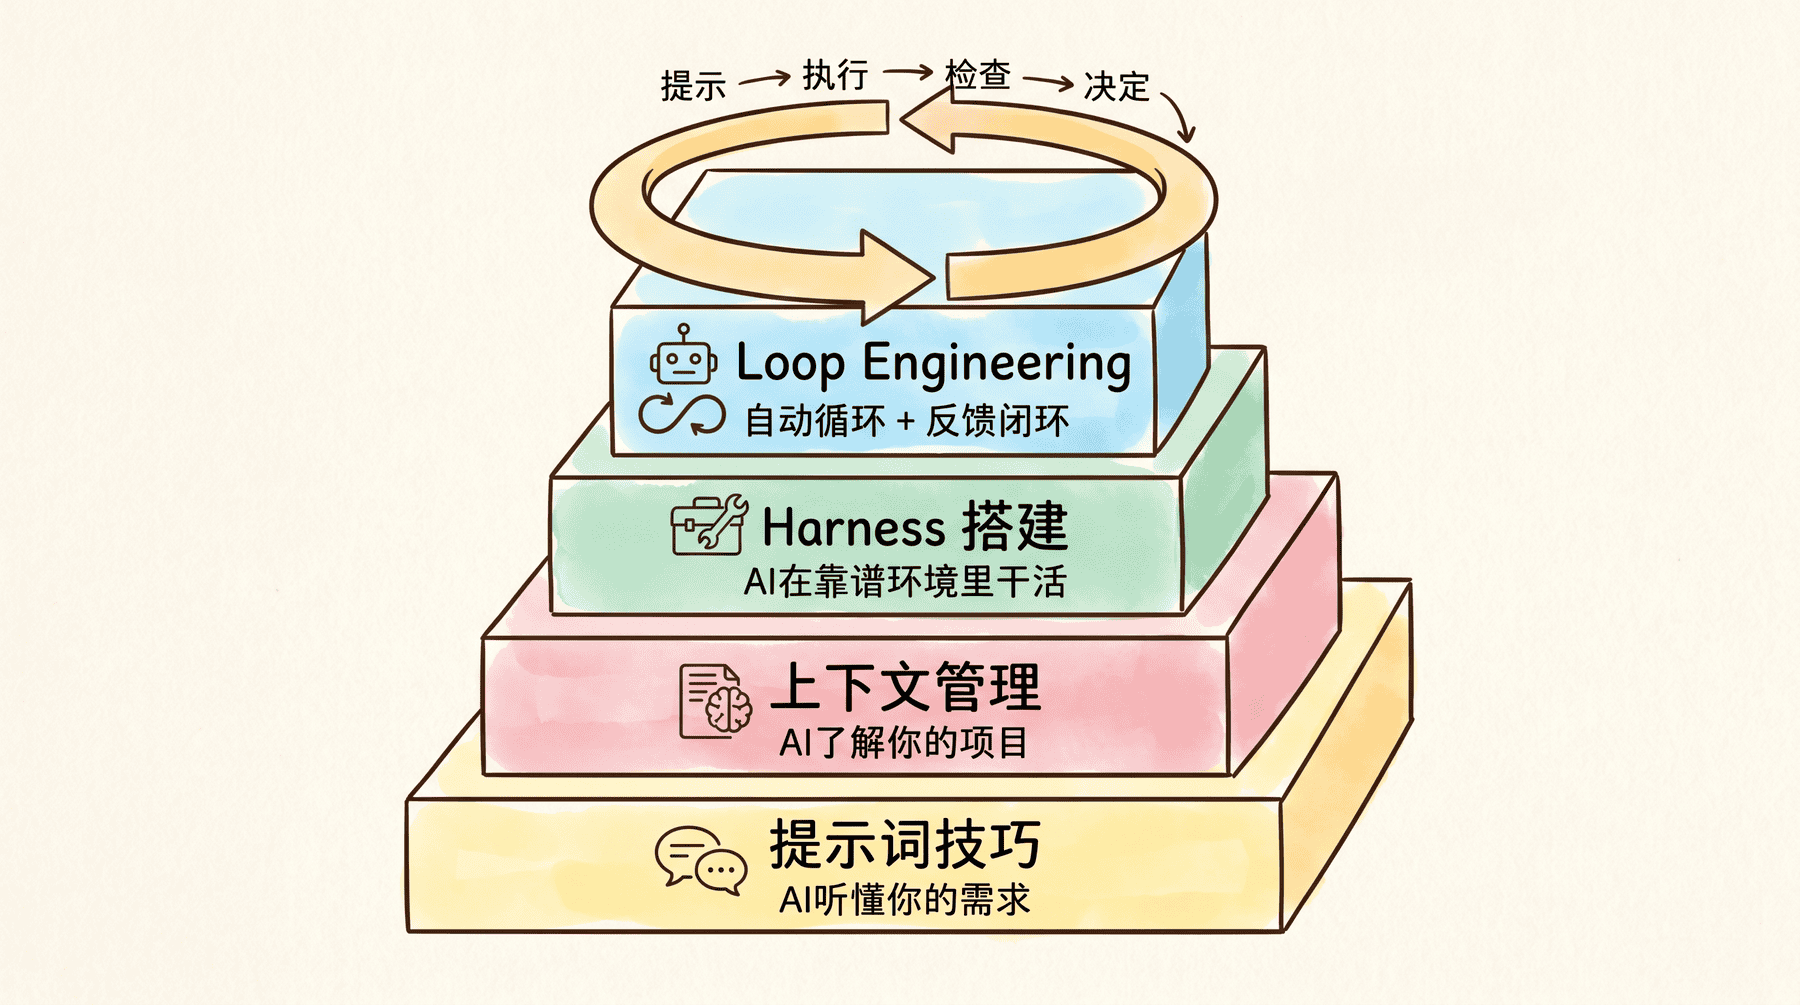
4. Loop Engineering (Mid 2026)
Focuses on how to make AI form its own work cycle.
With the first three steps done well, AI can already work in a reliable environment, but you still have to push it step by step. Loop aims to solve this problem: you hand over the tasks of "prompting, checking, deciding next steps" to a system that executes them in a loop, and you only need to set the goal and stopping conditions. AI can then run on its own until the goal is achieved.
These four are layered and inclusive. Prompting techniques, context management, and Harness building—all these capabilities are needed within a Loop. Loop simply adds a layer of "automatic loop + feedback loop" mechanism on top of these foundations.
Many students easily confuse Harness and Loop.
If we compare AI to a horse, Harness is the reins, saddle, and fence you put on the horse, and then you ride the horse manually. Loop, on the other hand, is like setting a patrol route, then not getting on the horse, letting the horse run around the route by itself. After each lap, it automatically checks for anomalies. If it finds a problem, it handles it and continues to the next lap. You transform from the rider into the route designer.
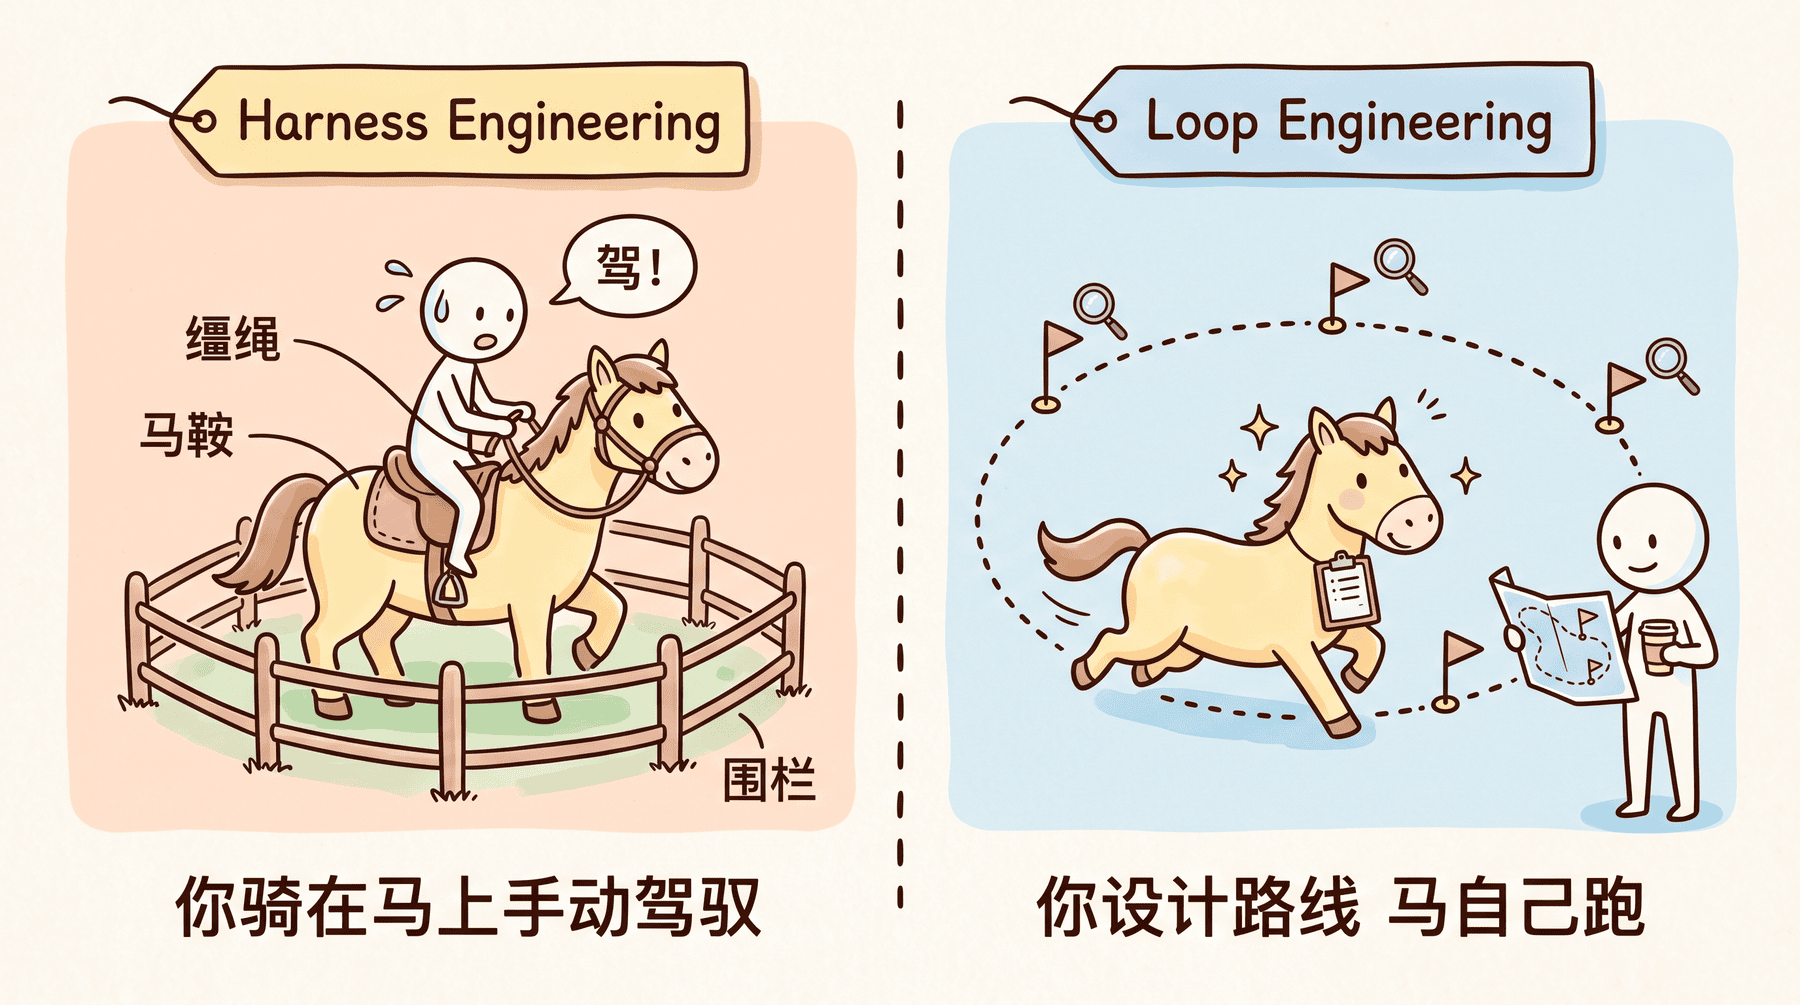
However, Loop Engineering is still a very early concept, and the industry hasn't established unified standards or best practices yet. It's recommended to first solidify the Harness foundation; learning Loop will be much easier then.
3. Hands-on Loop Experience
After understanding the basic concepts, let's jump straight into practice, using 3 AI tools simultaneously to experience what Loop feels like in actual development.
Currently, Claude Code and Codex have built-in Loop-related commands that can be used directly. Cursor doesn't have native Loop commands yet, but the same idea can be implemented through prompt design. Let's demonstrate each below.
Claude Code Loop Practice
Claude Code provides two Loop-related slash commands: /goal and /loop, corresponding to two different usage scenarios.
/goal Command
The /goal command makes AI work continuously until your set goal is achieved.
You provide a verifiable goal condition, AI starts working, and after each round, an independent small model judges whether "the goal has been achieved." If not, AI automatically starts the next round to continue advancing; if achieved, it stops and reports completion.
Note that the model judging whether the goal is achieved is separate from the model executing the task, avoiding bias from a single model.
For example, if I want Claude Code to fix the entire project's code, I can write:
/goal Fix the entire project's code until all tests pass and there are no errors
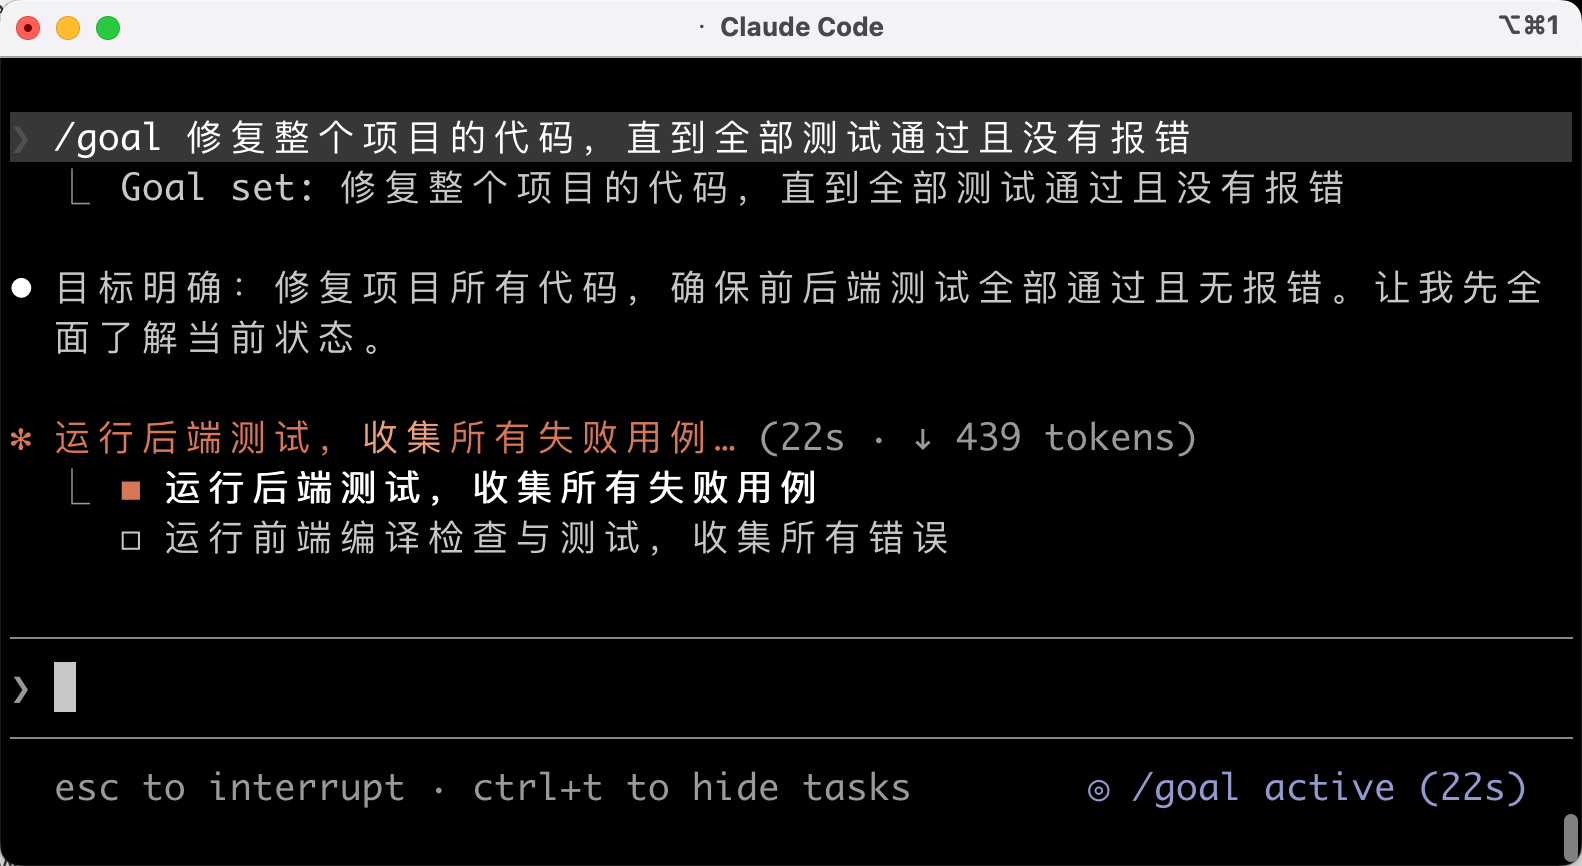
After execution, Claude immediately starts working until all tests pass and there are no errors. You don't need to intervene at all throughout the process.
There's also a tip: you can add a circuit breaker limit after the condition, like "stop if not done after 20 rounds," to prevent the AI from getting stuck in an infinite loop and burning tokens.
/goal is suitable for scenarios with clear termination conditions that are time-consuming to monitor manually, such as module migration, batch refactoring, fixing a test case until it passes, or processing a batch of issues with specific labels.
If you want to check progress midway, just type /goal without any parameters to see how long the current task has been running and how many tokens have been spent.
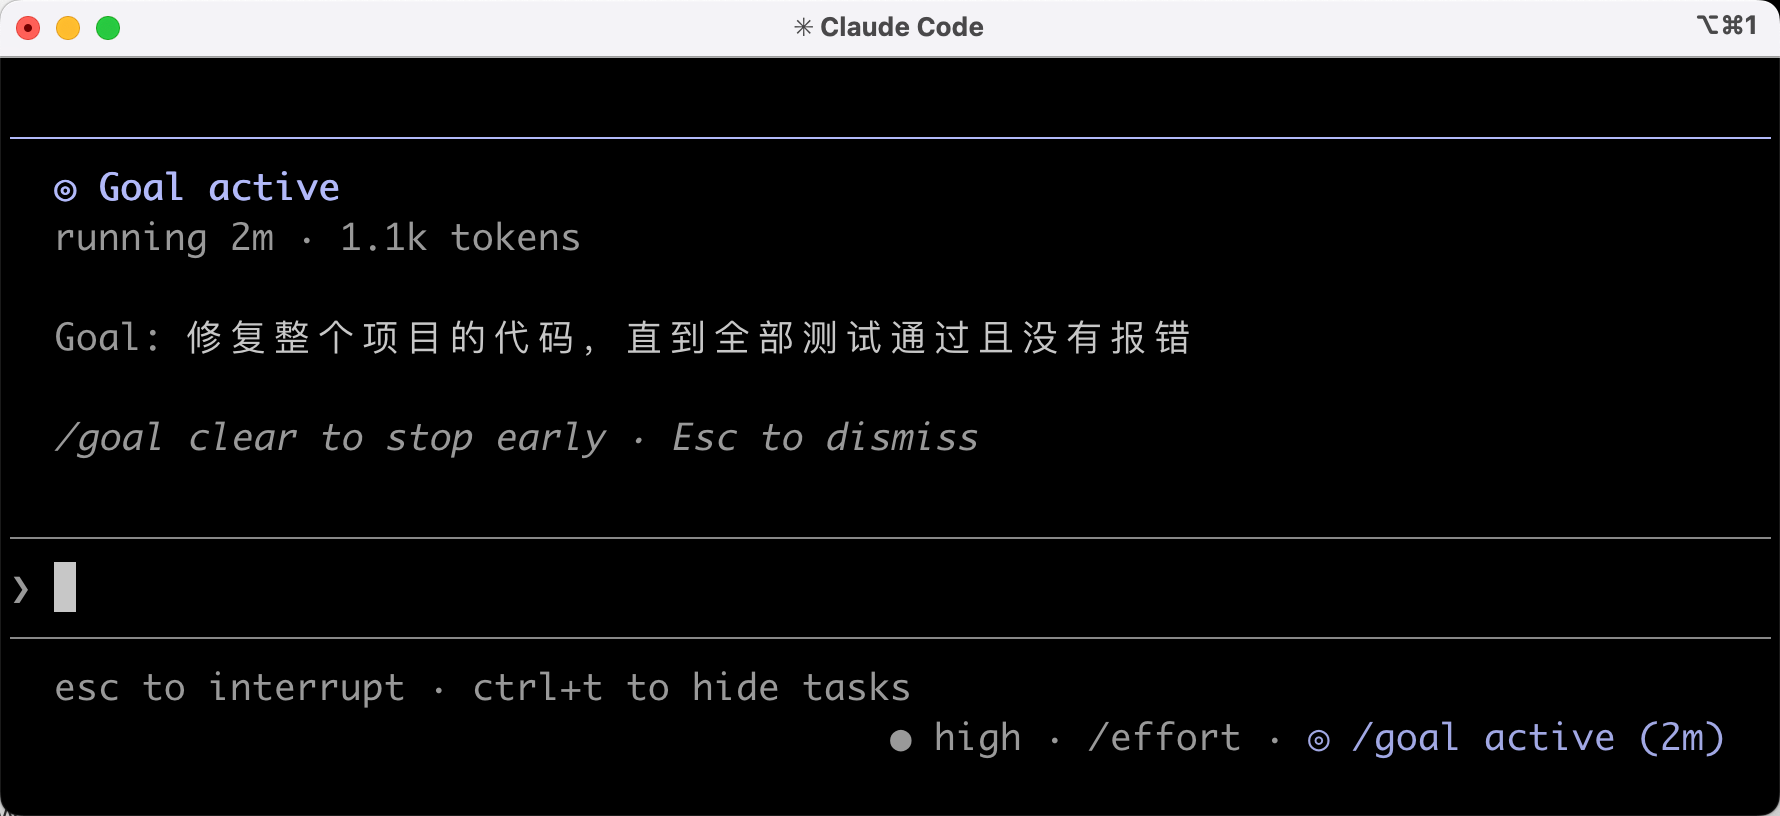
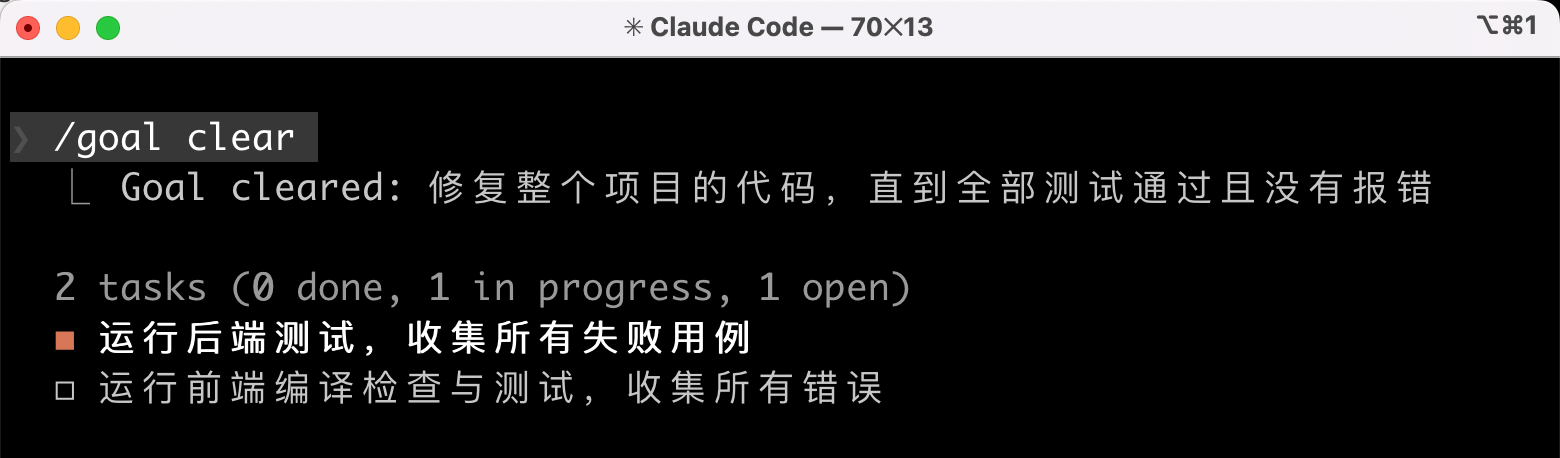
To stop early, use /goal clear:
/loop Command
The /loop command makes AI execute a certain operation cyclically at fixed time intervals.
For example, check deployment status every 5 minutes:
/loop 5m Check the deployment status of the project's frontend and backend
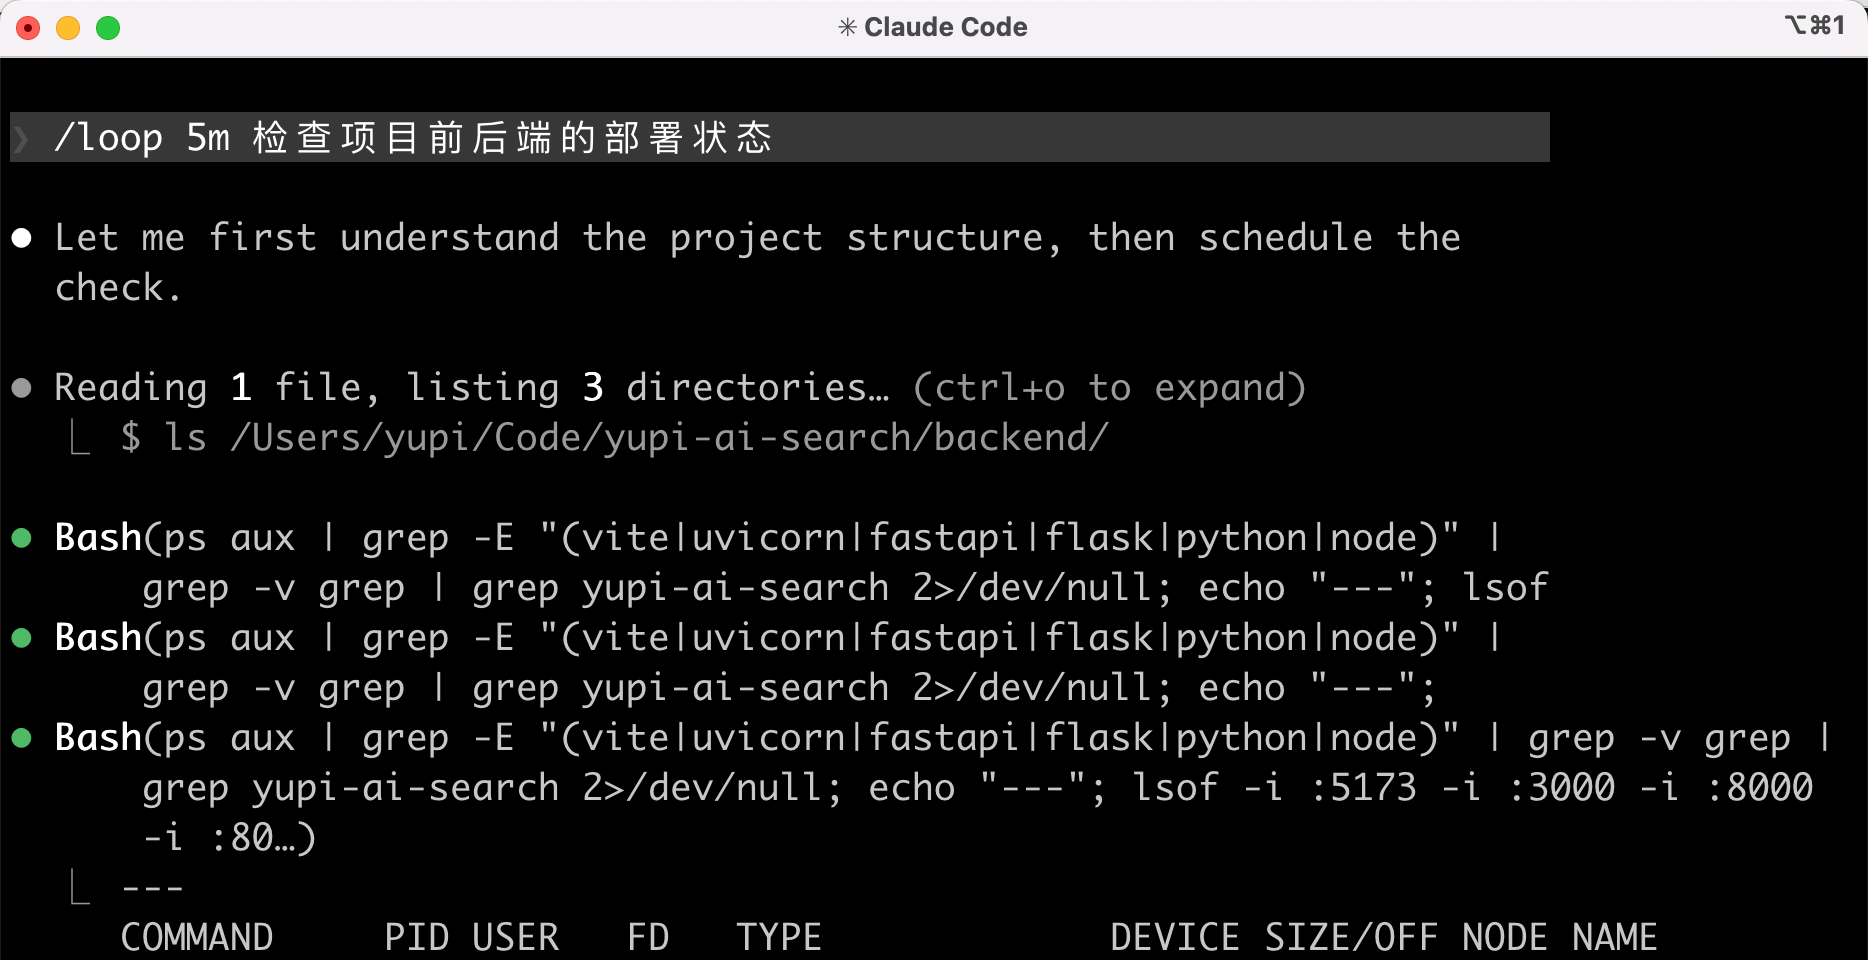
/loop is suitable for things that need regular monitoring, such as automatically notifying you when deployment is complete, checking for errors in online services at intervals, or periodically scanning for new security vulnerabilities in the codebase. Remember to stop the Loop after the task is done; otherwise, it will keep running in the background and consuming resources.
To summarize the difference between these two commands: /goal is "run until completion," suitable for one-time tasks with a clear endpoint; /loop is "run repeatedly at intervals," suitable for continuous monitoring without a clear endpoint. Both are implementations of Loop Engineering, just for different scenarios.

Codex Loop Practice
The Codex desktop app also has similar Loop capabilities, mainly implemented in two ways.
Setting a Goal
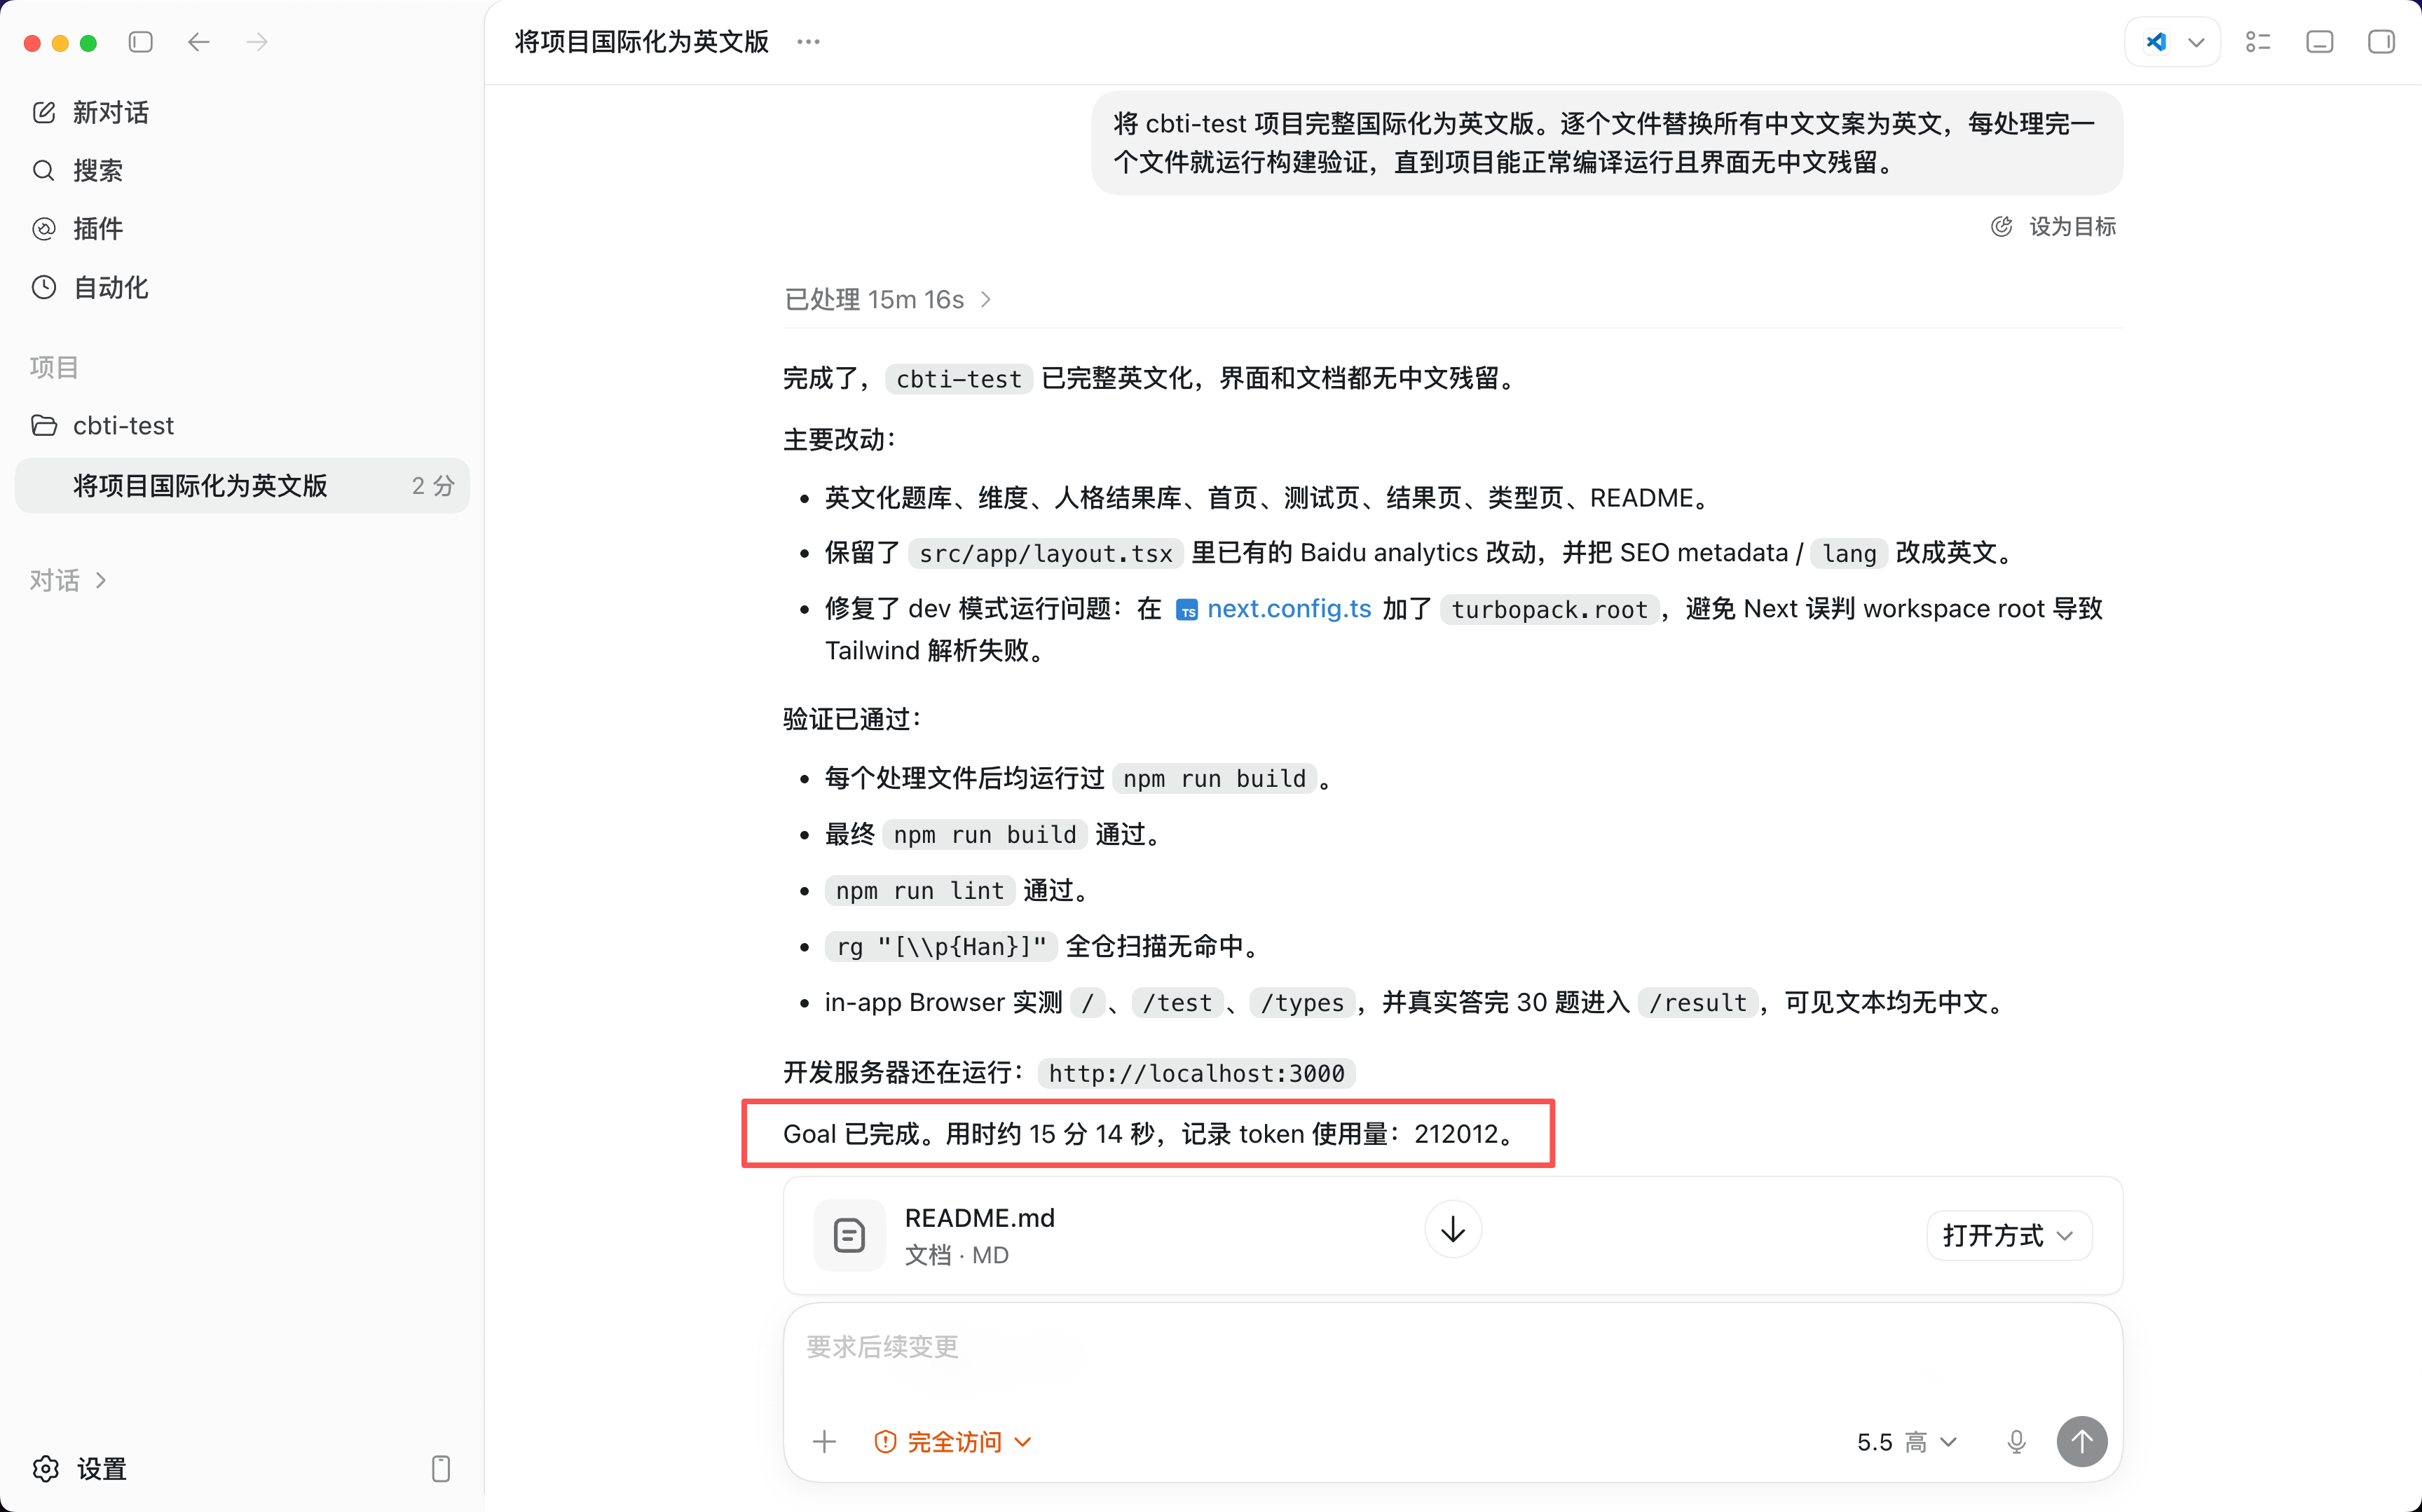
In the Codex app's dialog box, you can set a continuously running goal by typing /goal (or the Chinese equivalent /目标), similar to Claude Code's /goal. AI will work continuously until the goal is achieved.
For example, I want AI to do a complete internationalization transformation of my "Programmer Personality Test" project, translating all Chinese interfaces into English:
/goal Completely internationalize the cbti-test project to an English version. Replace all Chinese text in files one by one with English. After processing each file, run a build verification until the project compiles and runs normally with no Chinese text remaining.
After 15 minutes, AI completed the goal and output the token usage. Compared to letting AI do everything in one go, setting a goal and letting it develop step by step with automatic verification at each step results in much more stable final output quality.
Automations
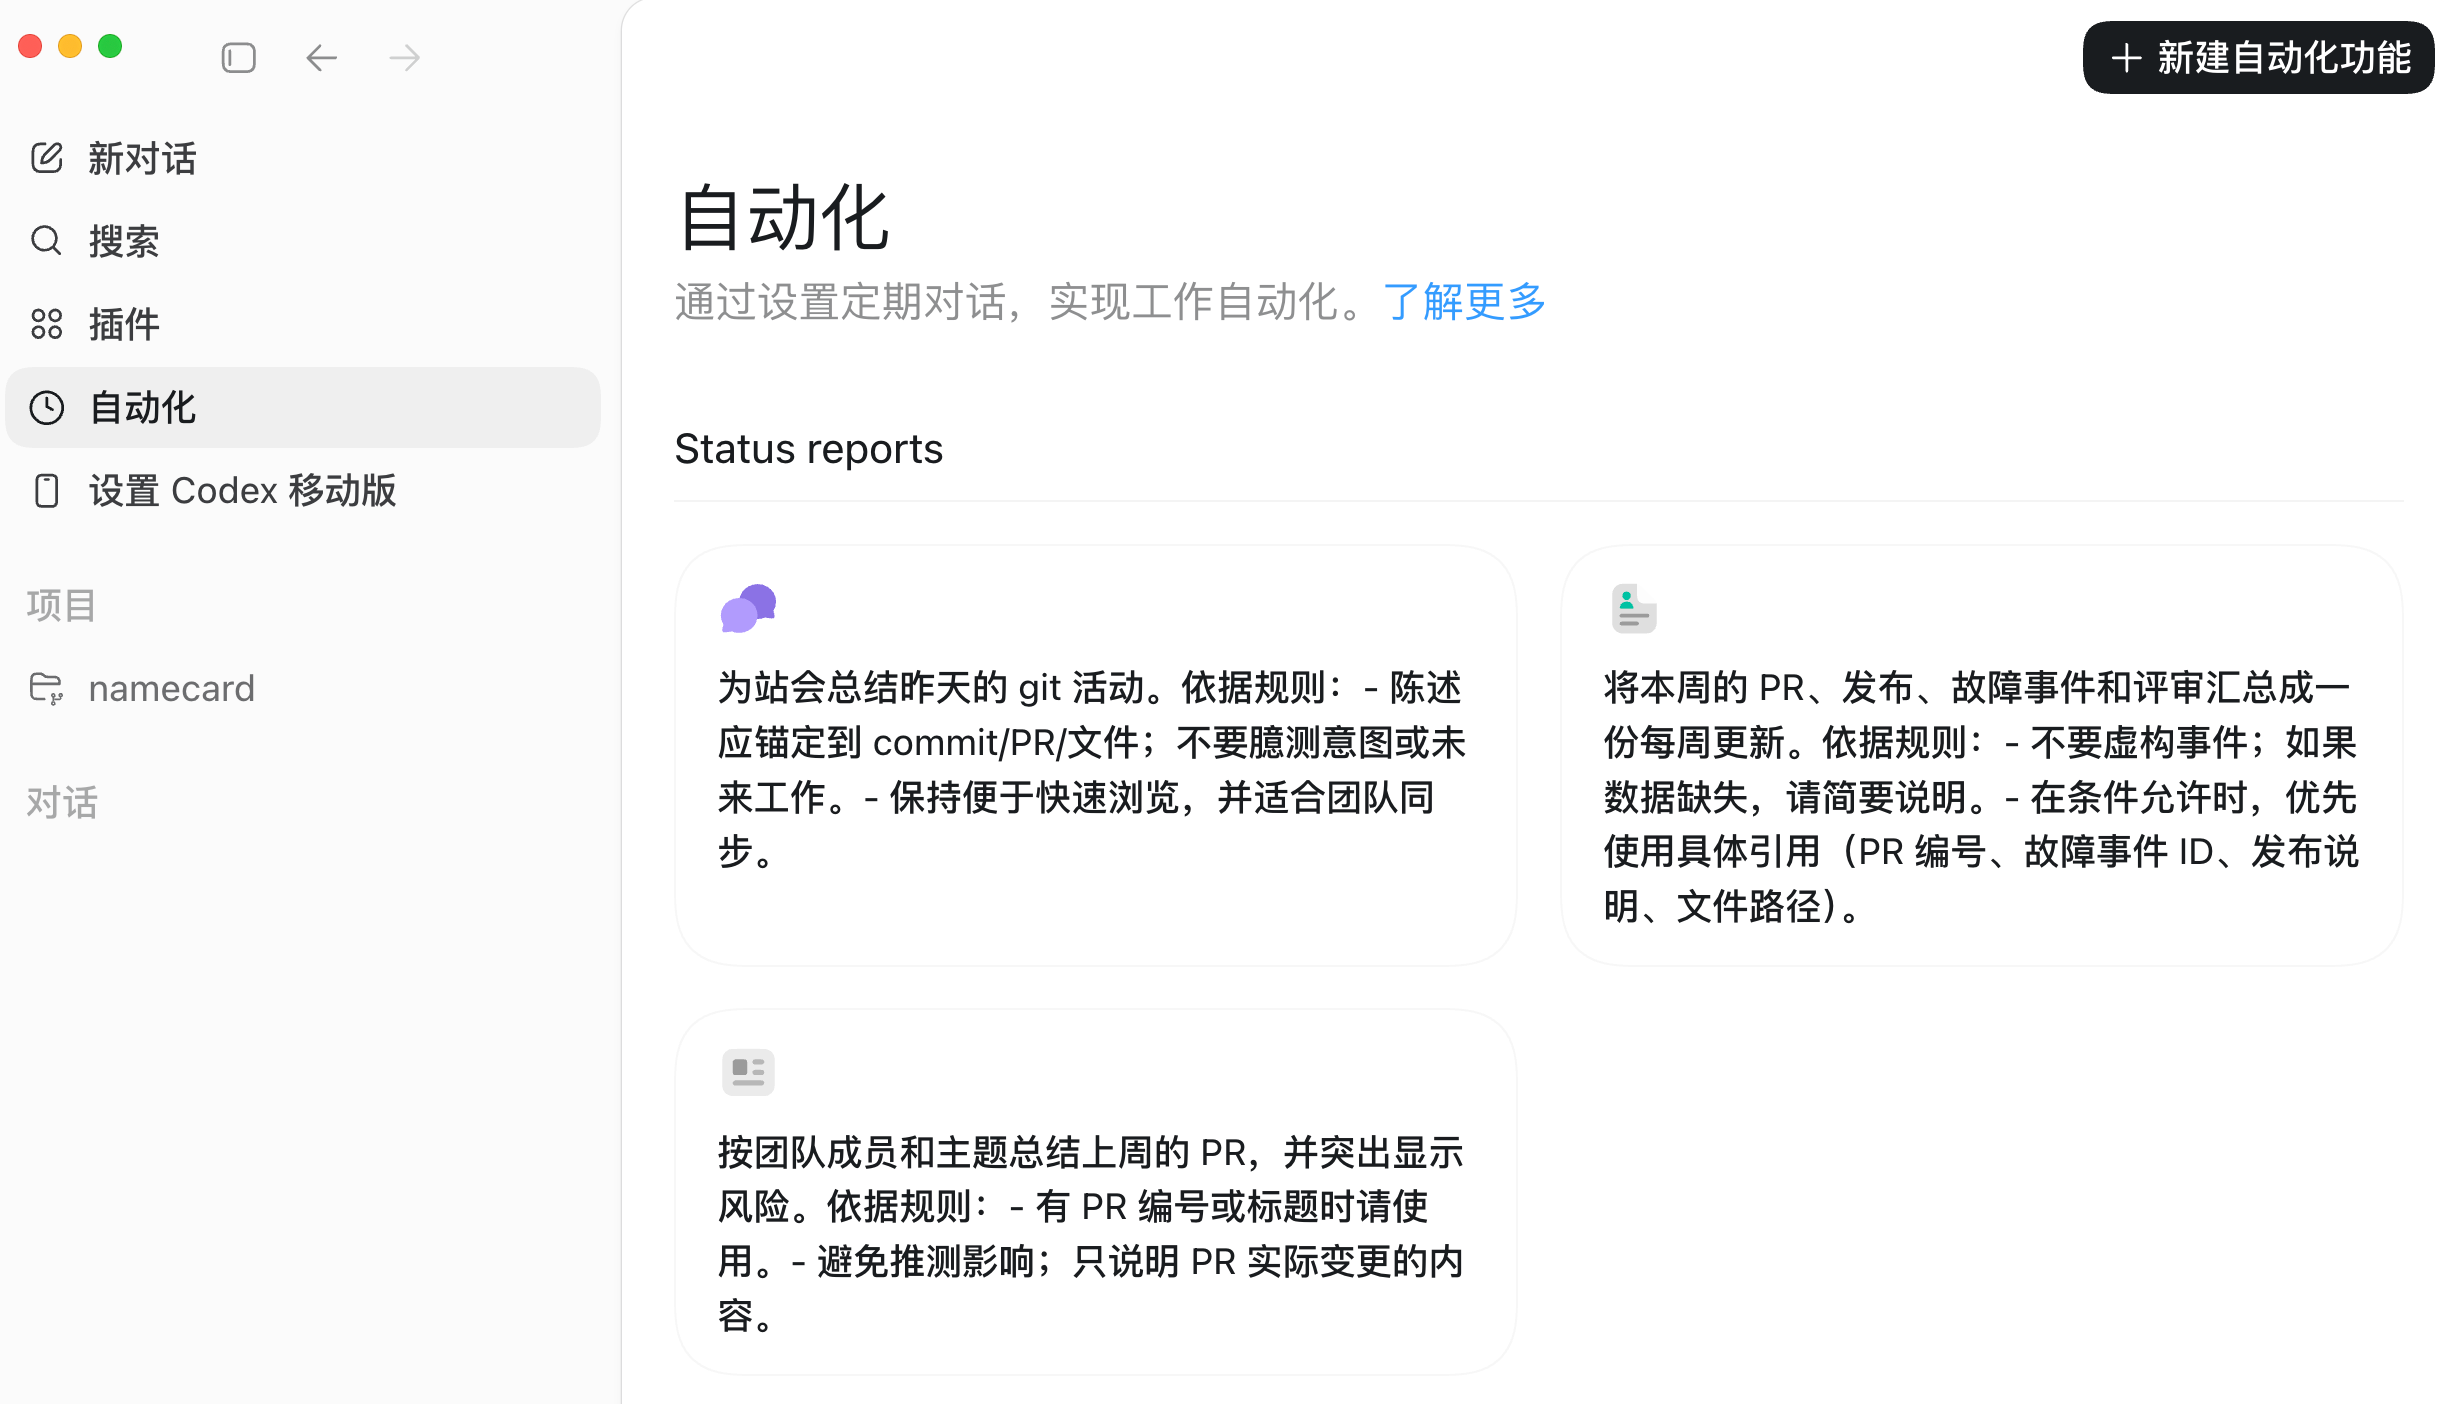
The Codex desktop app also has an "Automation" panel, similar to Claude Code's /loop, where you can configure scheduled automation tasks.
Enter the left-side automation panel to see some built-in templates from Codex, such as periodically summarizing code changes, checking for code issues, etc.
You can also create your own, for example, having AI collect hot topics in the AI programming field every morning:
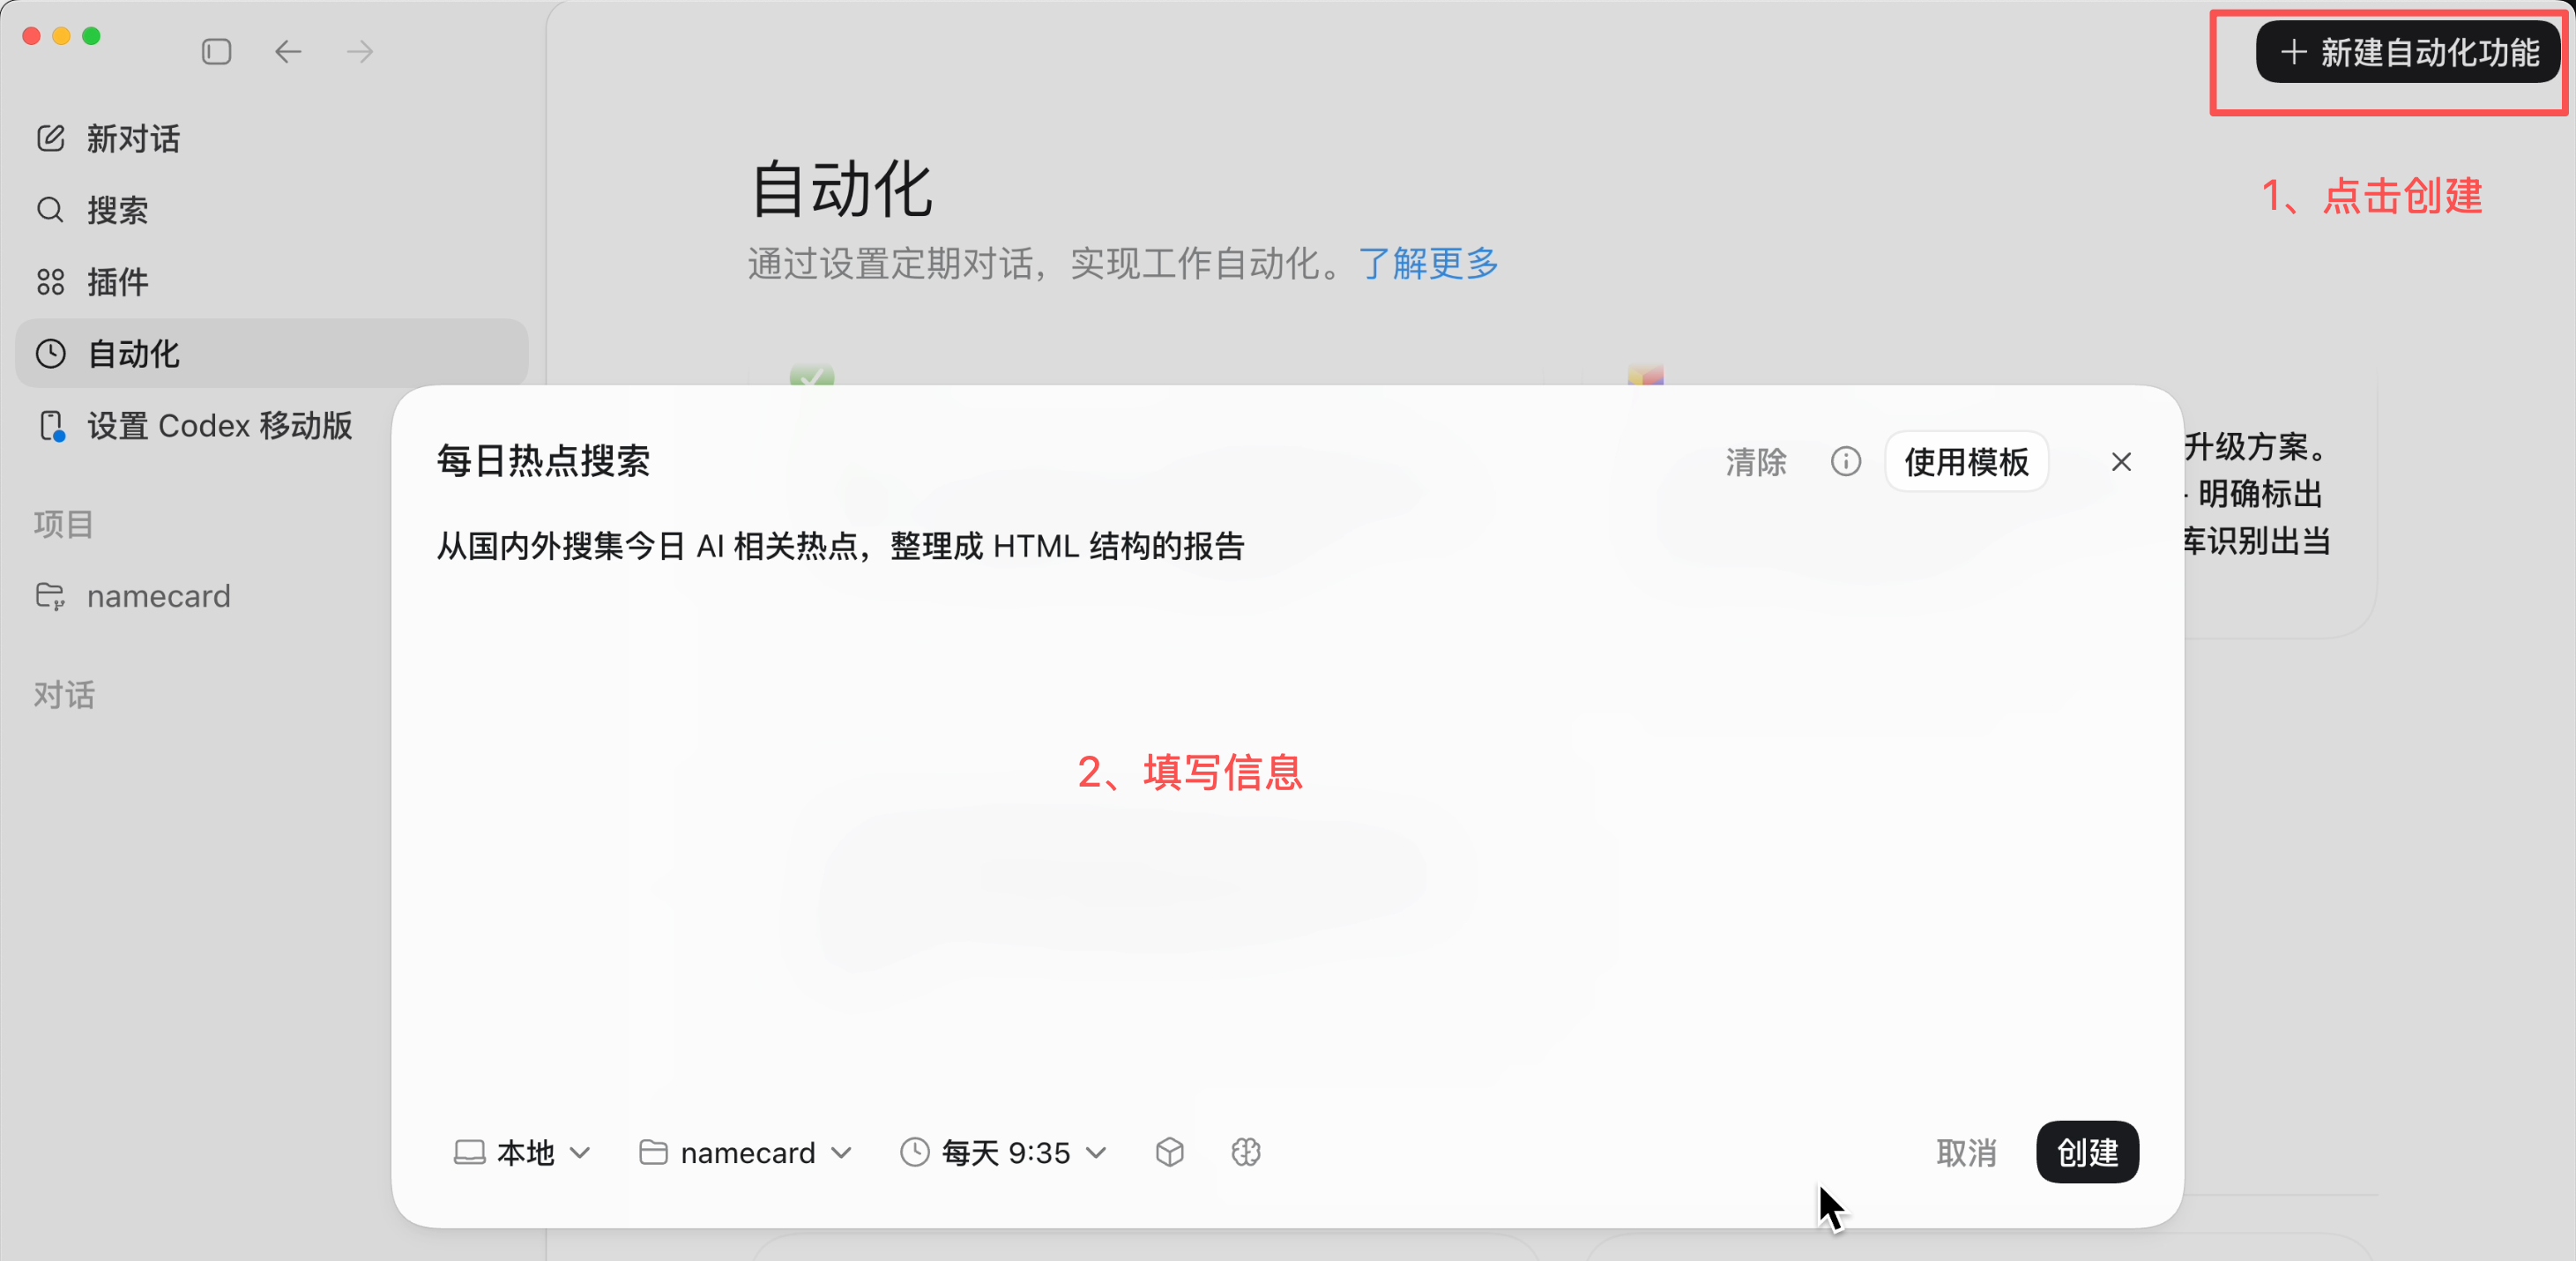
Once created, Codex will automatically start a conversation to execute the task when the time comes. You can also manually execute it once to see the effect first:
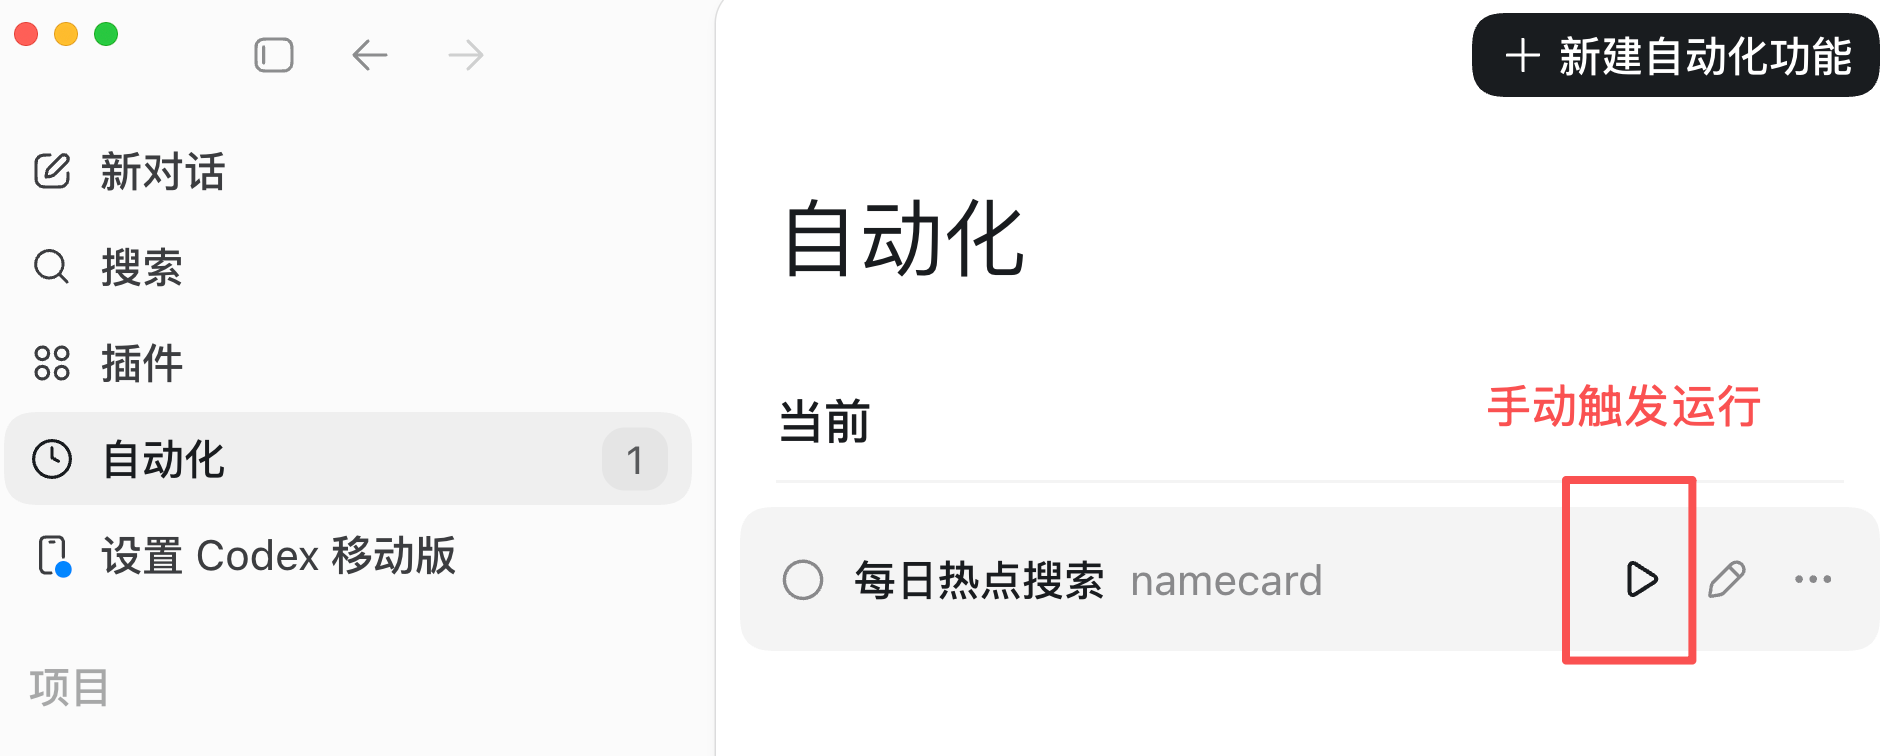
Click on a task to view detailed information:
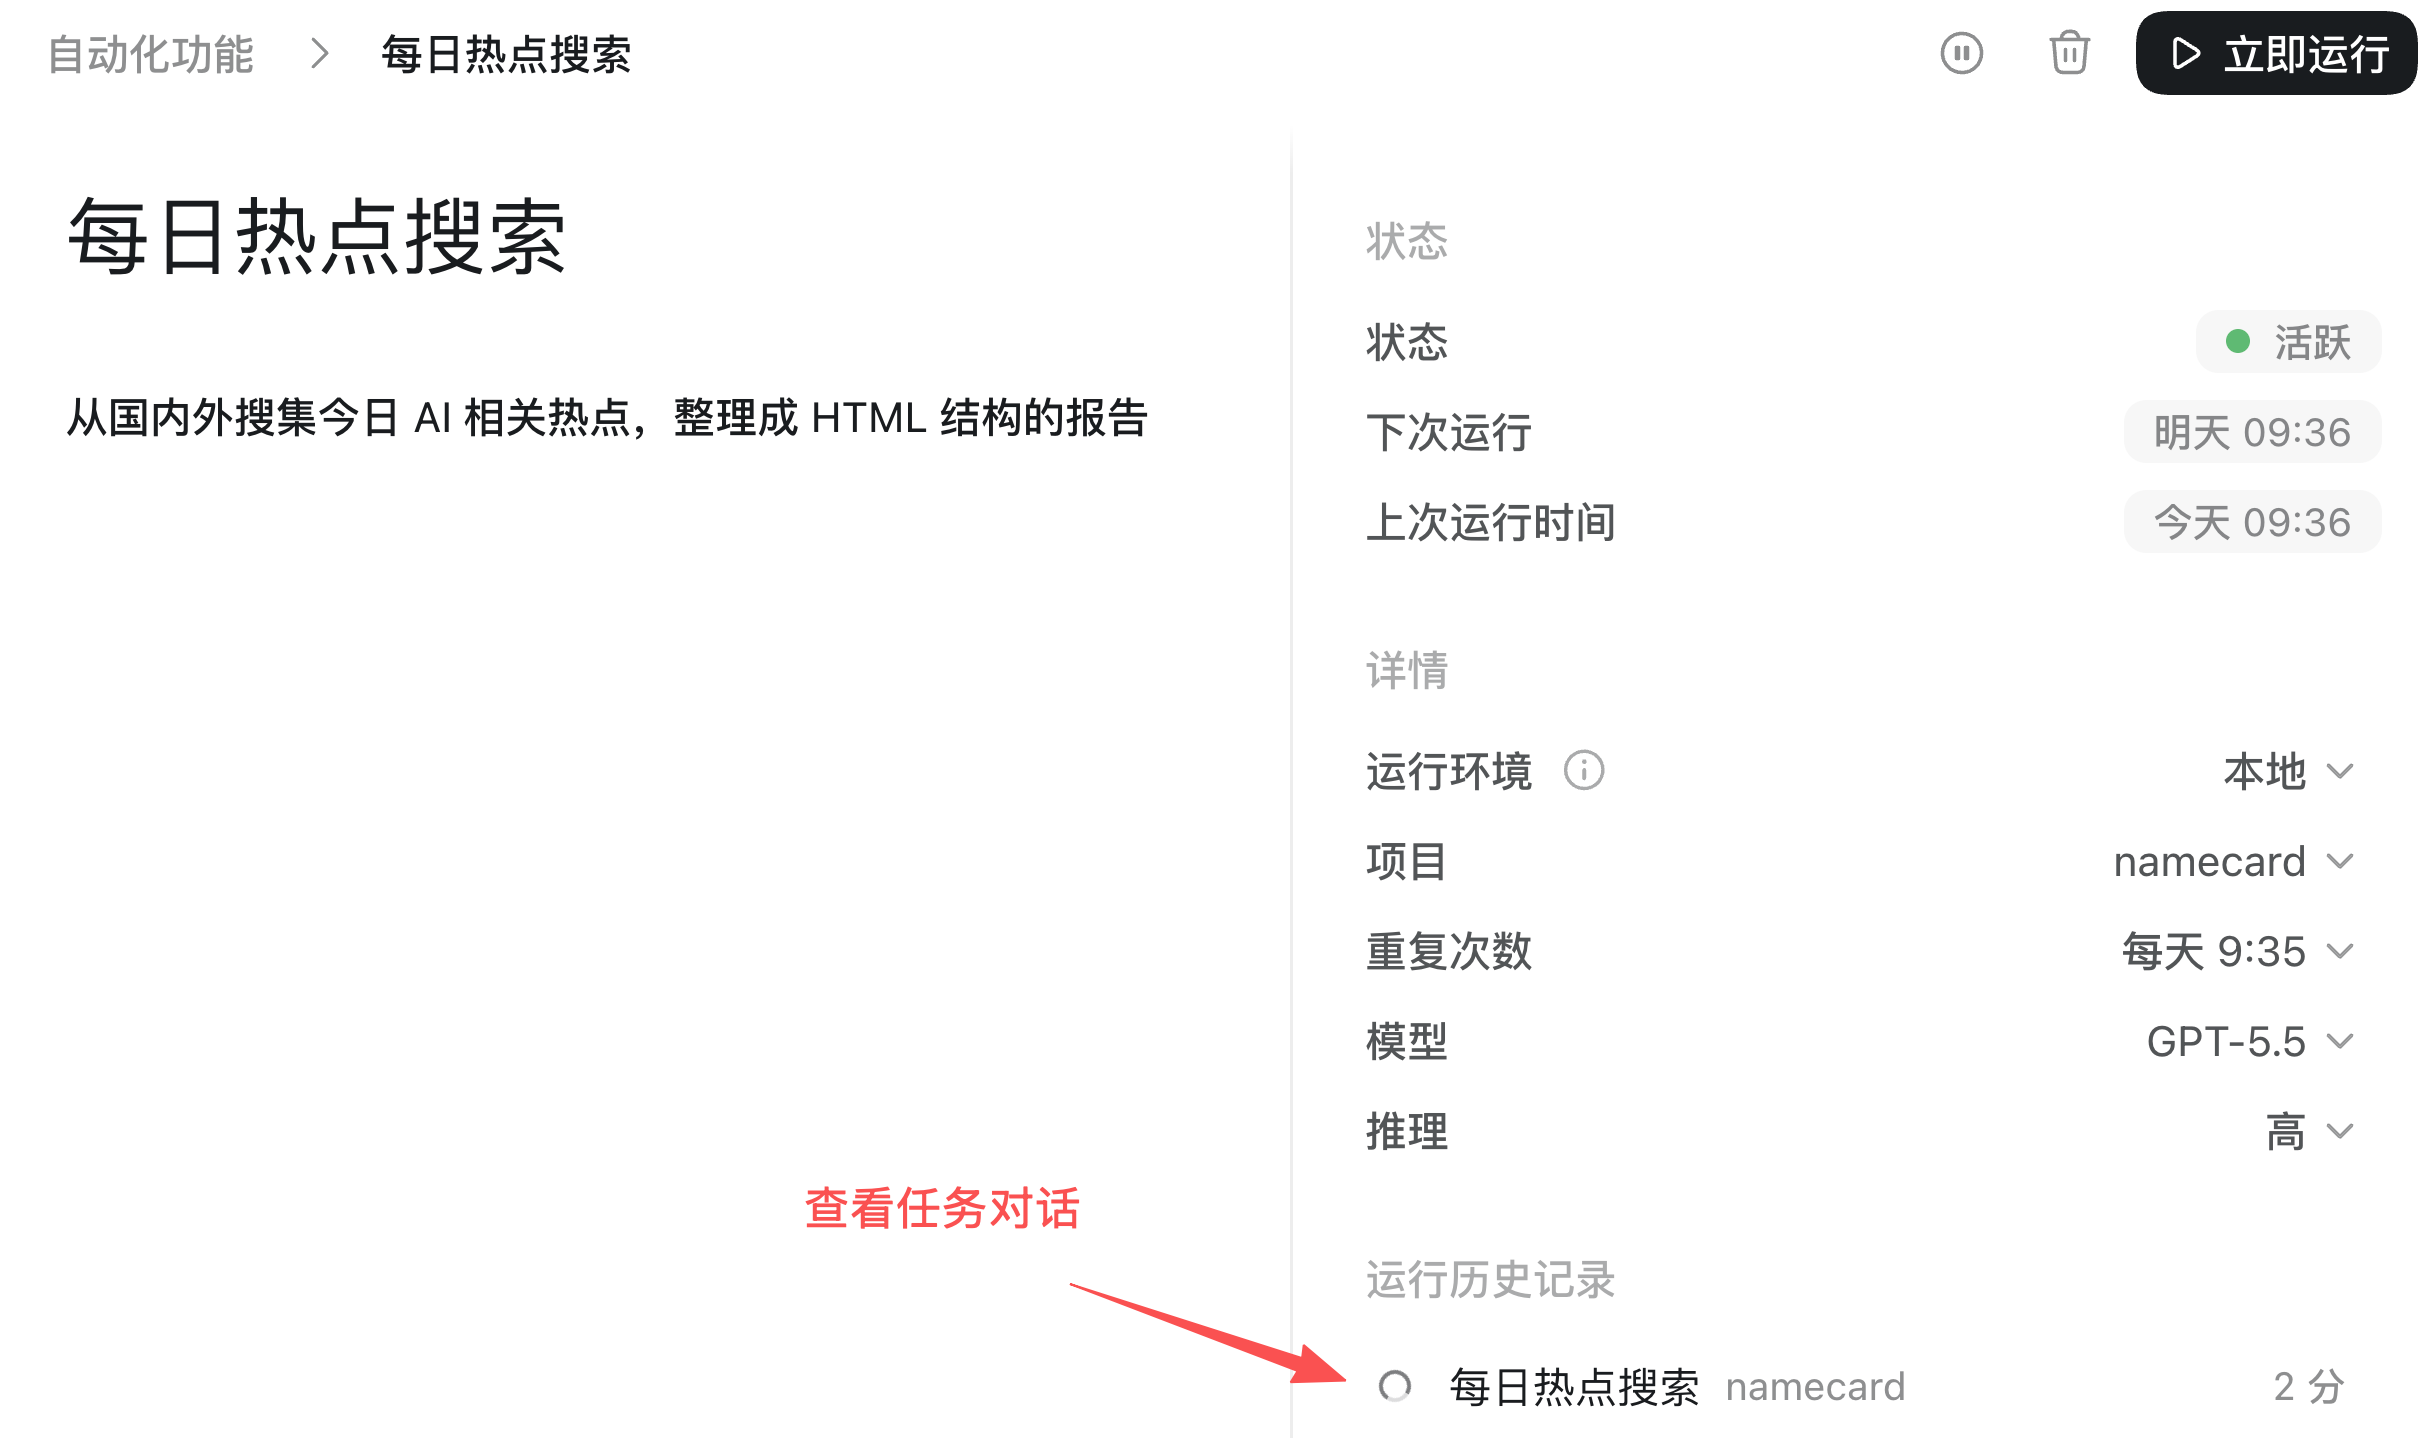
After clicking on a specific run history, you can view the ongoing task conversation. It's recommended to observe the task's performance and continuously iterate and optimize the prompts:

Implementing Loop Thinking in Cursor
Cursor currently doesn't have native /goal or /loop commands. However, as long as you design the loop mechanism within the prompt and let AI autonomously execute commands, you can still achieve the Loop effect.
For example, I want to use Cursor to develop a desktop app called "InstalledYet?" from scratch, helping students learning programming to install various development environments with one click. This project includes three modules: an Electron desktop app, a Python server, and a Web admin backend. It's quite complex.
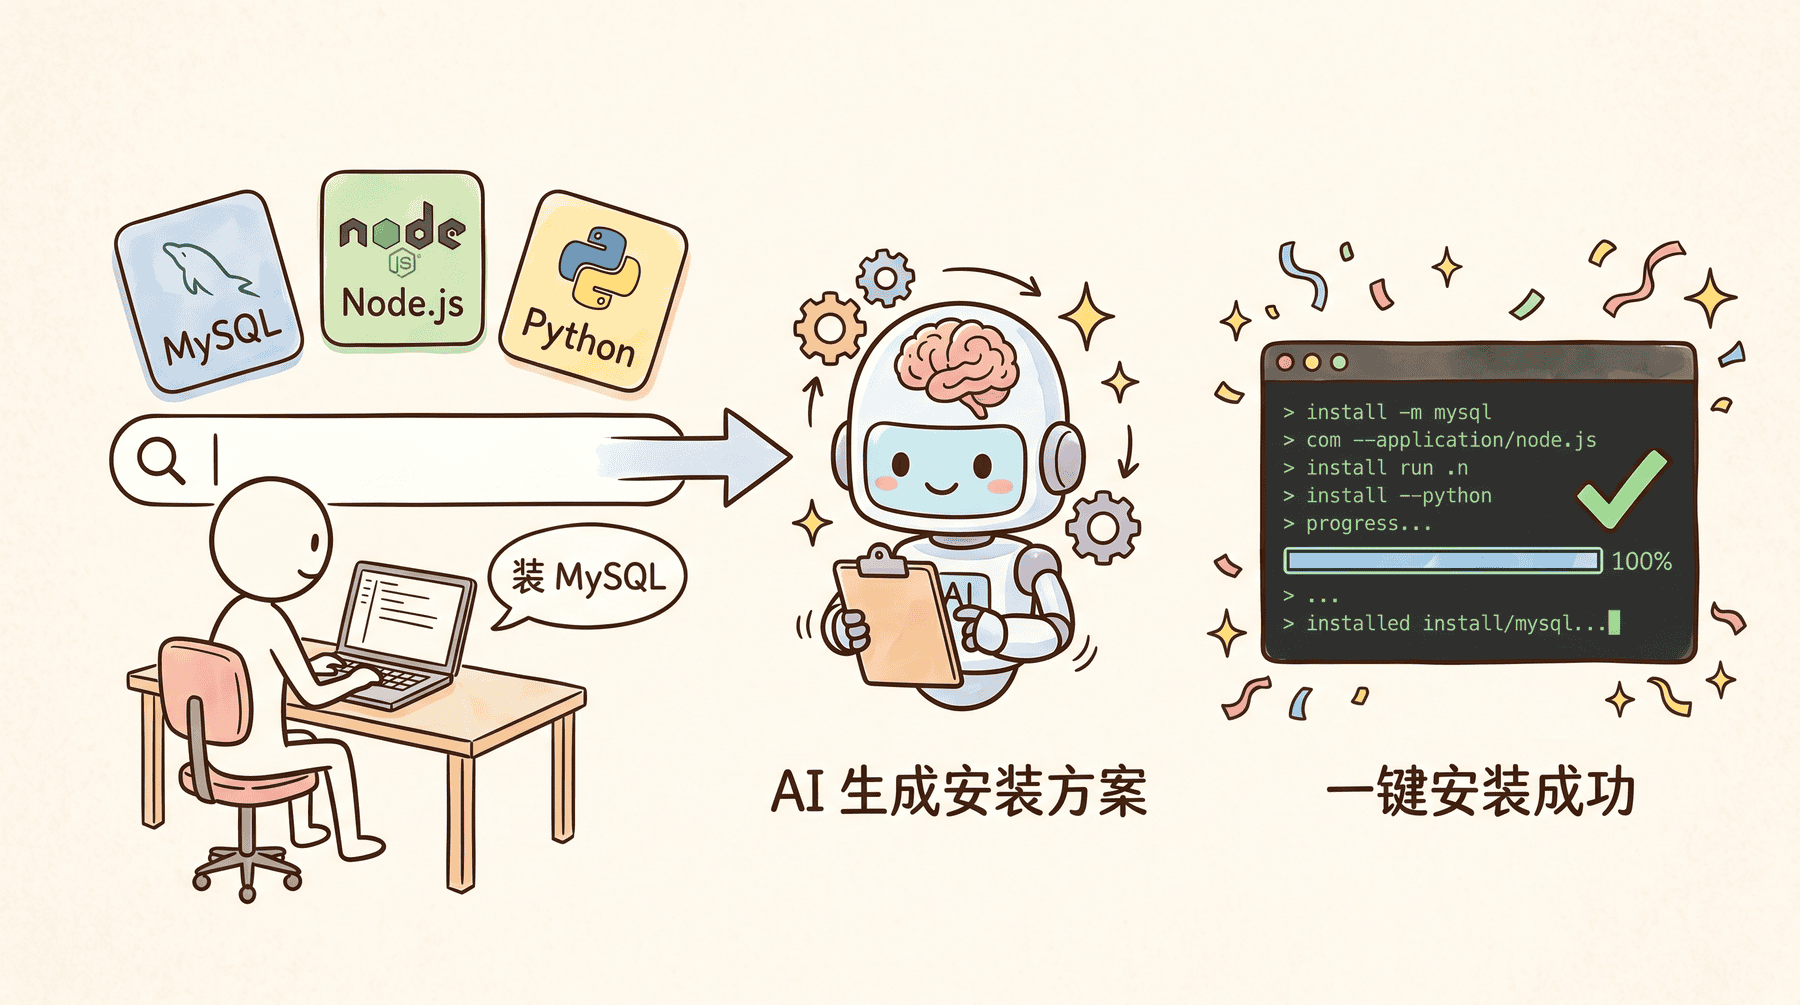
I deliberately designed an autonomous development loop within the prompt, telling AI not to stop and wait for my confirmation, but to run on its own until the entire system is usable.
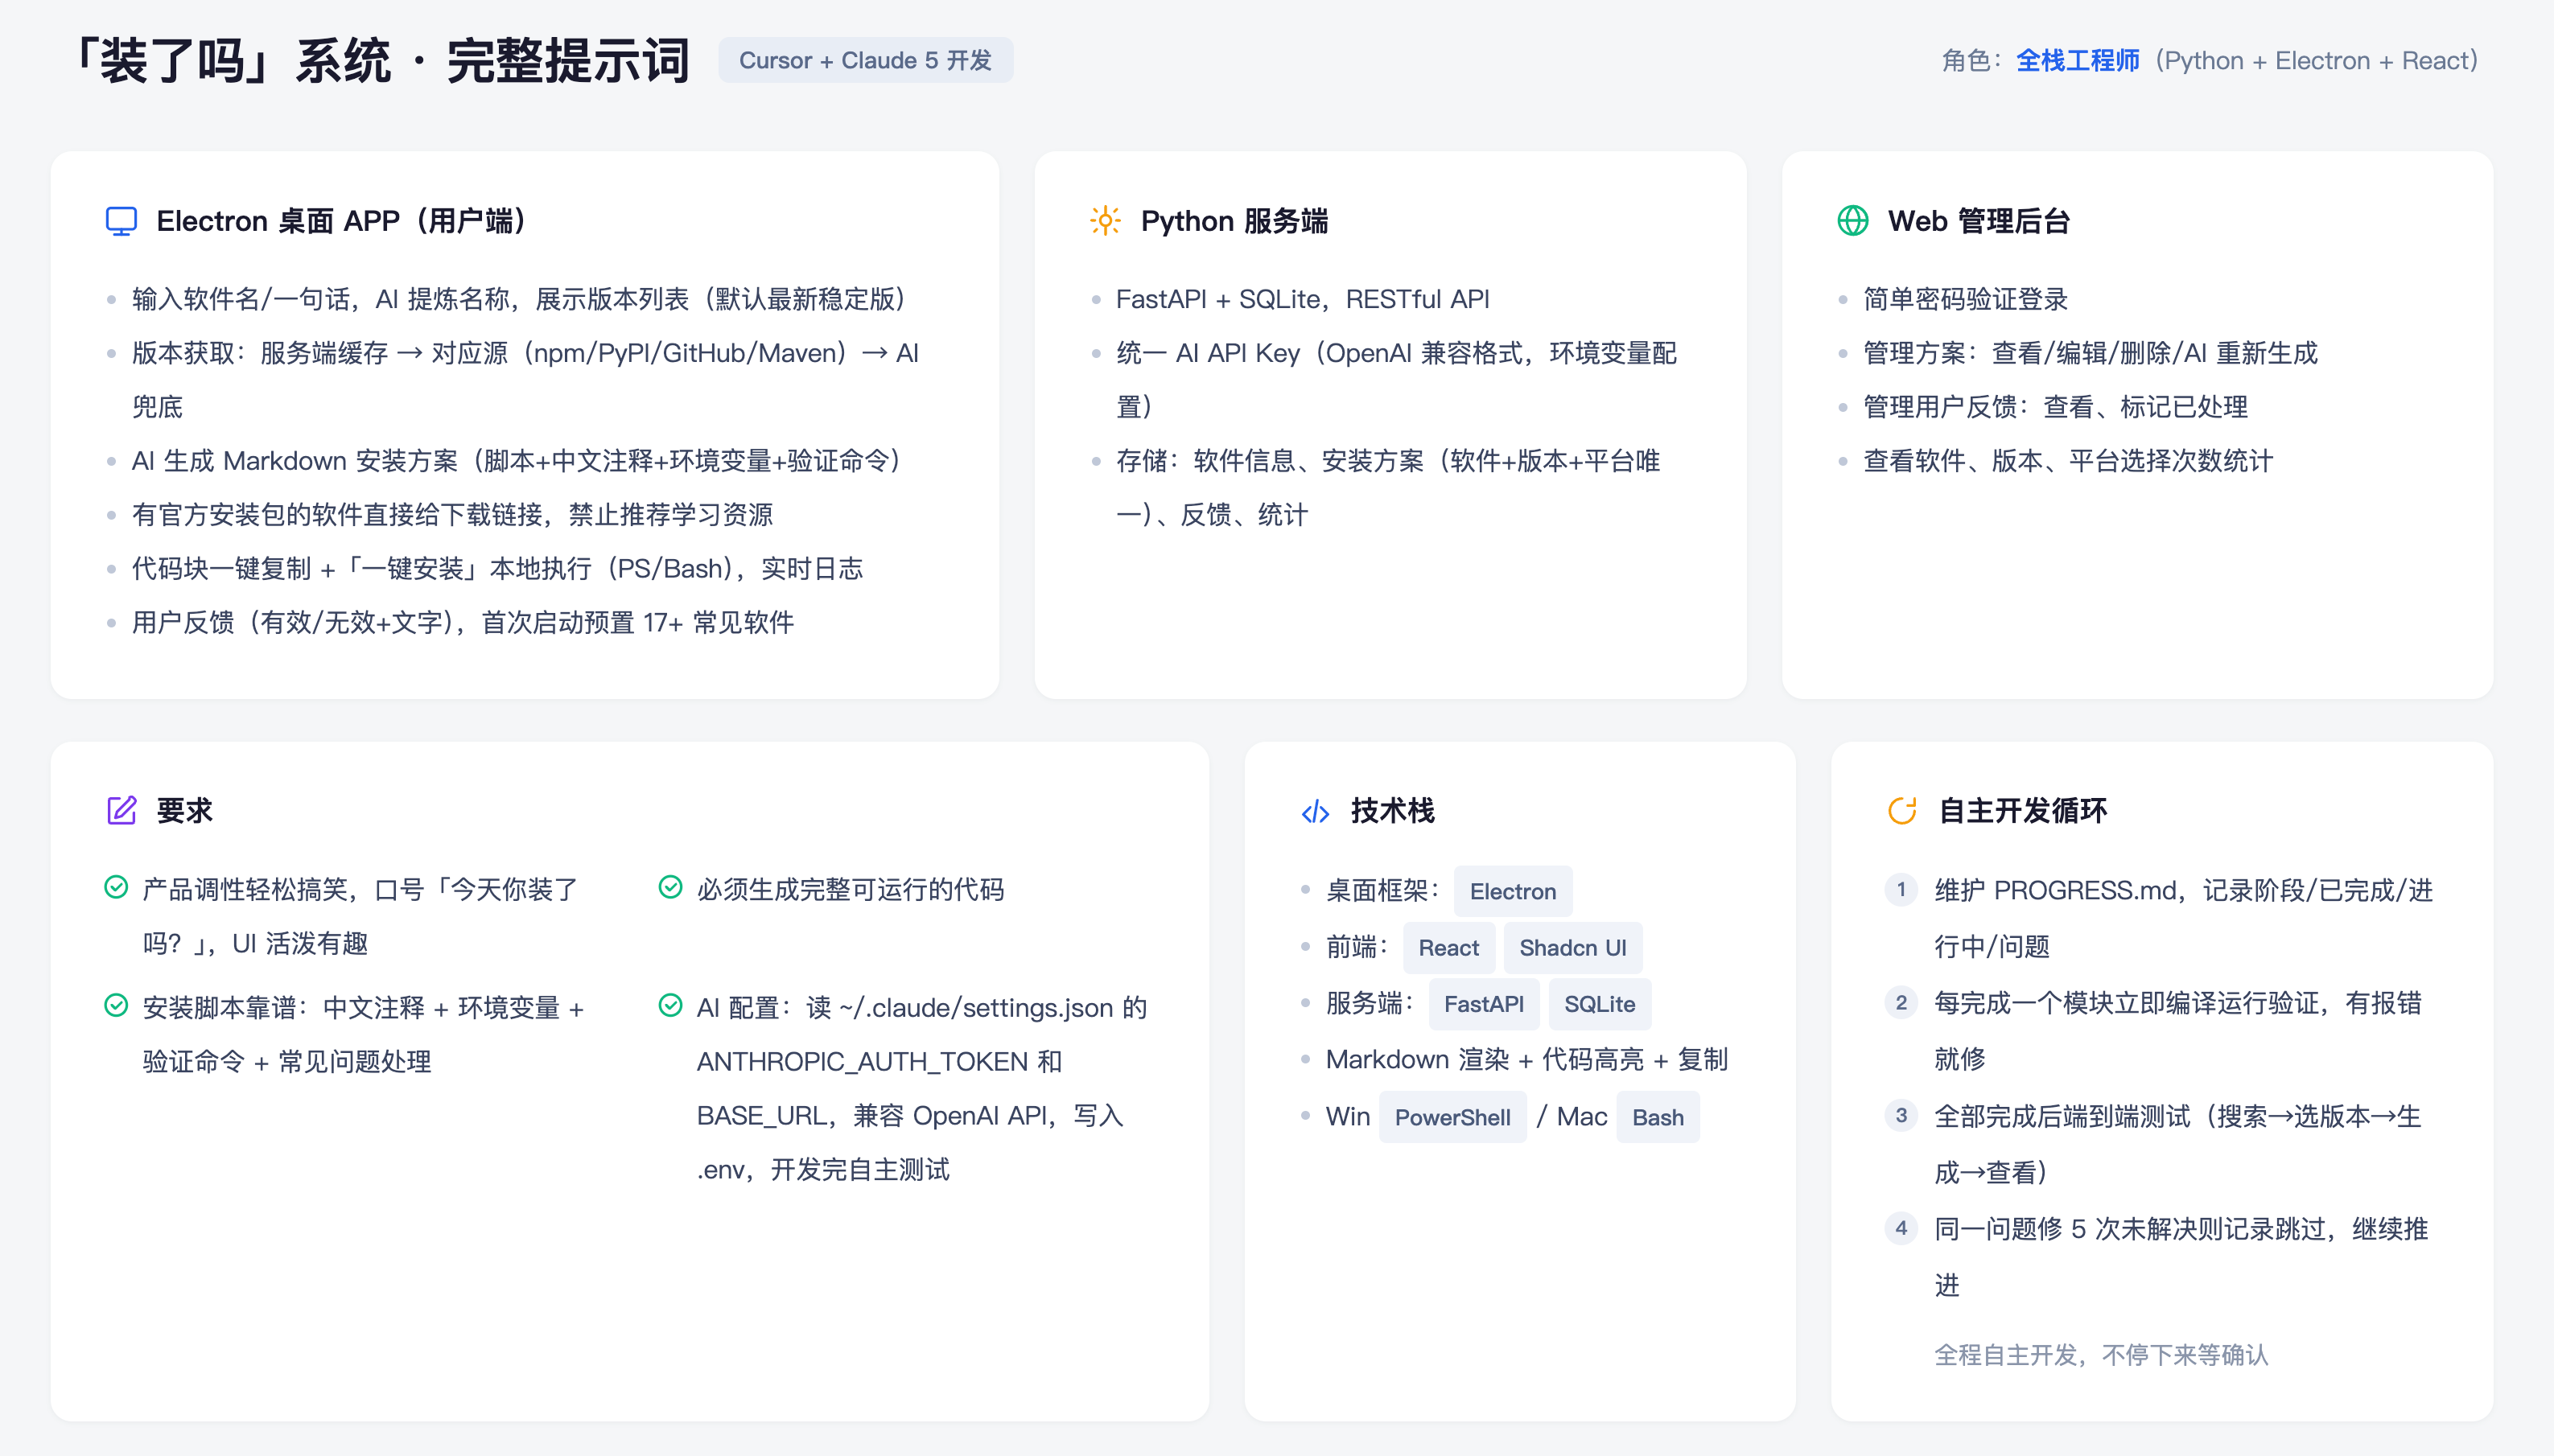
The key part of the prompt is as follows:
## Autonomous Development Loop

Develop autonomously throughout the process. Do not stop to wait for my confirmation unless you encounter a blocking issue that cannot be resolved independently. Follow this loop mechanism:

1. State Tracking: Maintain a PROGRESS.md file in the project root, recording the current phase, completed items, in-progress items, issues, and solutions. Update it after completing each module.
2. Development-Verification Loop: After completing each module, immediately compile and run to verify. If there are errors, fix them. Only proceed to the next module after passing verification.
3. End-to-End Verification: After all functions are complete, perform a complete end-to-end test from the user's perspective.
4. Dead Loop Prevention: If the same issue is not resolved after more than 5 fix attempts, record it in PROGRESS.md and skip it, continuing with other tasks.
You'll notice that these rules correspond exactly to the three core elements of a Loop mentioned earlier:
- Goal and Stopping Condition → "End-to-end test passes" is the stopping condition
- Feedback Loop → "Development-Verification Loop" lets AI automatically check after each step
- State Memory → PROGRESS.md file persistently records progress
After execution, AI began its autonomous loop. It first configured the environment, then developed the server, desktop client, and admin backend in order. I barely intervened throughout the process. AI maintained the PROGRESS.md file to record progress, automatically ran tests after completing a module, fixed errors when encountered, and continued advancing after fixing.
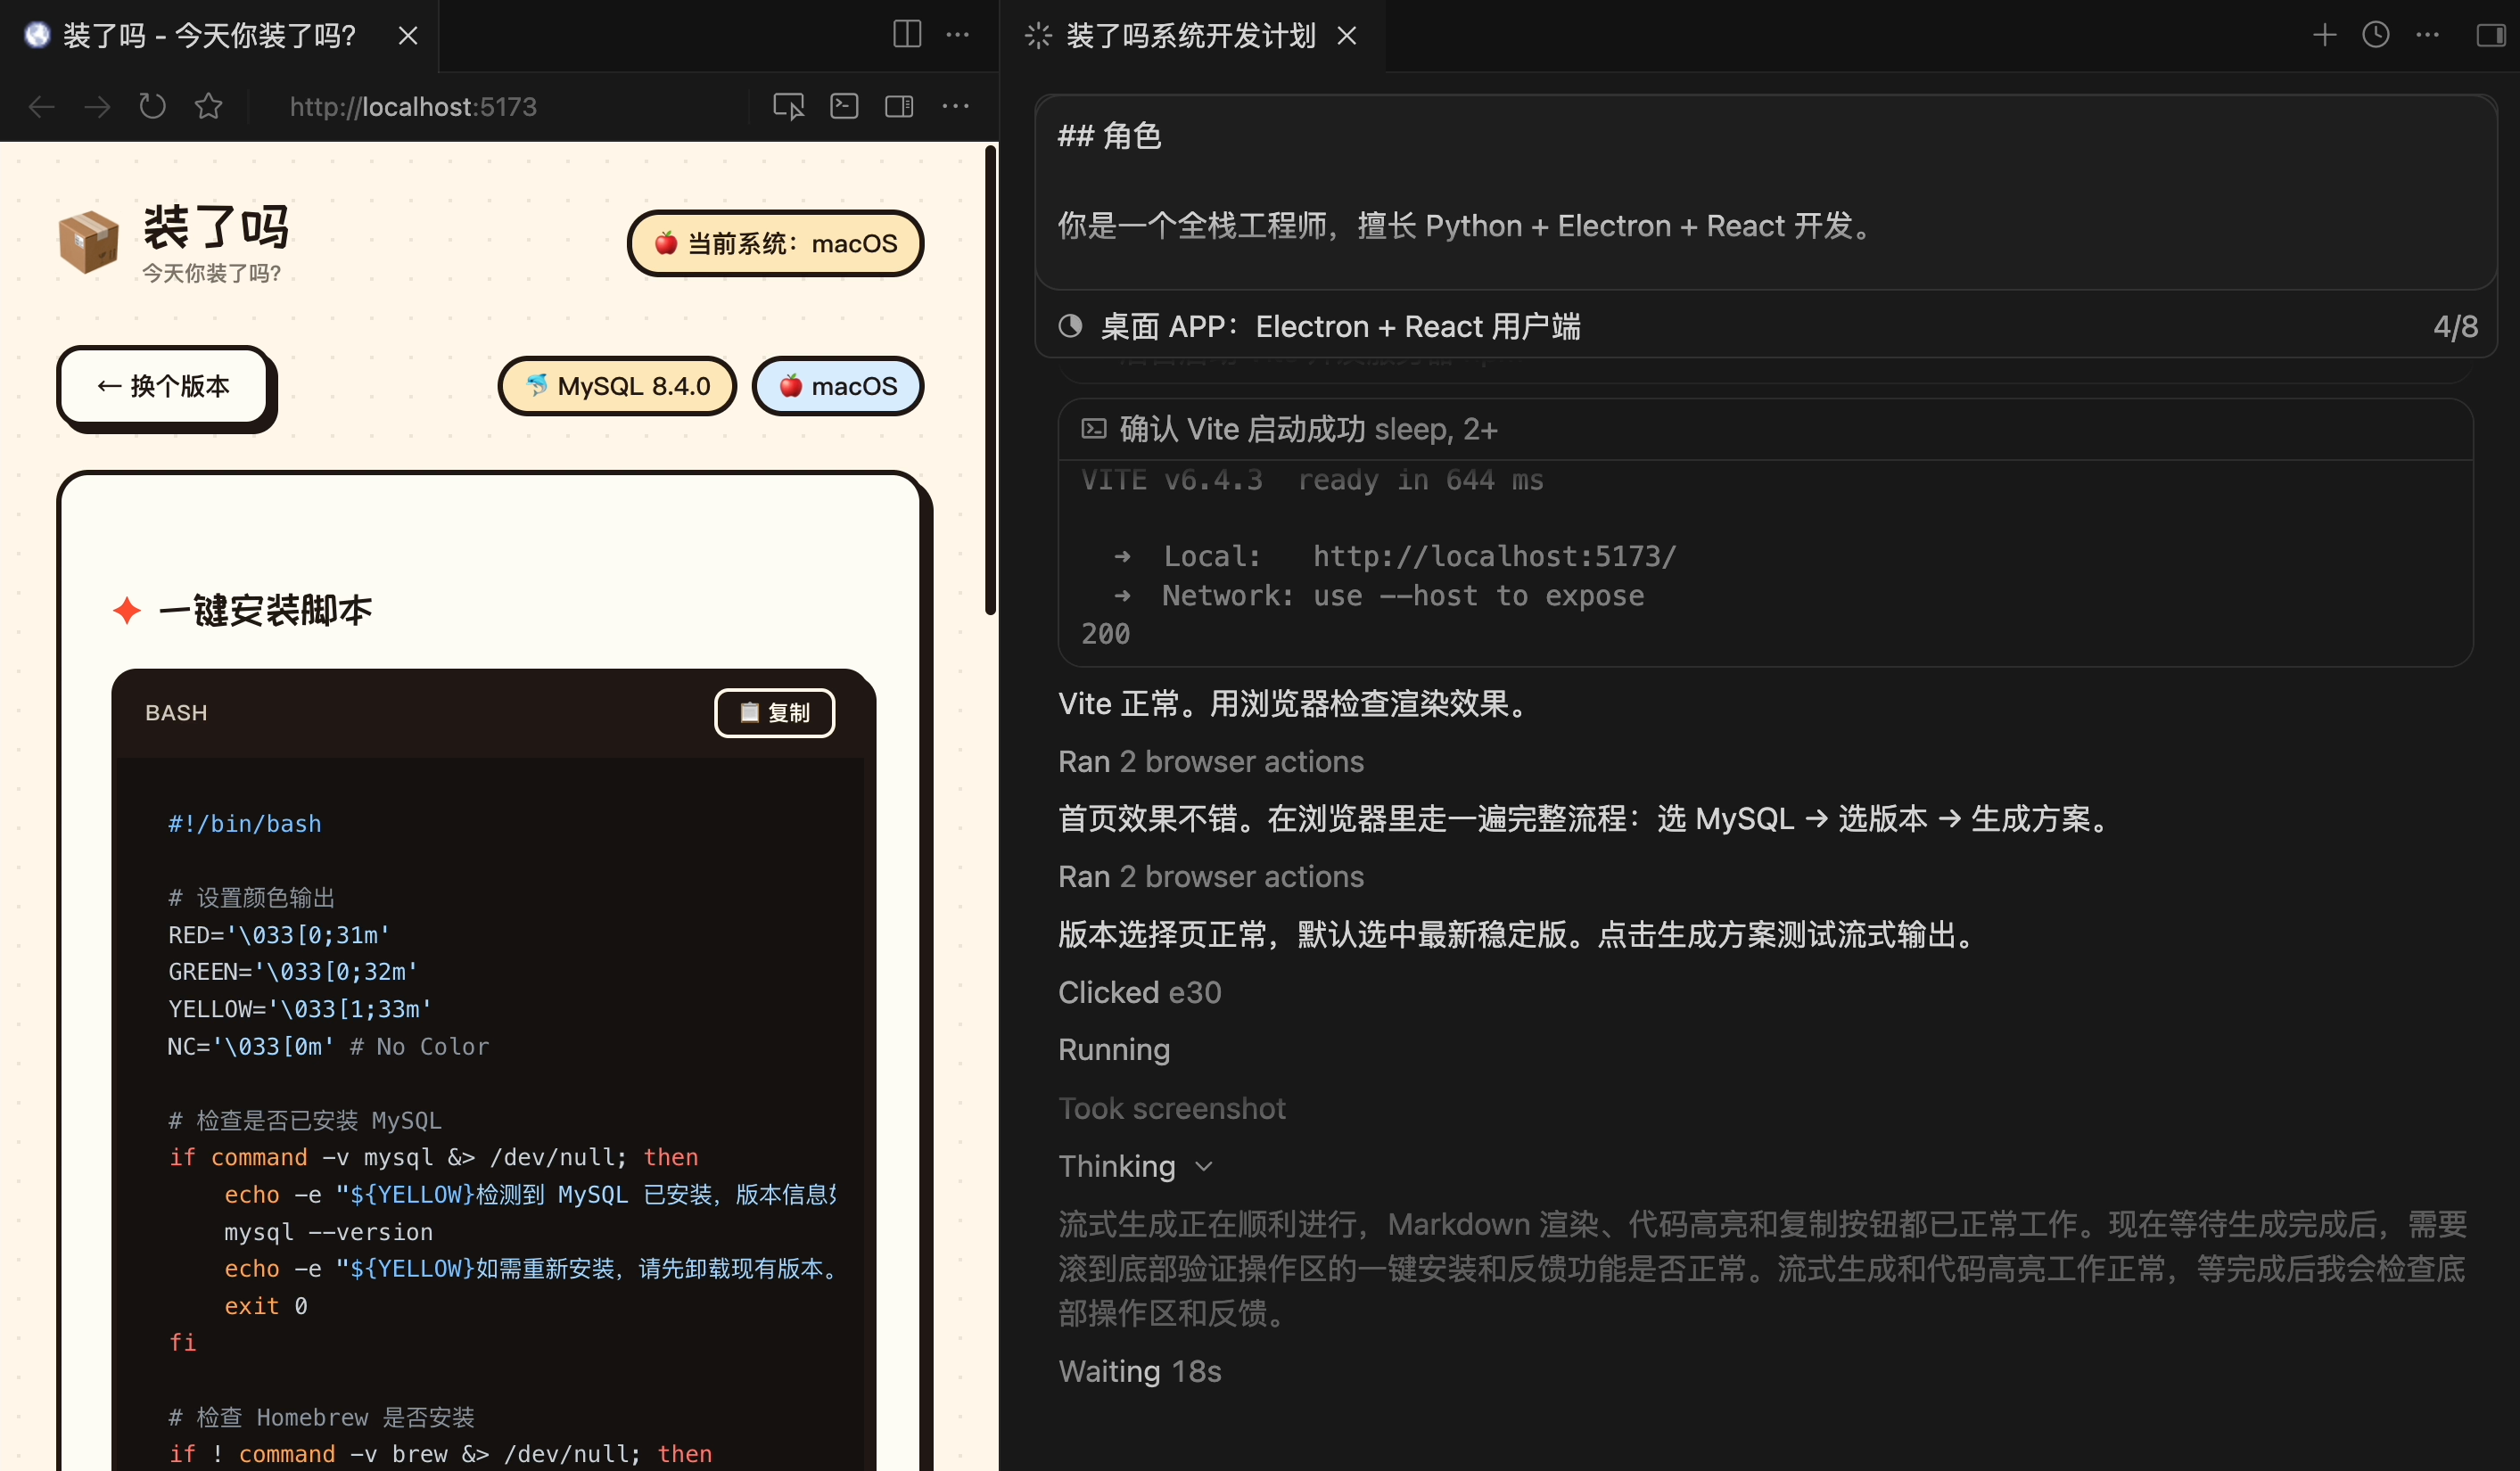
Ultimately, AI spent nearly 50 minutes independently completing the entire system's development and verification without my intervention. All three services started normally, and core functions worked.
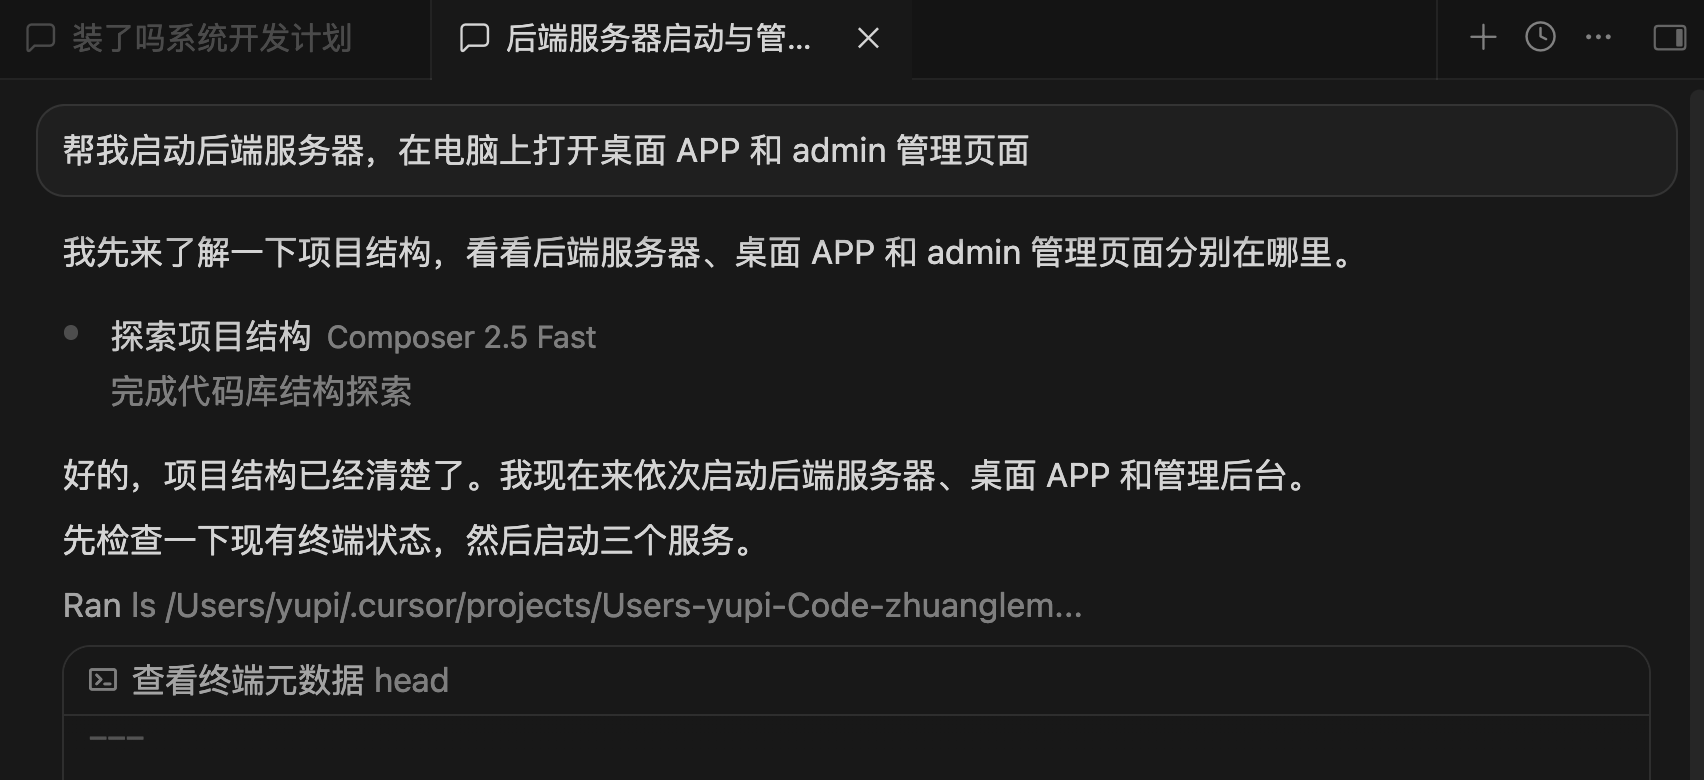
Let's open the desktop app to see the effect. The main interface has an AI dialog box with quick access buttons for common development environments preset below:
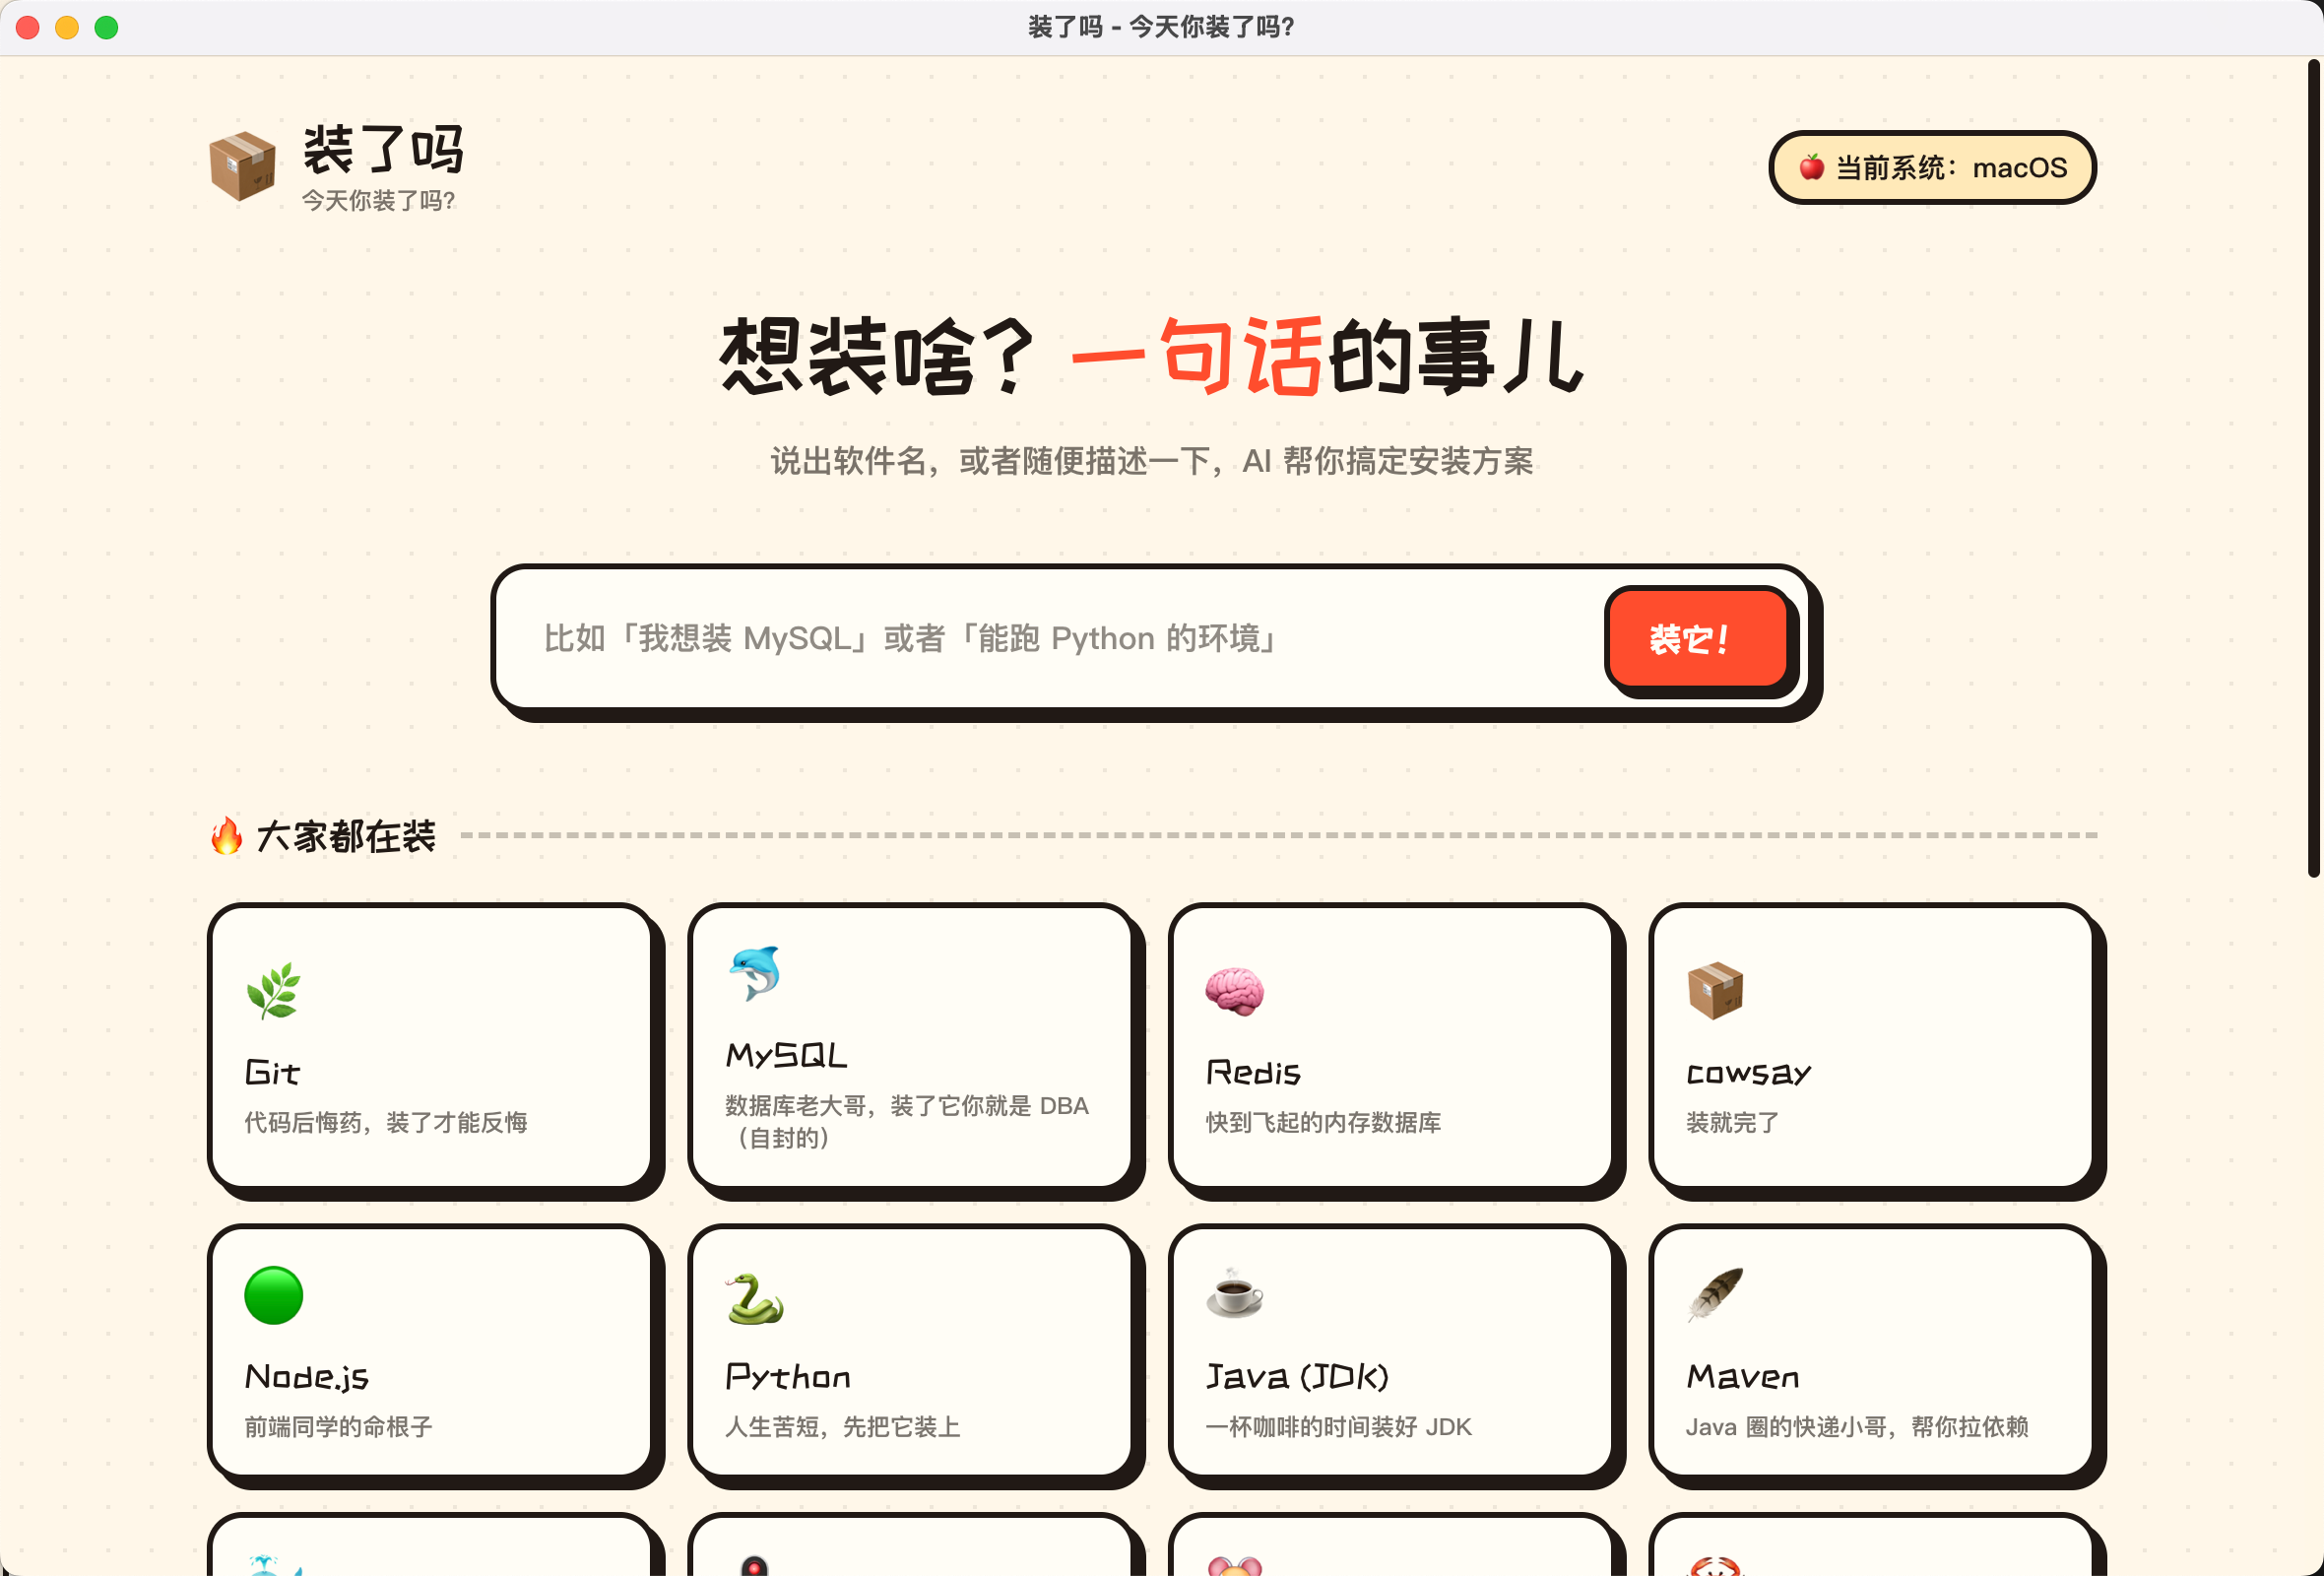
After selecting the software and version to install, AI automatically generates a complete installation script and plan, including Chinese comments, environment detection, and verification commands. You can copy and execute it directly or click for one-click installation:
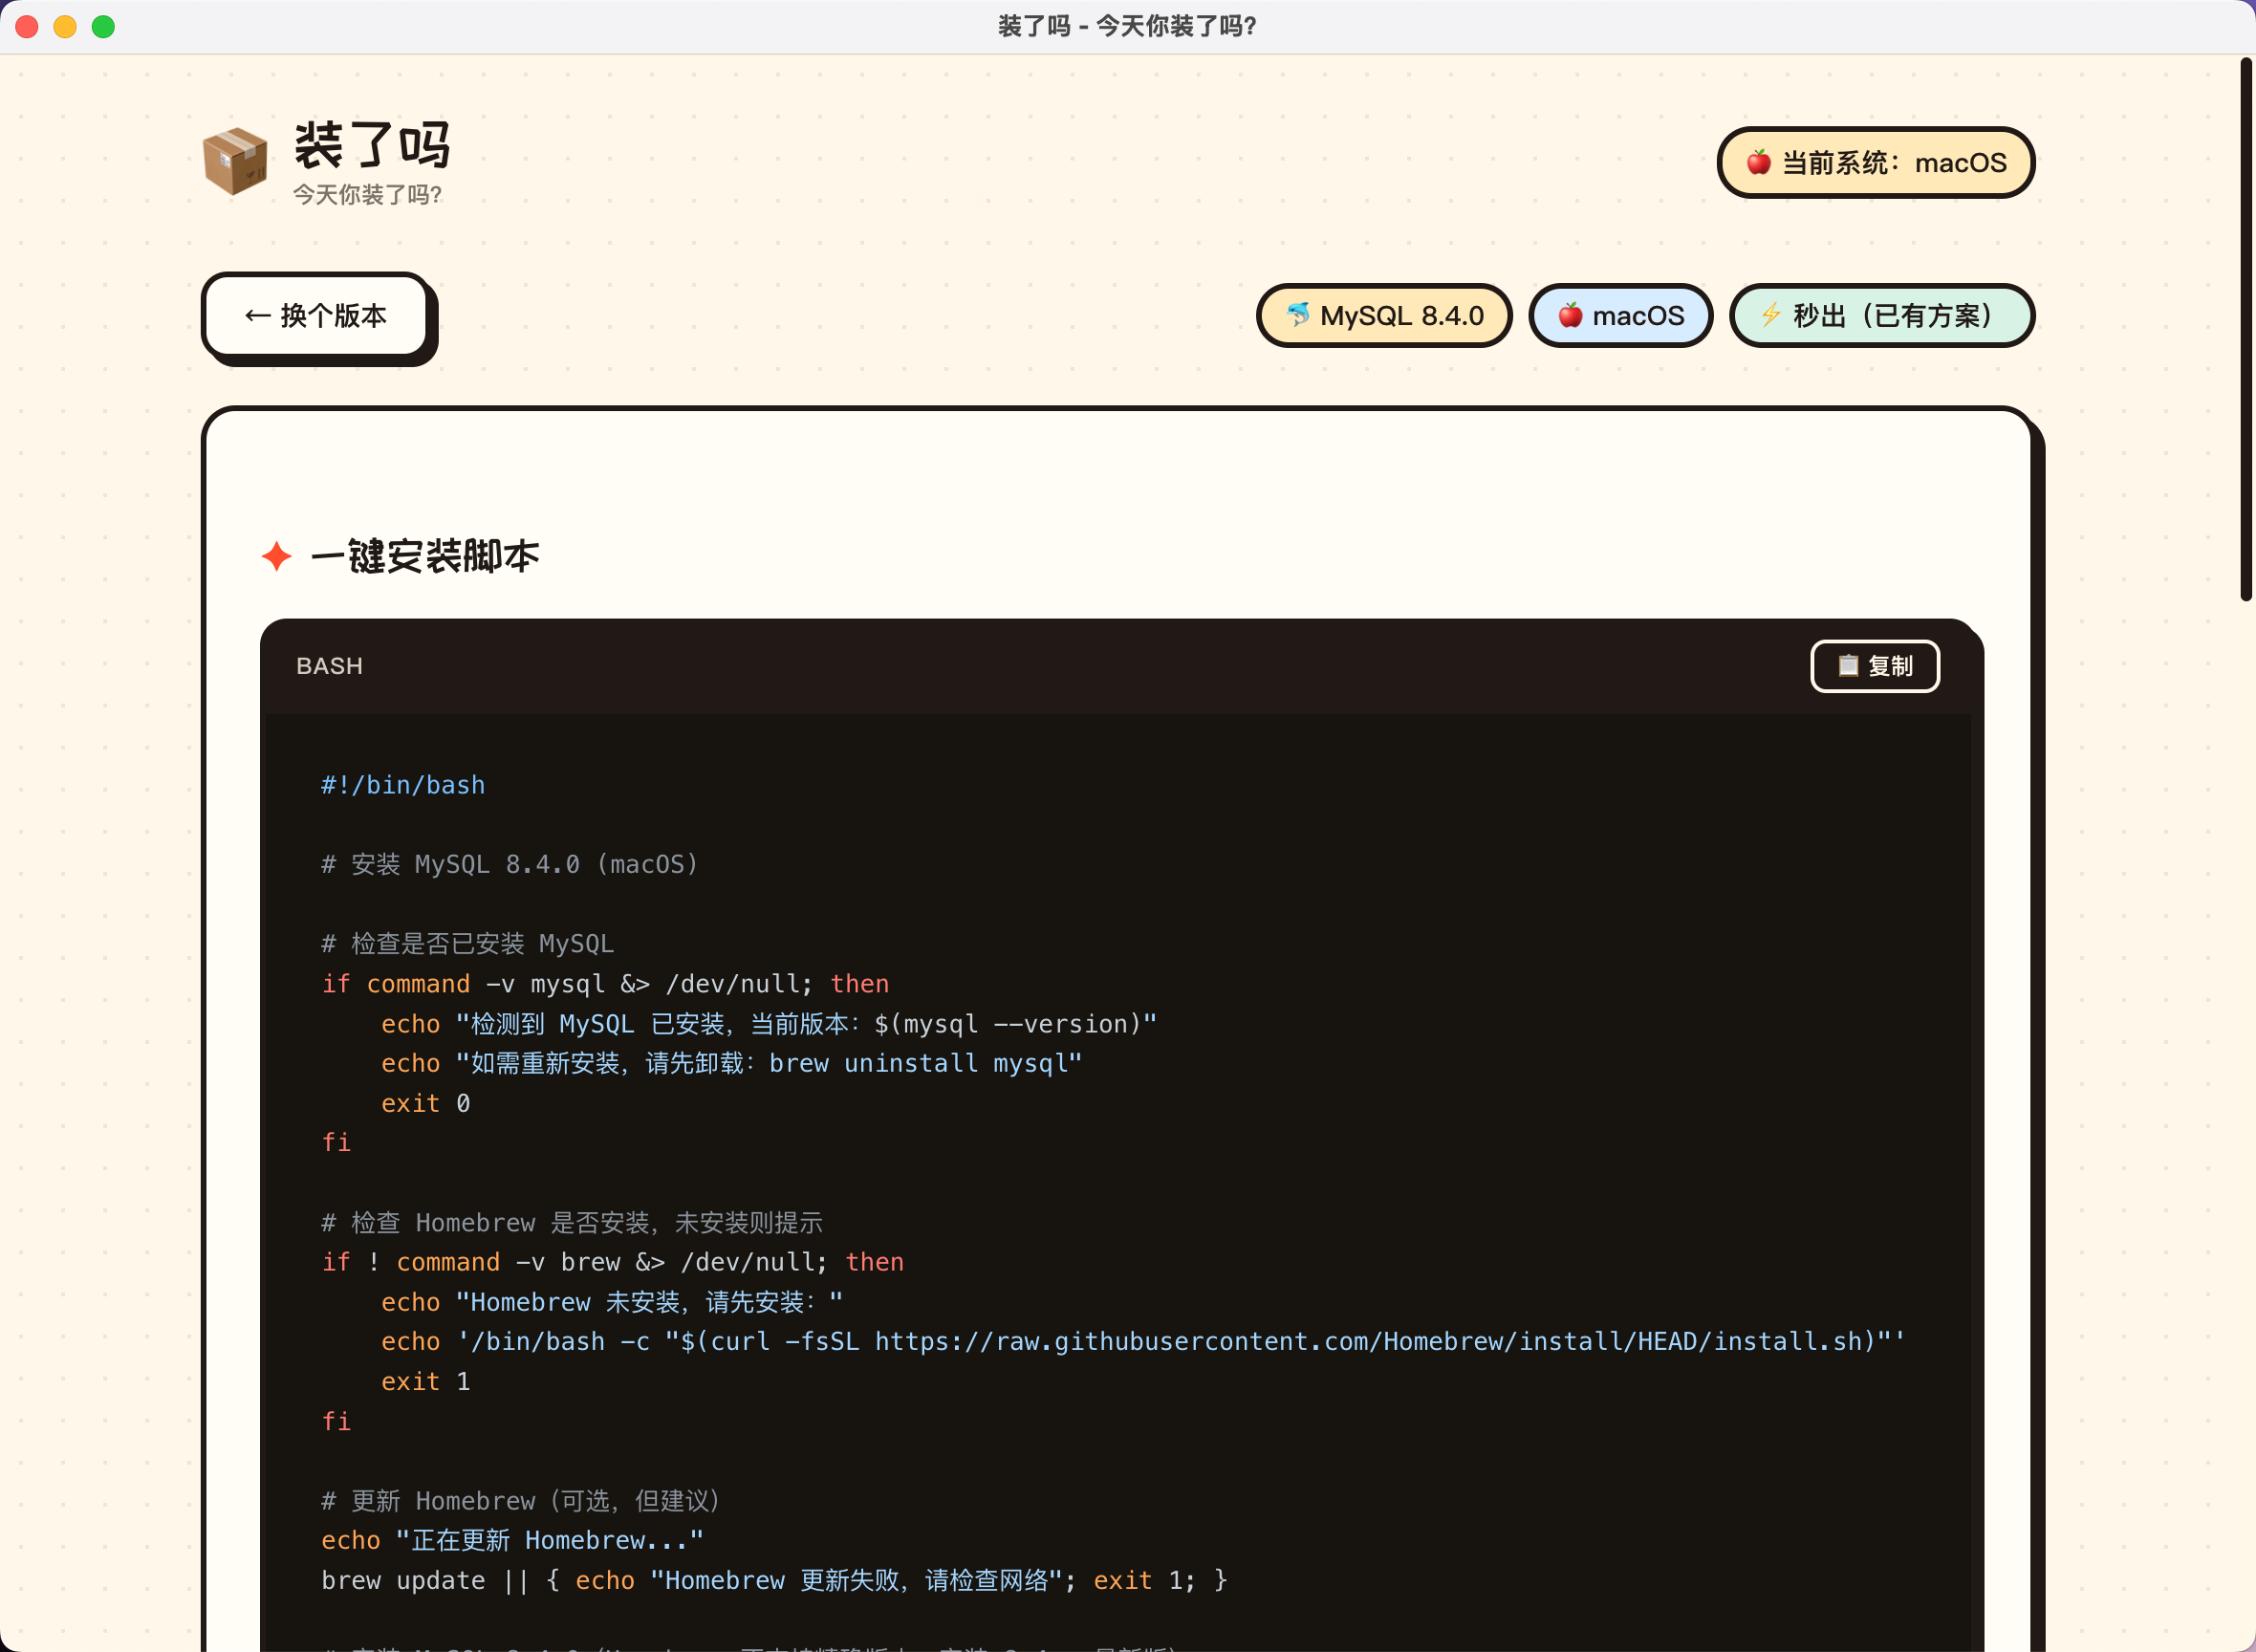
The Web admin backend also runs normally, allowing you to view installation data statistics, manage all generated installation plans, and view user feedback data:
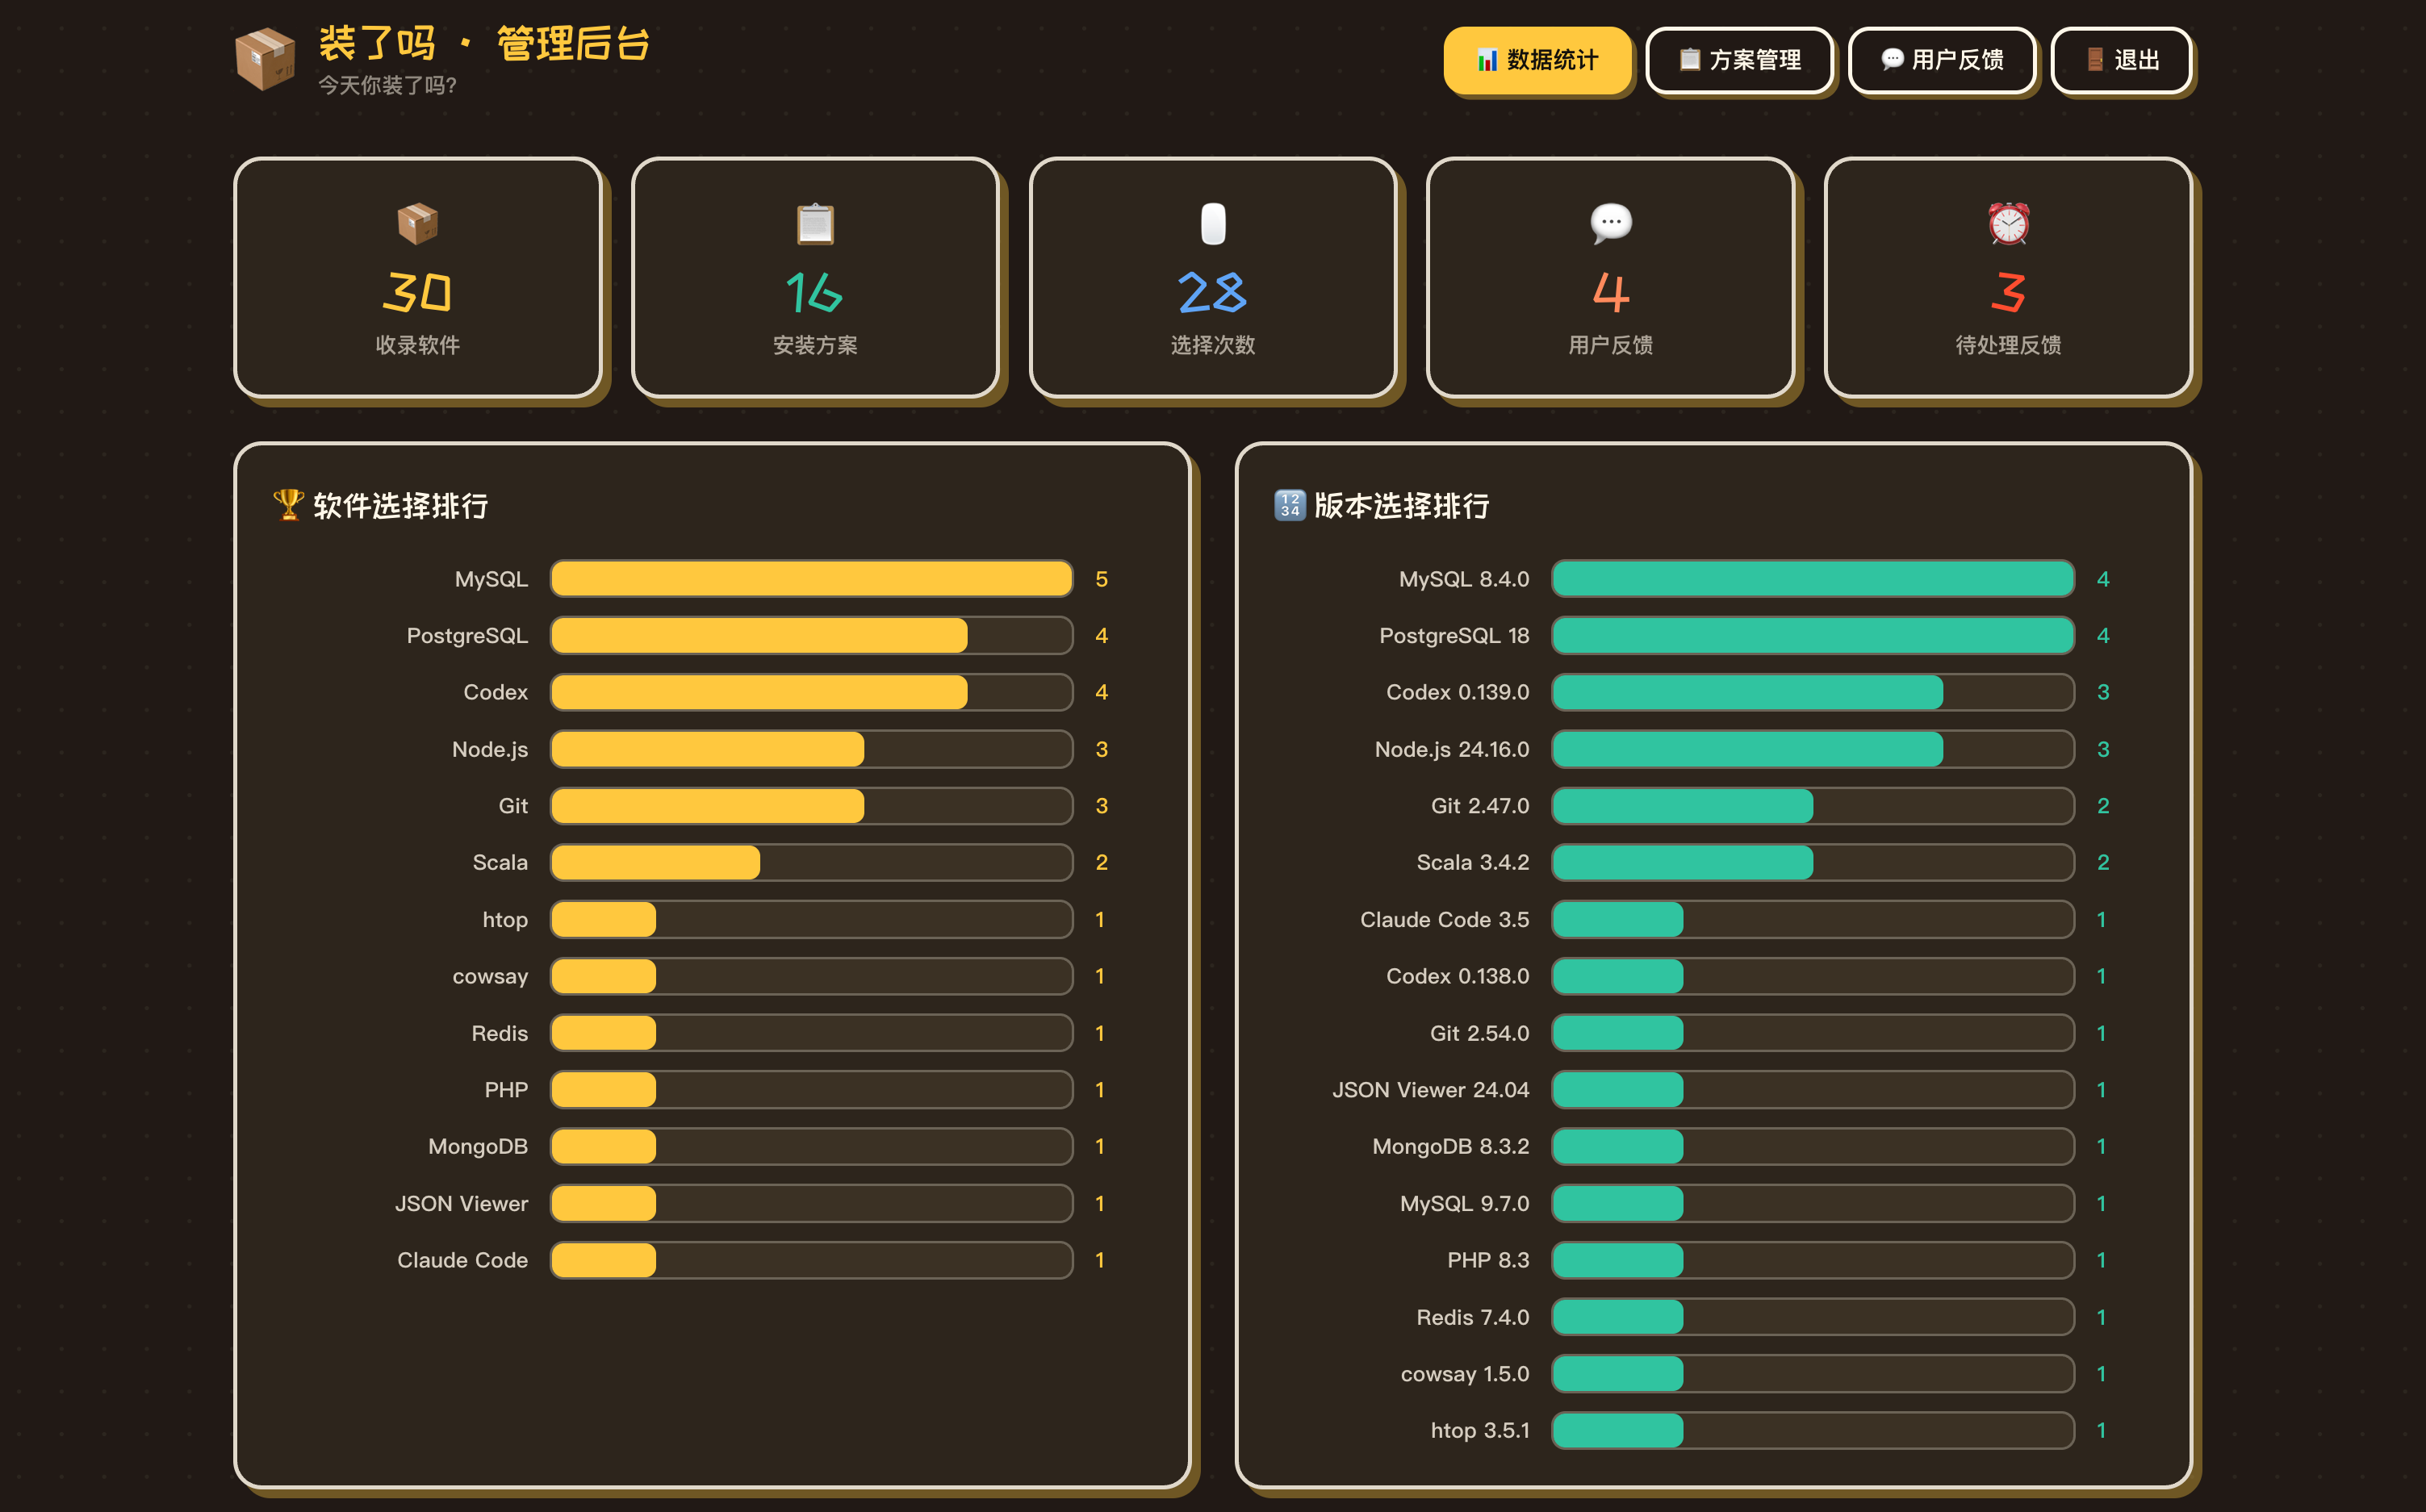
Pretty good, right?
This is how you implement Loop Engineering thinking in tools without built-in Loop commands, through prompt design. The core is to write state memory + feedback loop + dead loop prevention into the prompt, letting AI form its own cycle.
The complete prompt and development process for this project will be included in the free and open-source "AI Programming Zero-Basics Tutorial", which should help you learn many AI programming techniques.
4. Deep Dive into Loop's Core Modules
From the hands-on experience, you'll find that getting started with Loop isn't difficult. Set a goal, enter a command, and it runs.
But if you want to design a more complex and reliable loop system—for example, multiple agents working in parallel, automatically connecting to external tools, running continuously across sessions—you need to understand the more complete methodological framework of Loop Engineering.
Currently, a mainstream way to decompose Loop Engineering in the industry is to divide it into 5 core modules, plus state memory that runs through the entire process.
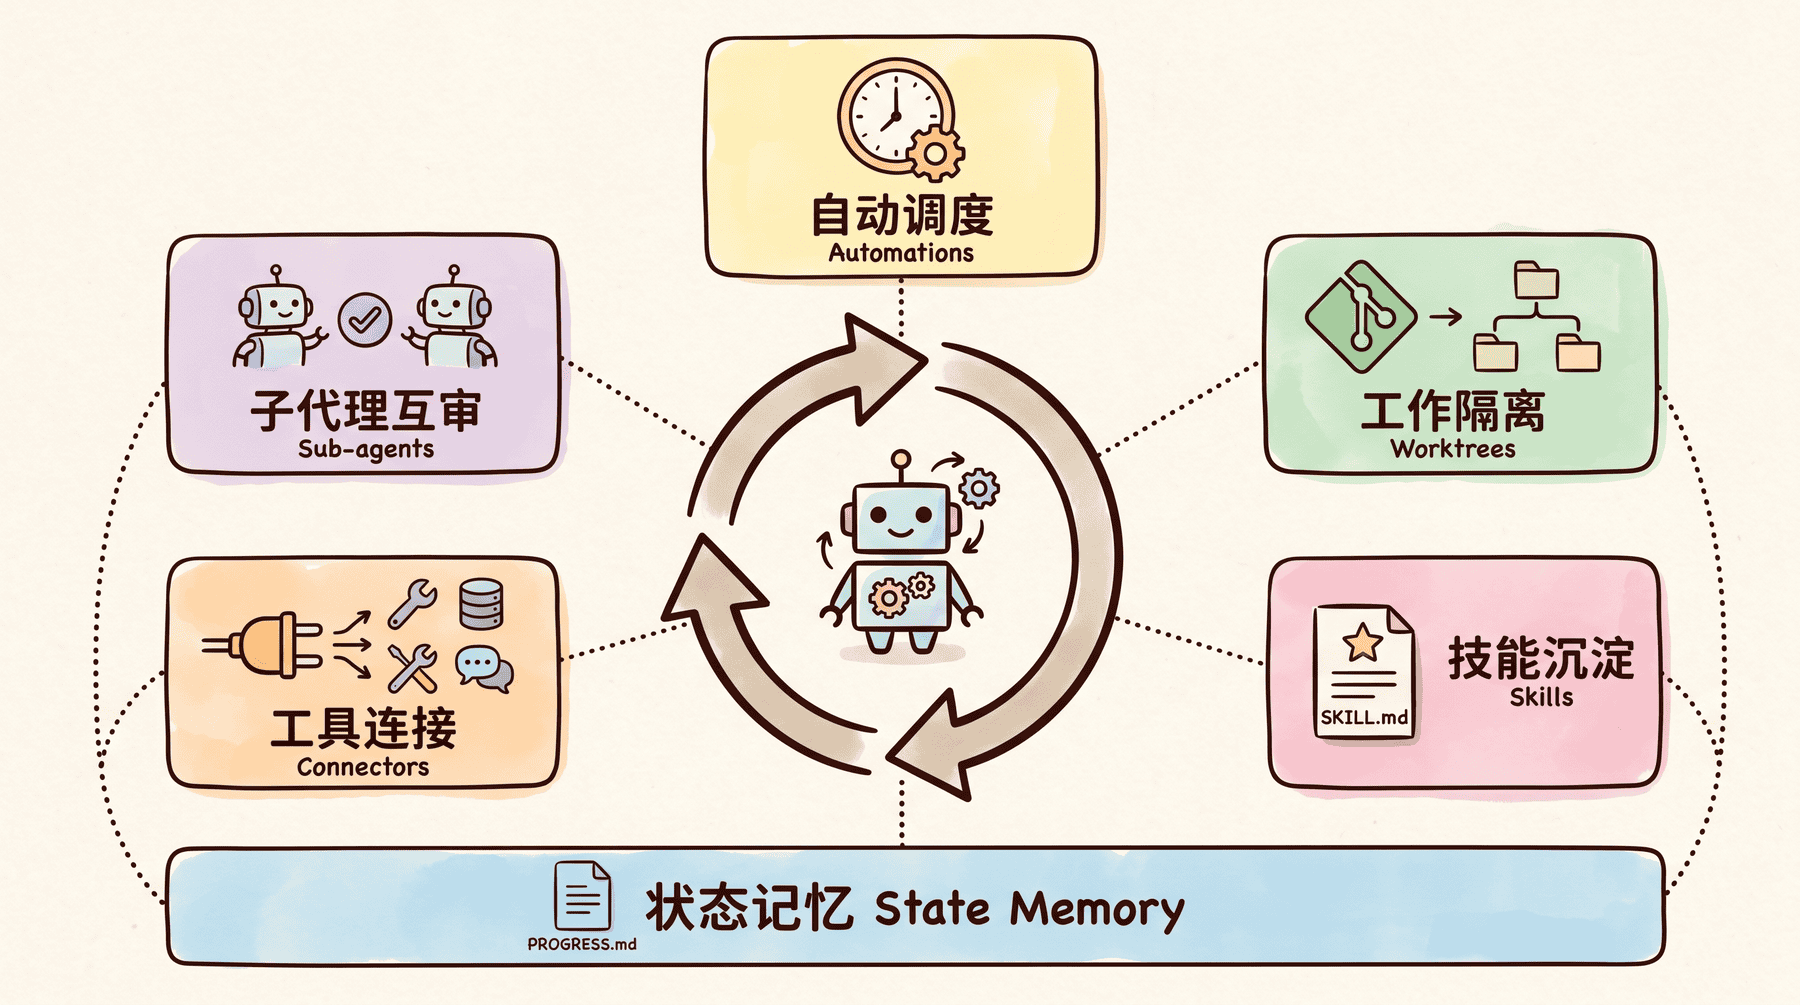
1. Automatic Scheduling
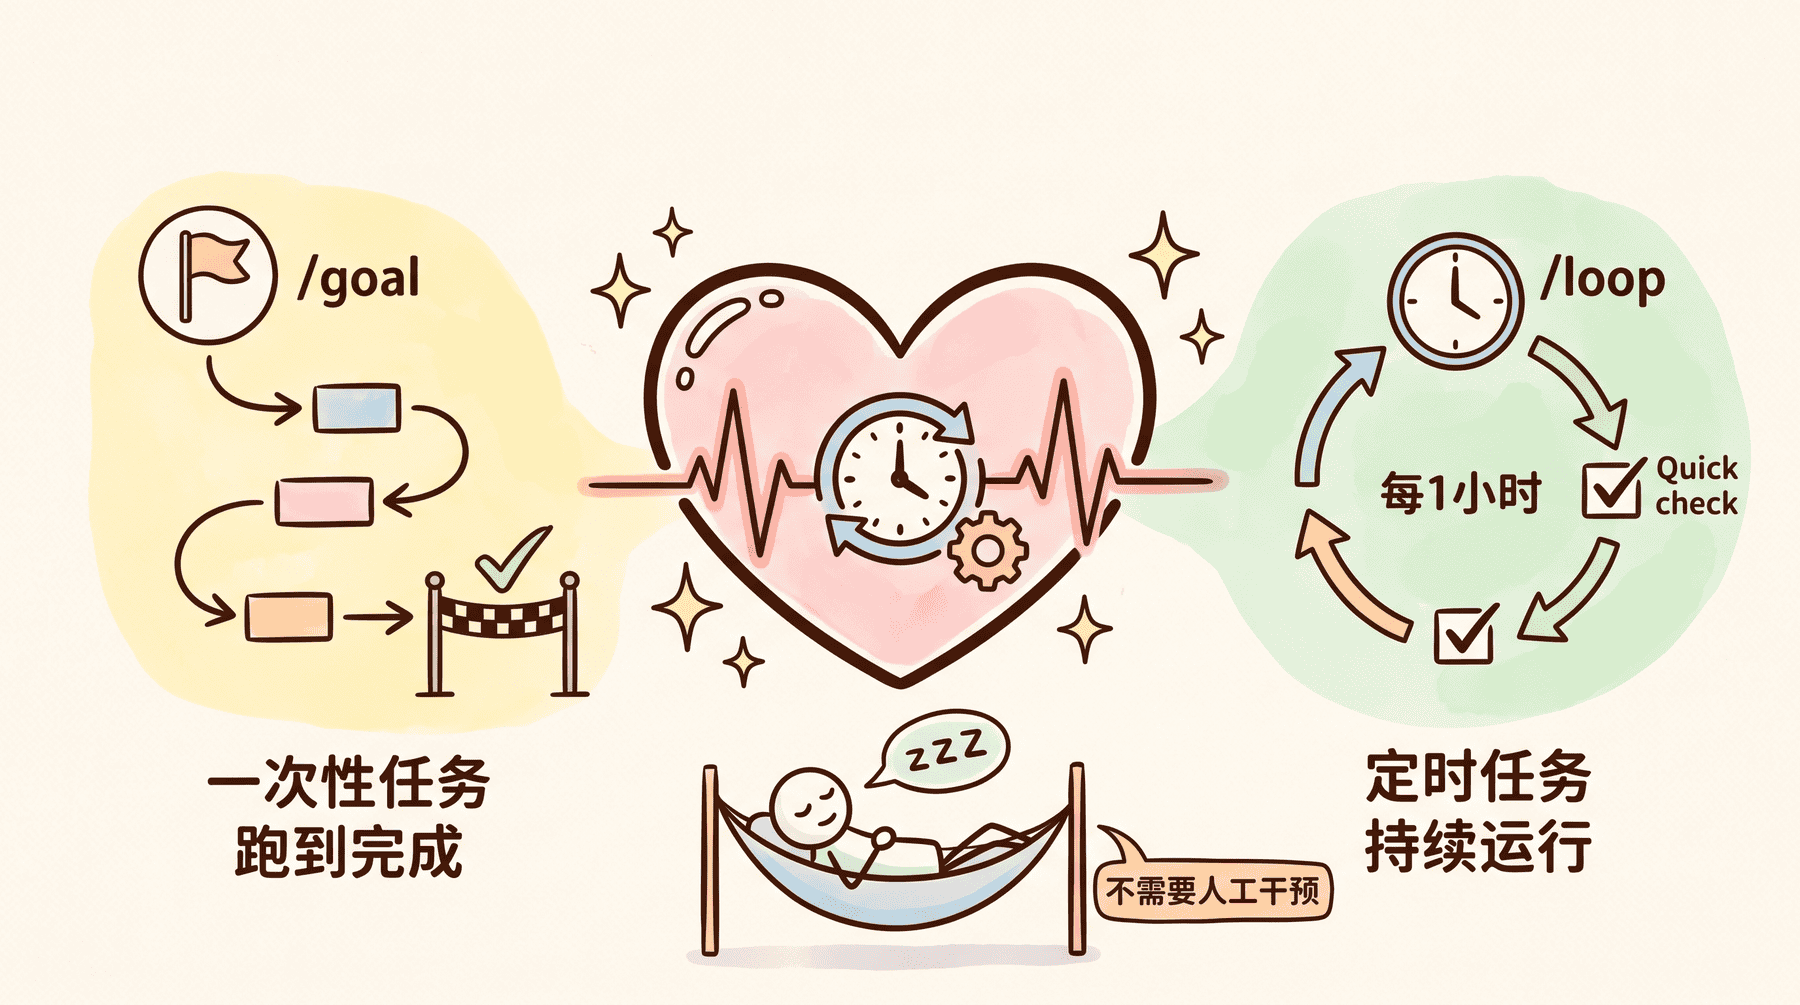
This is the heartbeat of the Loop. Without it, the Loop can't run.
You set the trigger conditions and execution frequency, and the Loop runs automatically according to the rhythm.
For example, you can set a /goal for AI to fix all errors in the project, or set a /loop for AI to check the code repository for new issues every hour. The former is a one-time task, the latter is a continuous task, but both are driven by automatic scheduling at the core, requiring no manual intervention.
2. Work Isolation
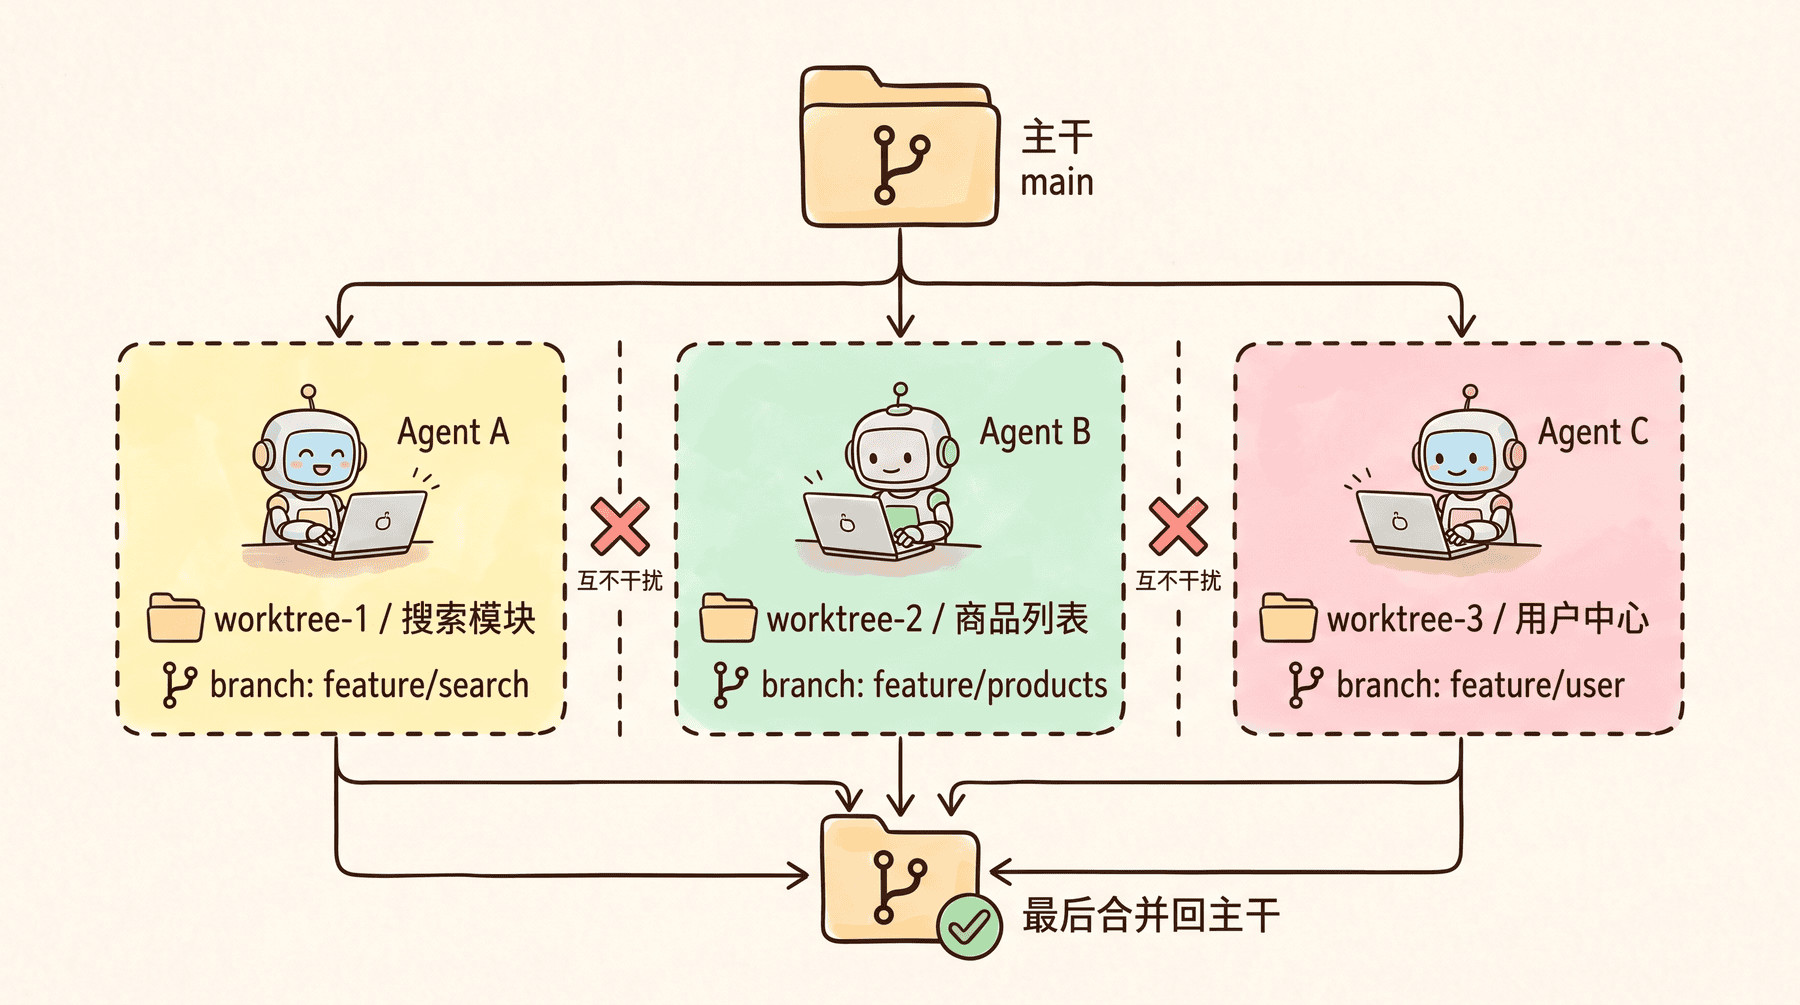
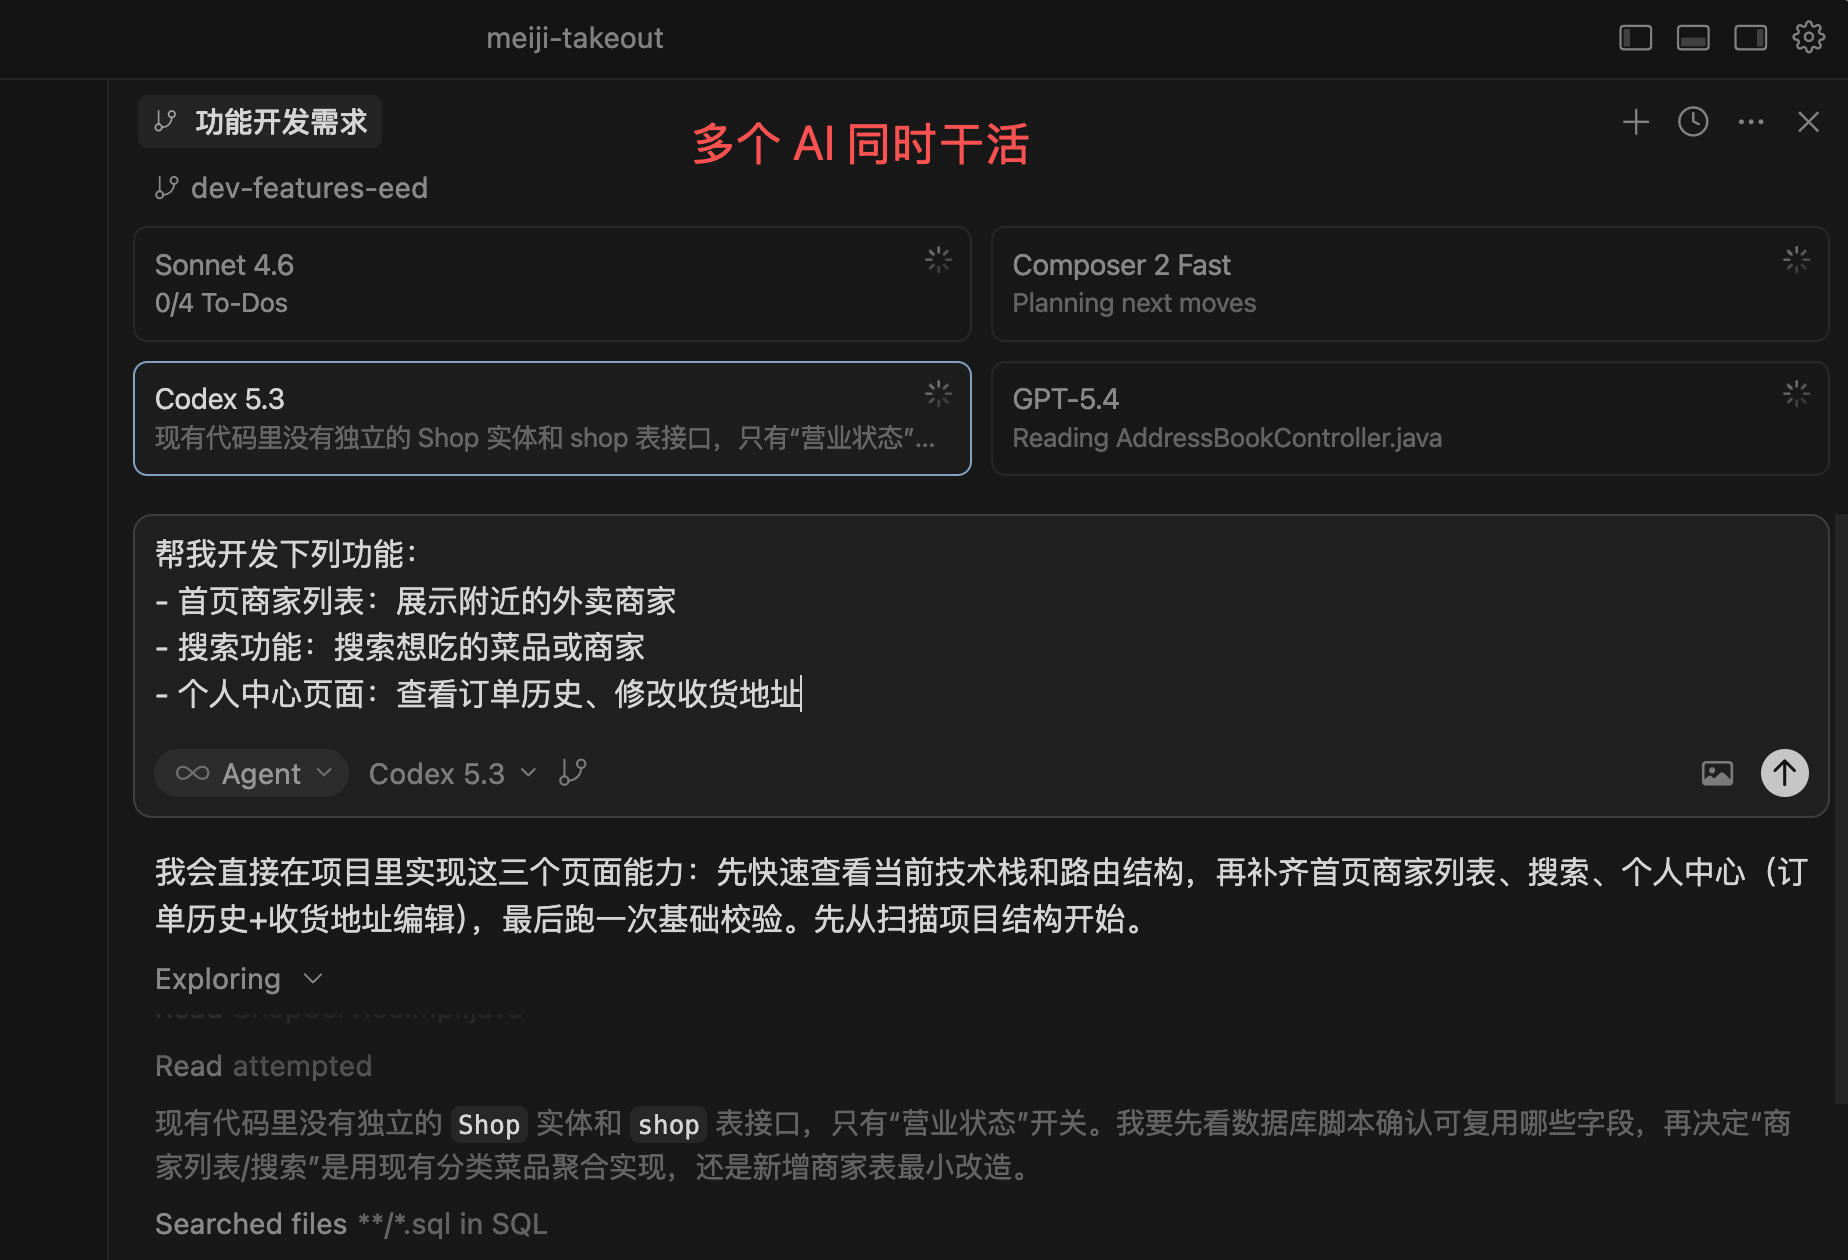
When you want multiple AIs to work on a project simultaneously, you might encounter problems.
For example, you have one agent developing the search module and another developing the product list module, but they both modify the homepage file simultaneously, causing code conflicts and chaos.
The solution is to use Git WorkTree, assigning each agent an independent working directory. Each develops on its own branch without interference, and they are merged back to the main branch at the end.
Claude Code can start an independent work tree via the --worktree parameter. Cursor and Codex's agent panels also have built-in WorkTree support, allowing automatic creation and management of work trees for multiple AIs to work simultaneously.
3. Skill Accumulation
If every time you start a new Loop, AI has to learn your project background, coding standards, and build process from scratch, that's a huge waste of time.
Skills involve writing these project knowledge and workflows into reusable SKILL.md documents. The Loop automatically loads them at startup. AI doesn't need to relearn each time; it can quickly get to work based on the documents.

This is similar to maintaining a "Project Development Document" at your company. Newcomers can start working after reading it. The difference now is that the reader is AI, not a human.
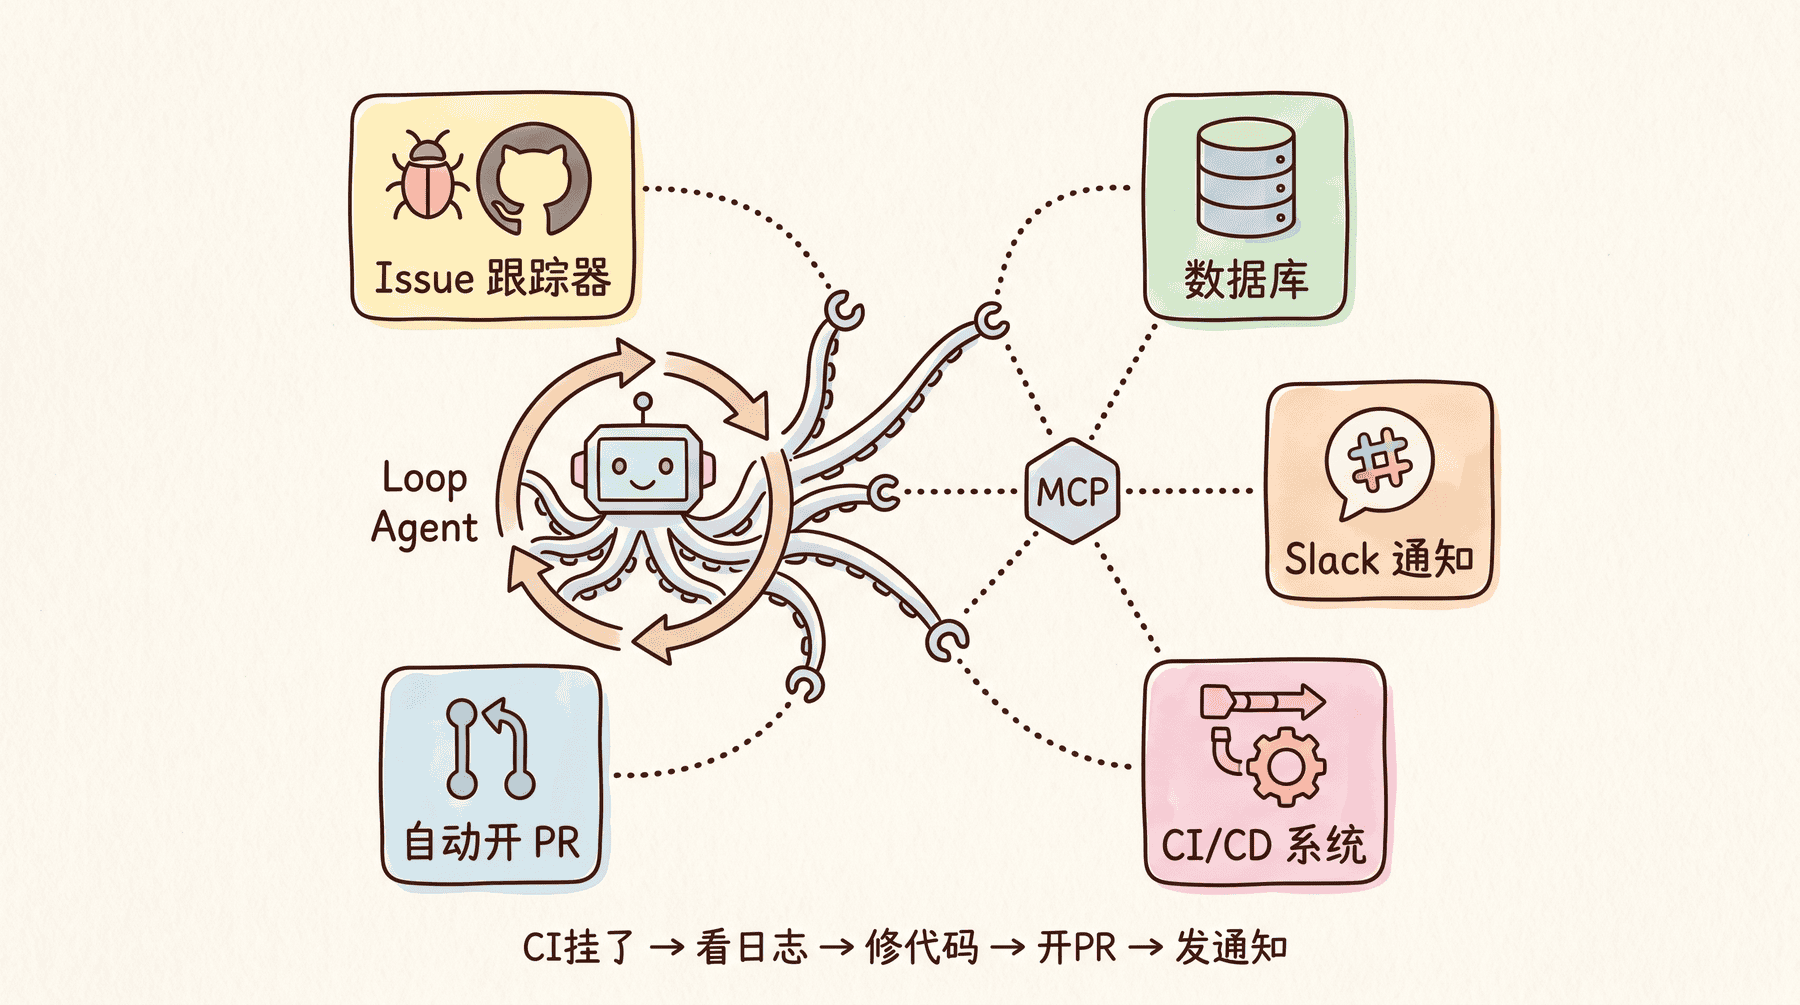
4. Tool Connection
AI large models are just brains—they can think and plan, but without hands and tools connected, many things they can't do.
Through the MCP protocol and various connectors, the Loop can connect to your issue tracker, database, Slack, CI/CD system. This way, if CI fails, it can go look at the error logs itself. If an issue comes in, it can classify and handle it itself. After fixing, it can automatically open a PR and send you a message.
With tool connections, the Loop transforms from "only being able to change code" to a complete closed loop that can "find problems, solve problems, and notify you of results."
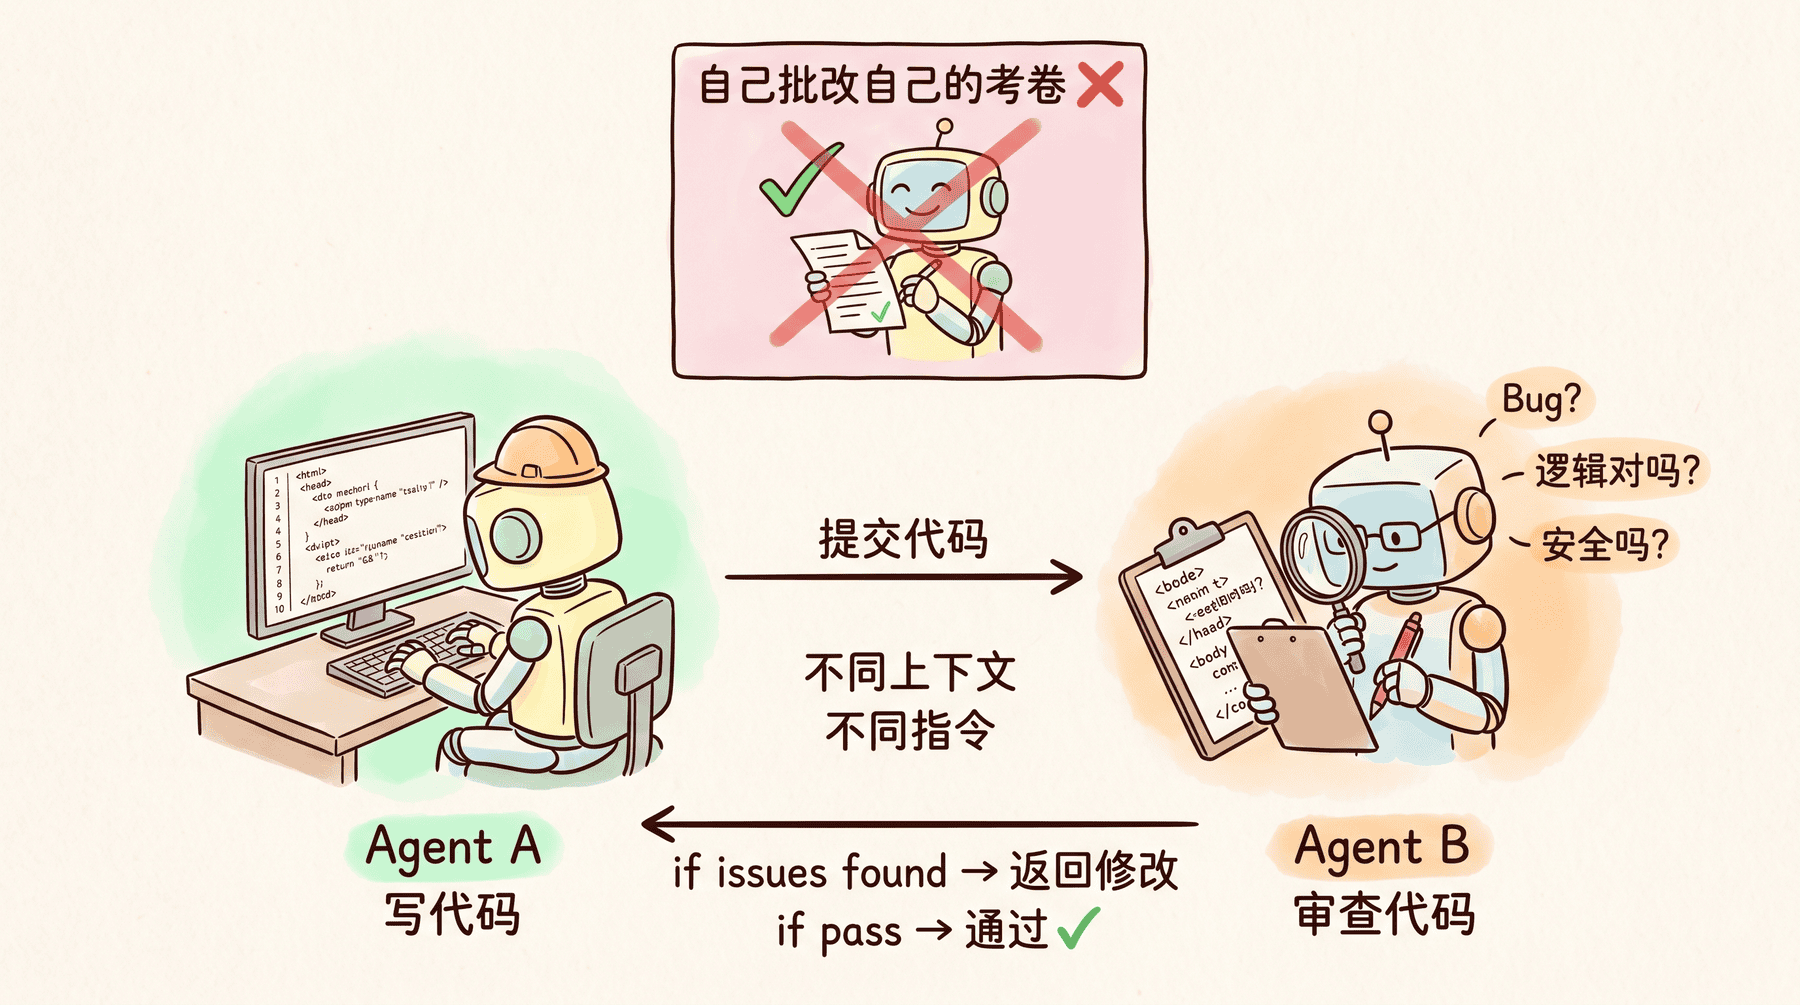
5. Sub-Agent Cross-Review
If you have one model generate code and then have the same model check whether this code is good, it will most likely think it's fine. It's like students grading their own exam papers—they'll go easy on themselves.
Therefore, in a Loop, at least two roles are generally arranged. One agent is responsible for writing code, and another agent is specifically responsible for running tests and code review. The second agent uses completely different context and instructions from the first; it only cares about whether this code has bugs and if the logic is correct, without being influenced by the first agent's thinking.
State Memory
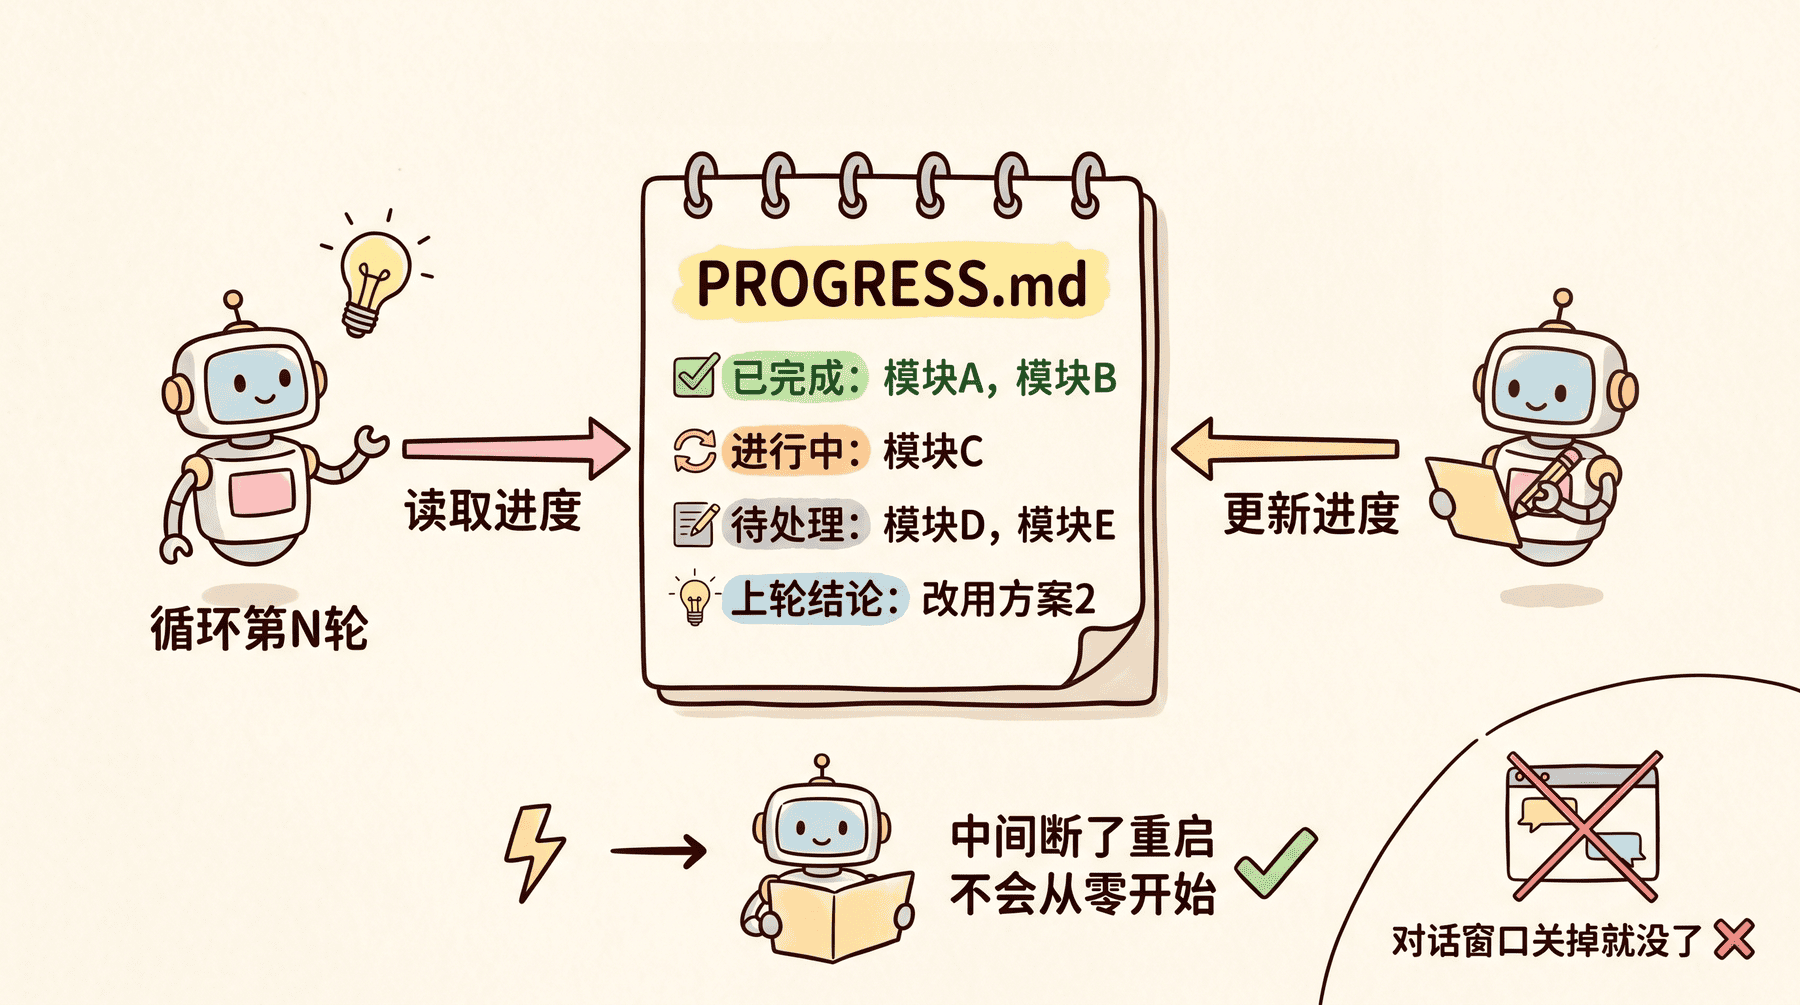
During the Loop's operation, a large amount of intermediate state is generated, such as which files have been processed, what the conclusion of the previous round was, and what the current progress is.
This information cannot exist only in the AI's conversation window, because the window has limited space and disappears when closed.
Progress can be recorded in an external file (like PROGRESS.md). Each time the agent starts a new loop round, it first reads the progress to understand the current state, then updates it after finishing work. If interrupted and restarted, it doesn't start from scratch.
Among these 5 modules, Automatic Scheduling and State Memory are the most core, and they are things we've already encountered in the hands-on section. The other modules (Work Isolation, Skill Accumulation, Tool Connection, Sub-Agent Cross-Review) are more about advanced optimization after the basic loop is running. Use them as needed; you don't need to configure everything at once.
5. Precautions and Learning Suggestions
Every time a new technology emerges, you always hear cries of "XX is dead." This time is no exception. Many are shouting: Prompt Engineering is dead, Loop Engineering is the future!
But Loop doesn't replace prompts; it builds upon the foundations of prompts, context, and Harness.
If the foundation isn't solid, running a Loop will only amplify the problems.
Let's discuss a few things to watch out for when actually using Loop.
Higher Token Consumption
Each Loop iteration is a complete prompt execution. If you set it to execute once per minute and run continuously for 24 hours, that's 1440 AI calls.
Think about it: the two big names strongly recommending Loop Engineering—one is an engineer at Anthropic, the other has OpenAI's resources behind him. They experiment with their own company's models, and the company covers the token costs, making it nearly zero cost for them. But for most ordinary developers, a $20/month subscription plan can hardly sustain high-frequency loops.
It's not a loop you're running; it's your wallet!
Someone in the comments questioned Peter: You have unlimited token supply; I don't!
Peter replied: That's true, but isn't your time really valuable?
This statement reminds us to think about cost-effectiveness. If a /goal task costs 30 yuan in tokens but saves you 3 hours of manual operation, it's probably worth it. But if it costs 100 yuan and still messes up, requiring manual rework, that's pure waste.
So before starting a Loop, think clearly: Can the goal be quantified? Is it worth running? Don't let your AI employee work for nothing.
Debugging is 10x Harder Than Prompting
Some developers say: Everyone is rushing towards loops, but debugging a state machine that has already run 47 rounds is 10 times harder than fixing a prompt!
Indeed, when a Loop goes off track, it's hard to pinpoint which round went wrong. So start with simple Loops, set small goals, and write clear stopping conditions. Have each loop round clearly record what was done and the result, making it easier for you to trace back later.
Overbaking
If a Loop runs for too long and the goal constraints aren't tight enough, AI might start "adding drama." For example, adding encryption features no one needs to your project, excessively splitting file structures, or even deleting test cases just to pass tests.
This phenomenon was first discovered by the community in the practice of Ralph Wiggum Loop, a predecessor of Loop Engineering. Someone used it to let AI continuously refactor a codebase in a loop. After running for too long, AI started adding random features and deleting tests. The community vividly called this situation Overbaking.
A more stable approach is to write clear requirement documents, explicitly listing what the Loop should and should not do. Also, set a reasonable upper limit on the number of loop iterations, and manually review the results after the loop finishes. Don't blindly merge.
Learning Path
If you're new to AI programming and still using Vibe Coding to chat with AI and write code, don't rush into Loop. Practice prompt techniques first, learn to use AGENTS.md to provide ample context to AI. This is the most basic and important step.
Once you can use AI to complete full features but often need to manually correct course, it's time to learn Harness Engineering. Equip AI with tools, write tests, set up architectural constraints, and let it work in a reliable environment.
After these foundations are solid, when you're ready to try Loop, start with lightweight methods like /goal. Give AI a small goal, let it run one round, and feel the effect and token consumption. After confirming it meets expectations, gradually add timed loops, dead loop prevention mechanisms, tool connections, and other advanced capabilities, building a more complete loop system step by step.
If you want to systematically learn the knowledge from the earlier stages, check out my free and open-source "AI Programming Zero-Basics Tutorial", which covers everything from zero basics to Harness practice.
Open source link: https://github.com/liyupi/ai-guide

Final Thoughts
To summarize, from Prompt Engineering to Loop Engineering, the level of automation in AI programming is getting higher and higher, and it is indeed gradually freeing our hands and attention.
Previously, you could only watch AI complete one function in an afternoon. Now, with /goal started, you can go do something more valuable (like getting some more sleep). When you come back, AI might have already handled several hours' worth of work for you.
But no matter how powerful the tool, you are still the one making decisions. Whether the Loop is well-designed, whether the goals are clearly broken down, whether the feedback mechanism is reliable enough—all depend on your own engineering ability and understanding of the project.
Loop is an amplifier. It can amplify your abilities, but it can also amplify your laziness.
Use it to accelerate work you truly understand. Don't use it to escape thinking itself.
I'm Yupi, continuously sharing AI programming干货 (dry goods). If you found this useful, remember to like, bookmark, and follow.
Also, feel free to comment: Do you see potential in Loop Engineering? Have you tried letting AI work in loops on its own? How were the results?